The LINSTOR User Guide
Please read this first
This guide is intended to serve users of the software-defined storage (SDS) solution LINSTOR® as a definitive reference guide and handbook.
| This guide assumes, throughout, that you are using the latest version of LINSTOR and related tools. |
This guide is organized as follows:
-
An introduction to LINSTOR is a foundational overview of LINSTOR and provides explanations for LINSTOR concepts and terms.
-
Basic administrative tasks and system setup deals with LINSTOR’s basic functionality and gives you insight into using common administrative tasks. You can also use this chapter as a step-by-step instruction guide to deploy LINSTOR with a basic, minimal setup.
-
Further LINSTOR tasks shows a variety of advanced and important LINSTOR tasks and configurations, so that you can use LINSTOR in more complex ways.
-
Using the LINBIT GUI for LINSTOR Administration deals with the graphical client approach to managing LINSTOR clusters.
-
LINSTOR Integrations has chapters that deal with how to implement a LINSTOR based storage solution with various platforms and technologies, such as Kubernetes, Proxmox VE, OpenNebula, Docker, OpenStack, and others, by using the LINSTOR API.
Introduction to LINSTOR
1. An introduction to LINSTOR
To use LINSTOR® effectively, this “Introduction to LINSTOR” chapter provides an overview of the software, explains how it works and deploys storage, and introduces and explains important concepts and terms to help your understanding.
1.1. An overview of LINSTOR
LINSTOR is an open source configuration management system, developed by LINBIT® for storage on Linux systems. It manages LVM logical volumes, ZFS ZVOLs, or both, on a cluster of nodes. It uses DRBD® for replication between different nodes and to provide block storage devices to users and applications. Some of its features include snapshots, encryption, and caching of HDD backed data in SSDs.
1.1.1. Where LINSTOR is used
LINSTOR was originally developed to manage DRBD resources. While you can still use LINSTOR to make managing DRBD more convenient, LINSTOR has evolved and it is often integrated with software stacks higher up to provide persistent storage more easily and more flexibly than would otherwise be possible within those stacks.
LINSTOR can be used on its own or you can integrate it with other platforms, such as Kubernetes, OpenShift, OpenNebula, OpenStack, Proxmox VE, and others. LINSTOR runs on bare-metal on-premise hardware, or you can use it within virtual machines (VMs), containers, clouds, or hybrid environments.
1.1.2. LINSTOR supported storage and related technologies
LINSTOR can work with the following storage provider and related technologies:
-
LVM and LVM thin volumes
-
ZFS and ZFS thin volumes
-
File and FileThin (loop devices)
-
Diskless
-
SPDK (remote)
-
Microsoft Windows Storage Spaces and thin Storage Spaces
-
EBS (target and initiator)
-
Device mapper cache (
dm-cache) and writecache (dm-writecache) -
bcache
-
LUKS
-
DRBD
By using LINSTOR, you can work with these technologies on their own or else in various meaningful combinations.
1.2. How LINSTOR works
A working LINSTOR setup requires one active controller node that runs the LINSTOR
controller software as a systemd service, linstor-controller.service. This is the LINSTOR
control plane, where the LINSTOR controller node communicates with LINSTOR satellite nodes.
The setup also requires one or more satellite nodes that run the LINSTOR satellite software as a
systemd service, linstor-satellite.service. The LINSTOR satellite service facilitates storage and related actions on the node, for example creating storage volumes to provide data storage to users and applications. However, satellite nodes do not have to provide
physical storage to the cluster. For example, you can have diskless satellite nodes that
participate in the LINSTOR cluster for DRBD quorum purposes.
| It is also possible for a node to run both the LINSTOR controller and satellite services and act in a Combined role. |
You can think of the storage technologies as implemented on LINSTOR satellite nodes, for example, DRBD replication, as the data plane. With LINSTOR, the control and data planes are separate and can function independently. This means, for example, that you can update the LINSTOR controller node or the LINSTOR controller software while your LINSTOR satellite nodes continue to provide (and replicate if using DRBD) storage to users and applications without interruption.
For convenience, a LINSTOR setup is often called a LINSTOR cluster in this guide, even though a valid LINSTOR setup can exist as an integration within another platform, such as Kubernetes.
Users can interact with LINSTOR by using either a CLI-based client or a graphical user interface (GUI). Both of these interfaces make use of the LINSTOR REST API. LINSTOR can integrate with other platforms and applications by using plugins or drivers that also make use of this API.
Communication between the LINSTOR controller and the REST API happens via TCP/IP and can be secured by using SSL/TLS.
The southbound drivers that LINSTOR uses to interface with physical storage are LVM, thinLVM and ZFS.

1.3. Installable components
A LINSTOR setup has three installable components:
-
LINSTOR controller
-
LINSTOR satellite
-
LINSTOR user interfaces (LINSTOR client and LINBIT SDS GUI)
These installable components are either source code that you can compile, or else prebuilt packages, that you can use to install and run the software.
1.3.1. LINSTOR controller
The linstor-controller service relies on a database that holds all the configuration
information for the whole cluster. A node or container running the LINSTOR controller software is responsible for resource placement,
resource configuration, and orchestration of any operational processes that require a view of
the whole cluster.
Multiple controllers can be used for LINSTOR, for example, when setting up a highly available LINSTOR cluster, but only one controller can be active.
As mentioned earlier, the LINSTOR controller operates on a separate plane from the data plane that it manages. You can stop the controller service, update or reboot the controller node, and still have access to your data hosted on the LINSTOR satellite nodes. While you can still access and serve the data on your LINSTOR satellite nodes, without a running controller node, you will not be able to perform any LINSTOR status or management tasks on the satellite nodes.
1.3.2. LINSTOR satellite
The linstor-satellite service runs on each node where LINSTOR consumes local storage or
provides storage to services. It is stateless and receives all the information it needs from the
node or container running the LINSTOR controller service. The LINSTOR satellite service runs programs like lvcreate and drbdadm. It acts
like an agent on a node or in a container that carries out instructions that it receives from the LINSTOR controller node or container.
1.3.3. LINSTOR user interfaces
When you need to interface with LINSTOR, you can send instructions to the active LINSTOR controller by using one of its user interfaces (UIs): the LINSTOR client, or the LINBIT SDS GUI.
Both of these UIs rely on the LINSTOR REST API.
LINSTOR client
The LINSTOR client, linstor, is a command line utility that you can use to issue commands to
the active LINSTOR controller node. These commands can be action-oriented, such as commands that
create or modify storage resources in your cluster, or they can be status commands to glean
information about the current state of your LINSTOR cluster.
You can use the LINSTOR client either by entering linstor followed by valid commands and
arguments, or in the client’s interactive mode, by entering linstor on its own.
You can find more information about using the LINSTOR client in the Using the LINSTOR client section in this user guide.
# linstor
Use "help <command>" to get help for a specific command.

Available commands:
- advise (adv)
- backup (b)
- controller (c)
- drbd-proxy (proxy)
- encryption (e)
- error-reports (err)
- file (f)
- help
- interactive
- key-value-store (kv)
- list-commands (commands, list)
- node (n)
- node-connection (nc)
- physical-storage (ps)
- remote
- resource (r)
- resource-connection (rc)
- resource-definition (rd)
- resource-group (rg)
- schedule (sched)
- snapshot (s)
- sos-report (sos)
- space-reporting (spr)
- storage-pool (sp)
- volume (v)
- volume-definition (vd)
- volume-group (vg)
LINSTOR ==>
LINBIT SDS graphical user interface
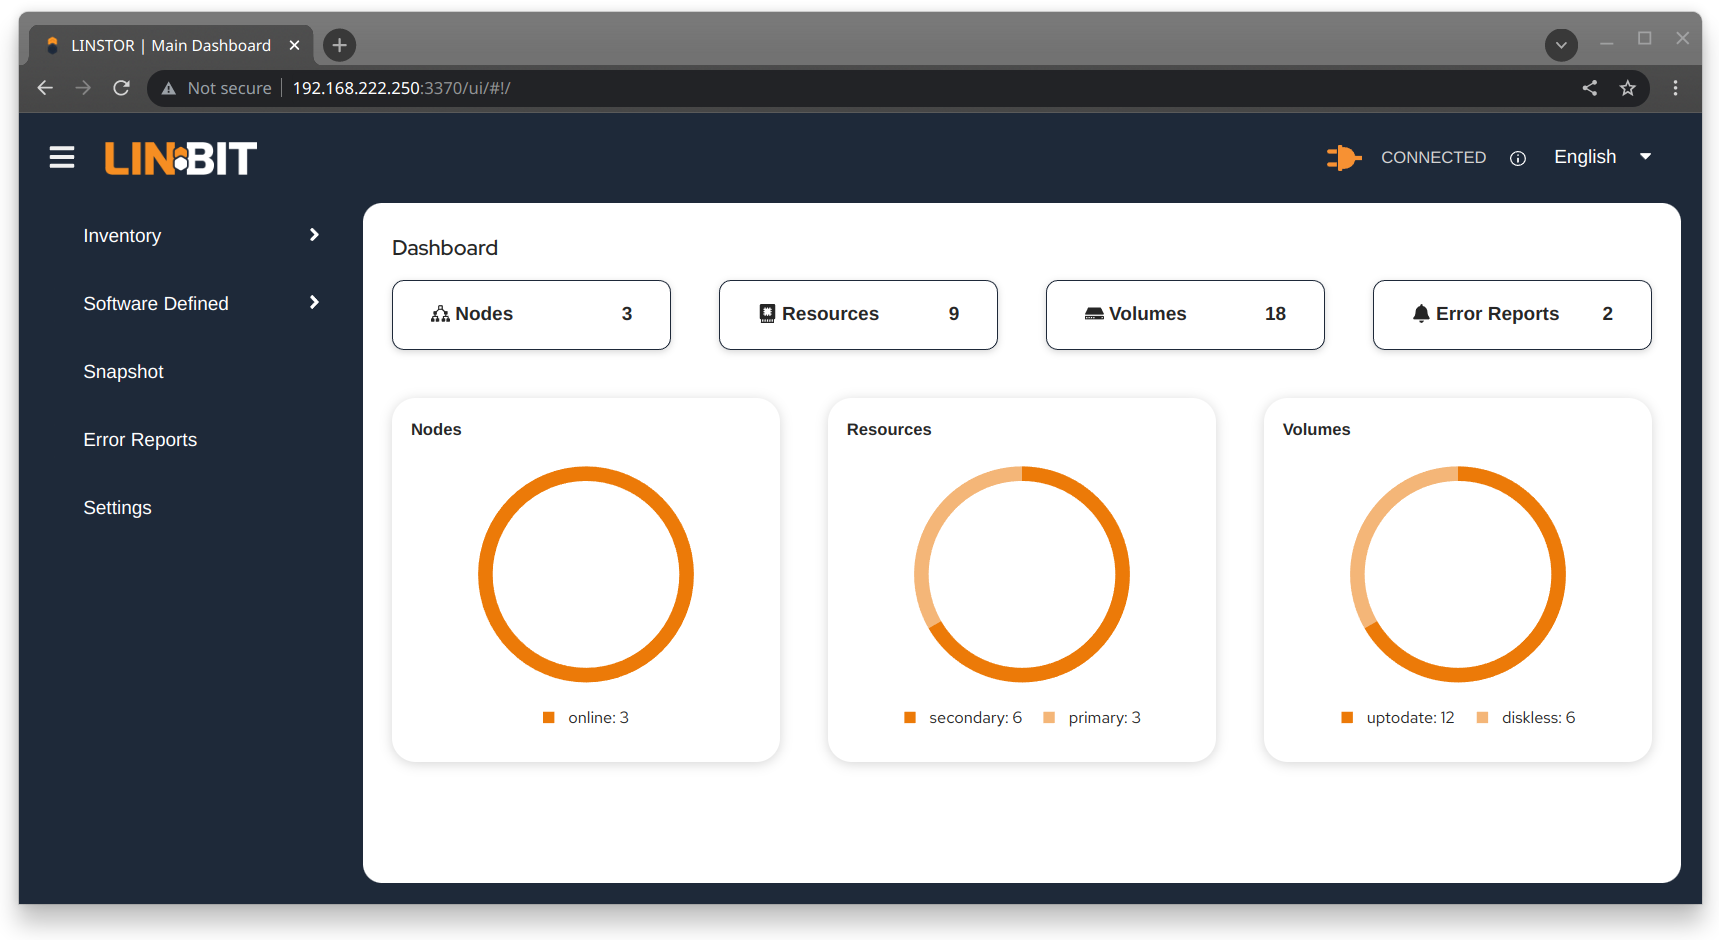
The LINBIT SDS graphical user interface (GUI) is a web-based GUI that you can use to work with LINSTOR. It can be a convenient way to navigate and get overview information about a LINSTOR cluster, or add, modify, or delete LINSTOR objects within a cluster. For example, you can add nodes, add or delete resources, or do other tasks.
You can find more information about using the GUI interface in the LINBIT SDS GUI chapter in this user guide.
1.4. Internal components
The internal components of LINSTOR are abstractions of the software code that are used to describe how LINSTOR works and how you use it. Examples of internal components would be LINSTOR objects, such as resources or storage pools. Although these are abstractions, you will interact with them in a very real way as you use either the LINSTOR client or GUI to deploy and manage storage.
Along the way, this section also introduces and explains core concepts and terms that you will need to familiarize yourself with to understand how LINSTOR works and how to use it.
1.4.1. LINSTOR objects
LINSTOR takes an object-oriented approach to software-defined storage (SDS). LINSTOR objects are the end result that LINSTOR presents to the user or application to consume or build upon.
The most commonly used LINSTOR objects are explained below and a full list of objects follows.
Resource
A resource is the LINSTOR object that represents consumable storage that is presented to applications and end users. If LINSTOR is a factory, then a resource is the finished product that it produces. Often, a resource is a DRBD replicated block device but it does not have to be. For example, a resource could be diskless to satisfy DRBD quorum requirements, or it could be an NVMe-oF or EBS initiator.
A resource has the following attributes:
-
The name of the node that the resource exists on
-
The resource definition that the resource belongs to
-
Configuration properties of the resource
Volume
A volume is the closest LINSTOR internal component to physical storage and is a subset of a resource. A resource can have multiple volumes. For example, you might want to have a database stored on slower storage than its transaction log in a MySQL cluster. To accomplish this by using LINSTOR, you could have one volume for the faster transaction log storage media and another for the slower database storage media, and have both under a single “MySQL” resource. By keeping multiple volumes under a single resource you are essentially creating a consistency group.
An attribute that you specify for a volume takes precedence over the same attribute if it is also specified “higher up” in the LINSTOR object hierarchy. This is because, again, a volume is the closest internal LINSTOR object to physical storage.
Node
A Node is a server or container that participates in a LINSTOR cluster. The node object has the following attributes:
-
Name
-
IP address
-
TCP port
-
Node type (controller, satellite, combined, auxiliary)
-
Communication type (plain or SSL/TLS)
-
Network interface type
-
Network interface name
Storage pool
A storage pool identifies storage that is assignable to other LINSTOR objects, such as LINSTOR resources, resource definitions, or resource groups, and can be consumed by LINSTOR volumes.
A storage pool defines:
-
The storage back-end driver to use for the storage pool on the cluster node, for example, LVM, thin-provisioned LVM, ZFS, and others
-
The node that the storage pool exists on
-
The storage pool name
-
Configuration properties of the storage pool
-
Additional parameters to pass to the storage pool’s back-end driver (LVM, ZFS, and others)
A list of LINSTOR objects
LINSTOR has the following core objects:
EbsRemote |
ResourceConnection |
SnapshotVolumeDefinition |
ExternalFile |
ResourceDefinition |
StorPool |
KeyValueStore |
ResourceGroup |
StorPoolDefinition |
LinstorRemote |
S3Remote |
Volume |
NetInterface |
Schedule |
VolumeConnection |
Node |
Snapshot |
VolumeDefinition |
NodeConnection |
SnapshotDefinition |
VolumeGroup |
Resource |
SnapshotVolume |
1.4.2. Definition and group objects
While definitions and groups are also LINSTOR objects, they are a special kind. Definition and group objects can be thought of as profiles or templates. These template objects are used to create child objects that will inherit their parent object’s attributes. They might also have attributes that can affect child objects but are not attributes of the child objects themselves. These attributes could be things such as the TCP port to use for DRBD replication or the volume number that a DRBD resource should use.
Definitions
Definitions define the attributes of an object. Objects created from a definition will inherit the configuration attributes defined in the definition. A definition must be created before you can create an associated child object. For example, you must create a resource definition prior to creating the corresponding resource.
There are two LINSTOR definition objects that you can create directly, by using the LINSTOR client: resource definitions and volume definitions.
- Resource definition
-
Resource definitions can define the following attributes of a resource:
-
The resource group that the resource definition belongs to
-
The name of a resource (implicitly, by virtue of the resource definition’s name)
-
The TCP port to use for the resource’s connection, for example, when DRBD is replicating data
-
Other attributes such as a resource’s storage layers, peer slots, and external name.
-
- Volume definition
-
Volume definitions can define the following:
-
The size of the storage volume
-
The volume number of the storage volume (because a resource can have multiple volumes)
-
The metadata properties of the volume
-
The minor number to use for the DRBD device, if the volume is associated DRBD replicated storage
-
In addition to these definitions, LINSTOR has some indirect definitions: the storage pool definition, the snapshot definition, and the snapshot volume definition. LINSTOR creates these automatically when you create the respective object.
Groups
Groups are similar to definitions in that they are like profiles or templates. Where definitions apply to LINSTOR object instances, groups apply to object definitions. As the name implies, a group can apply to multiple object definitions, just as a definition can apply to multiple object instances. For example, you can have a resource group that defines resource attributes for a frequently needed storage use case. You can then use the resource group to easily spawn (create) multiple resources that need to have those attributes, without having to specify the attributes every time you create a resource.
- Resource group
-
A resource group is a parent object of a resource definition where all property changes made on a resource group will be inherited by its resource definition children[1]. The resource group also stores settings for automatic placement rules and can spawn a resource definition depending on the stored rules.
A resource group defines characteristics of its resource definition child objects. A resource spawned from the resource group, or created from a resource definition that belongs to the resource group, will be a “grandchild” object of a resource group and the “child” of a resource definition. Every resource definition that you create will be a member of the default LINSTOR resource group,
DfltRscGrp, unless you specify another resource group when creating the resource definition.Changes to a resource group will be applied to all resources or resource definitions that were created from the resource group, retroactively, unless the same characteristic has been set on a child object, for example, a resource definition or resource that was created from the resource group.
All of this makes using resource groups a powerful tool to efficiently manage a large number of storage resources. Rather than creating or modifying individual resources, you can simply configure a resource group parent, and all the child resource objects will receive the configuration.
- Volume group
-
Similarly, volume groups are like profiles or templates for volume definitions. A volume group must always reference a specific resource group. In addition, a volume group can define a volume number, and a “gross” volume size.
1.5. LINSTOR object hierarchy
As alluded to in previous subsections of this chapter, there is a concept of hierarchy among LINSTOR objects. Depending on the context, this can be described either as a parent-child relationship, or else as a higher-lower relationship where lower means closer to the physical storage layer[2].
A child object will inherit attributes that are defined on its parent objects, if the same attributes are not already defined on the child object. Similarly, a lower object will receive attributes that are set on higher objects, if the same attributes are not already defined on the lower object.
1.5.1. General rules for object hierarchy in LINSTOR
The following are some general rules for object hierarchy in LINSTOR:
-
A LINSTOR object can only receive or inherit attributes that can be set on that object.
-
Lower objects receive attributes set on higher objects.
-
An attribute set on a lower object takes precedence over the same attribute set on higher objects.
-
Child objects inherit attributes set on parent objects.
-
An attribute set on a child object takes precedence over the same attribute set on parent objects.
1.5.2. Using diagrams to show relationships between LINSTOR objects
This section uses diagrams to represent the hierarchical relationships between some of the most frequently used LINSTOR objects. Because of the number of LINSTOR objects and their interconnectedness, multiple diagrams are shown first rather than a single diagram, to simplify the conceptualization.

The next diagram shows the relationships between LINSTOR group objects on a single satellite node.

While the two preceding diagrams show higher-lower relationships between common LINSTOR objects, you can also think of some LINSTOR objects as having parent-child relationships. The next diagram introduces this kind of relationship between LINSTOR objects by using a storage pool definition (parent object) and a storage pool (child object) as an example. A parent object can have multiple child objects, as shown in the following diagram.

Having introduced the concept of parent-child relationships in a conceptual diagram, the next diagram is a modified version of the second diagram with some of those relationships added for groups and definitions. This modified diagram also incorporates some of the higher-lower relationships that were shown in the first diagram.

The next diagram synthesizes the relationship concepts of the preceding diagrams while also introducing new LINSTOR objects related to snapshots and connections. With the many objects and criss-crossing lines, the reason for building up to this diagram should be apparent.

Even with its seeming complexity, the preceding diagram is still a simplification and not an all-encompassing representation of the possible relationships between LINSTOR objects. As listed earlier, there are more LINSTOR objects than are shown in the diagram[3].
The good news is that you do not need to memorize the preceding diagram to work with LINSTOR. It could be useful to refer to though if you are trying to troubleshoot attributes that you have set on LINSTOR objects and their inheritance and effects on other LINSTOR objects in your cluster.
Administering a LINSTOR Cluster
2. Basic administrative tasks and system setup
This is a how-to style chapter that covers basic LINSTOR® administrative tasks, including installing LINSTOR and how to get started using LINSTOR.
2.1. Before installing LINSTOR
Before you install LINSTOR, there are a few things that you should be aware of that might affect how you install LINSTOR.
2.1.1. Packages
LINSTOR is packaged in both the RPM and the DEB variants:
-
linstor-clientcontains the command line client program. It depends on Python which is usually already installed. In RHEL 8 systems you will need to symlinkpython. -
linstor-controllerandlinstor-satelliteBoth contain systemd unit files for the services. They depend on Java runtime environment (JRE) version 1.8 (headless) or higher.
For further details about these packages see the Installable Components section above.
| If you have a LINBIT® support subscription, you will have access to certified binaries through LINBIT customer-only repositories. |
2.1.2. FIPS compliance
This standard shall be used in designing and implementing cryptographic modules…
You can configure LINSTOR to encrypt storage volumes, by using LUKS (dm-crypt), as detailed in
the Encrypted Volumes section of this user guide. Refer to
the LUKS and dm-crypt projects for FIPS compliance status.
You can also configure LINSTOR to encrypt communication traffic between a LINSTOR satellite and a LINSTOR controller, by using SSL/TLS, as detailed in the Secure Satellite Connections section of this user guide.
LINSTOR can also interface with Self-Encrypting Drives (SEDs) and you can use LINSTOR to initialize an SED drive. LINSTOR stores the password of an SED as a property that applies to the storage pool associated with the drive. LINSTOR encrypts the SED drive password by using the LINSTOR master passphrase that you must create first.
By default, LINSTOR uses the following cryptographic algorithms:
-
HMAC-SHA2-512
-
PBKDF2
-
AES-128
A FIPS compliant version of LINSTOR is available for the use cases mentioned in this section. If you or your organization require FIPS compliance at this level, contact [email protected] for details.
2.2. Installing LINSTOR
| If you want to use LINSTOR in containers, skip this section and use the Containers section below for the installation. |
2.2.1. Installing a volume manager
To use LINSTOR to create storage volumes, you will need to install a volume manager, either LVM or ZFS, if one is not already installed on your system.
2.2.2. Using a script to manage LINBIT cluster nodes
If you are a LINBIT® customer, you can download a LINBIT created helper script and run it on your nodes to:
-
Register a cluster node with LINBIT.
-
Join a node to an existing LINBIT cluster.
-
Enable LINBIT package repositories on your node.
Enabling LINBIT package repositories will give you access to LINBIT software packages, DRBD® kernel modules, and other related software such as cluster managers and OCF scripts. You can then use a package manager to fetch, install, and manage updating installed packages.
Downloading the LINBIT manage node script
To register your cluster nodes with LINBIT, and configure LINBIT’s repositories, first download and then run the manage node helper script by entering the following commands on all cluster nodes:
# curl -O https://my.linbit.com/linbit-manage-node.py
# chmod +x ./linbit-manage-node.py
# ./linbit-manage-node.py
You must run the script as the root user.
|
The script will prompt you for your LINBIT customer portal username and password. After entering your credentials, the script will list cluster nodes associated with your account (none at first).
Enabling LINBIT package repositories
After you specify which cluster to register the node with, have the script write the
registration data to a JSON file when prompted. Next, the script will show you a list of LINBIT
repositories that you can enable or disable. You can find LINSTOR and other related packages
in the drbd-9 repository. In most cases, unless you have a need to be on a different DRBD
version branch, you should enable at least this repository.
Final tasks within manage nodes script
After you have finished making your repositories selection, you can write the configuration to a file by following the script’s prompting. Next, be sure to answer yes to the question about installing LINBIT’s public signing key to your node’s keyring.
Before it closes, the script will show a message that suggests different packages that you can install for different use cases.
On DEB based systems you can install a precompiled DRBD kernel module package,
drbd-module-$(uname -r), or a source version of the kernel module, drbd-dkms. Install one
or the other package but not both.
|
2.2.3. Using a package manager to install LINSTOR
After registering your node and enabling the drbd-9 LINBIT package repository, you can use a
DEB, RPM, or YaST2 based package manager to install LINSTOR and related components.
If you are using a DEB based package manager, refresh your package repositories list
by entering: apt update, before proceeding.
|
Installing DRBD packages for replicated LINSTOR storage
| If you will be using LINSTOR without DRBD, you can skip installing these packages. |
If you want to be able to use LINSTOR to create DRBD replicated storage, you will need to install the required DRBD packages. Depending on the Linux distribution that you are running on your node, install the DRBD-related packages that the helper script suggested. If you need to review the script’s suggested packages and installation commands, you can enter:
# ./linbit-manage-node.py --hints
Installing LINSTOR packages
To install LINSTOR on a controller node, use your package manager to install the
linbit-sds-controller package.
To install LINSTOR on a satellite node, use your package manager to install the
linbit-sds-satellite package.
Install both packages if your node will be both a satellite and controller (Combined role).
2.2.4. Installing LINSTOR from source code
The LINSTOR project’s GitHub page is here: https://github.com/LINBIT/linstor-server.
LINBIT also has downloadable archived files of source code for LINSTOR, DRBD, and more, available here: https://linbit.com/linbit-software-download-page-for-linstor-and-drbd-linux-driver/.
2.3. Upgrading LINSTOR
LINSTOR does not support rolling upgrades.
LINSTOR controller and satellite services running in your cluster must have the same version, otherwise the controller will discard the satellite with a VERSION_MISMATCH.
While this is a situation you should fix, it is not a risk for your data.
Satellite nodes will not do any actions so long as they are not connected to a controller node, and
because of LINSTOR data and control plane separation, this state does not disrupt DRBD data replication.
2.3.1. Backing up the controller database before upgrading
Before upgrading LINSTOR, you should back up the LINSTOR controller database.
If you are using the embedded default H2 database and you upgrade the linstor-controller package, an automatic backup file of the database will be created in the default /var/lib/linstor
directory. This file is a good restore point if a linstor-controller database
migration should fail. It is recommended to report the error to LINBIT and restore the old
database file and roll back to your previous controller version.
If you use any external database or etcd, make a manual backup of your current database, before upgrading LINSTOR. You can use this backup as a restore point if needed.
2.3.2. Upgrading LINSTOR on RPM-based Linux
On RPM-based Linux distributions, LINSTOR services are not automatically restarted when you upgrade LINSTOR packages. For this reason, the upgrading process does not entail as much downtime for your LINSTOR services (LINSTOR control plane) as it might on other systems.
On all nodes, update applicable LINSTOR packages. Modify the command below to only update packages applicable to each node’s role in your LINSTOR cluster:
dnf update -y linstor-client linstor-controller linstor-satellite
After updating LINSTOR packages on all nodes, as simultaneously as you can, restart the LINSTOR satellite service on all your satellite nodes, except for the actively running controller node if that node is in a combined role.
systemctl restart linstor-satellite
Next, restart the LINSTOR controller service on the node where the service is actively running. If that node is in a combined role, also update the LINSTOR satellite service, for example:
systemctl restart linstor-satellite linstor-controller
If you have made the LINSTOR controller service highly available in your cluster, you will need to update the linstor-controller package on all potential LINSTOR controller nodes.
However, you only need to restart the LINSTOR controller service on the node currently running the service.
|
2.3.3. Upgrading LINSTOR on DEB-based Linux
On DEB-based Linux systems, because LINSTOR services will restart automatically after installing an updated version, you will need to plan for more downtime of the LINSTOR control plane than on an RPM-based system.
First, upgrade the LINSTOR controller software on the active LINSTOR controller node.
apt install -y --only-upgrade linstor-controller
If you have made the LINSTOR controller service highly available in your cluster, you will need to update the linstor-controller package on all potential LINSTOR controller nodes.
|
Upgrading the software will automatically restart the controller service.
At this point, if you enter a linstor node list command, output will show that your satellite nodes are in an OFFLINE(VERSION MISMATCH) state.
Next, update the LINSTOR client and satellite packages on nodes where those packages are installed. Modify the command below to only update packages applicable to each node’s role in your LINSTOR cluster:
apt install -y --only-upgrade linstor-client linstor-satellite
| Upgrading the LINSTOR satellite service software package on your satellite (and combined) nodes will automatically restart the LINSTOR satellite service on those nodes. |
2.3.4. Verifying a LINSTOR upgrade
After upgrading all LINSTOR packages applicable to each node in your cluster, verify:
-
The output of a
linstor --versioncommand shows the expected LINSTOR client software version number on all nodes that you run the LINSTOR client on. -
The output of a
linstor controller versioncommand shows the expected LINSTOR controller software version number. If you have made the LINSTOR controller service highly available, you will need to use a package manager query (dnf info linstor-controllerorapt show linstor-controller) to verify the installed software version on the potential controller nodes. -
The output of a
linstor node listcommand shows all LINSTOR satellite nodes are in anOnlinestate. The LINSTOR controller service will log aversion mismatcherror message (journalctl -xeu linstor-controller) for any nodes where the installed LINSTOR satellite software version does not match the controller software version. The output of alinstor node listcommand will show such nodes as being in anOFFLINE(VERSION MISMATCH)state.
2.4. Containers
LINSTOR and related software are also available as containers. The base images are available
in LINBIT’s container registry, drbd.io.
| The LINBIT container image repository (https://drbd.io) is only available to LINBIT customers or through LINBIT customer trial accounts. Contact LINBIT for information on pricing or to begin a trial. Alternatively, you can use LINSTOR SDS’ upstream project named Piraeus, without being a LINBIT customer. |
To access the images, you first have to login to the registry using your LINBIT Customer Portal credentials.
# docker login drbd.io
The containers available in this repository are:
-
drbd.io/drbd9-rhel8
-
drbd.io/drbd9-rhel7
-
drbd.io/drbd9-sles15sp1
-
drbd.io/drbd9-bionic
-
drbd.io/drbd9-focal
-
drbd.io/linstor-csi
-
drbd.io/linstor-controller
-
drbd.io/linstor-satellite
-
drbd.io/linstor-client
You can find an up-to-date list of available images with versions at https://drbd.io.
To load the kernel module, needed only for LINSTOR satellites, you’ll need to run a
drbd9-$dist container in privileged mode. The kernel module containers either retrieve an
official LINBIT package from a customer repository, use shipped packages, or they try to build
the kernel modules from source. If you intend to build from source, you need to have the
according kernel headers (for example, kernel-devel) installed on the host. There are four
ways to execute such a module load container:
-
Building from shipped source
-
Using a shipped/pre-built kernel module
-
Specifying a LINBIT node hash and a distribution.
-
Bind-mounting an existing repository configuration.
Example building from shipped source (RHEL based):
# docker run -it --rm --privileged -v /lib/modules:/lib/modules \
  -v /usr/src:/usr/src:ro \
  drbd.io/drbd9-rhel7
Example using a module shipped with the container, which is enabled by not bind-mounting
/usr/src:
# docker run -it --rm --privileged -v /lib/modules:/lib/modules \
  drbd.io/drbd9-rhel8
Example using a hash and a distribution (rarely used):
# docker run -it --rm --privileged -v /lib/modules:/lib/modules \
  -e LB_DIST=rhel7.7 -e LB_HASH=ThisIsMyNodeHash \
  drbd.io/drbd9-rhel7
Example using an existing repository configuration (rarely used):
# docker run -it --rm --privileged -v /lib/modules:/lib/modules \
  -v /etc/yum.repos.d/linbit.repo:/etc/yum.repos.d/linbit.repo:ro \
  drbd.io/drbd9-rhel7
| In both cases (hash + distribution, and bind-mounting a repository) the hash or repository configuration has to be from a node that has a special property set. Contact LINBIT customer support for help setting this property. |
For now (that is, pre DRBD 9 version “9.0.17”), you must use the containerized DRBD
kernel module, as opposed to loading a kernel module onto the host system. If you intend to use
the containers you should not install the DRBD kernel module on your host systems. For DRBD
version 9.0.17 or greater, you can install the kernel module as usual on the host system, but
you need to load the module with the usermode_helper=disabled parameter (for example,
modprobe drbd usermode_helper=disabled).
|
Then run the LINSTOR satellite container, also privileged, as a daemon:
# docker run -d --name=linstor-satellite --net=host -v /dev:/dev \
  --privileged drbd.io/linstor-satellite
net=host is required for the containerized drbd-utils to be able to communicate with
the host-kernel through Netlink.
|
To run the LINSTOR controller container as a daemon, mapping TCP port 3370 on the host to the
container, enter the following command:
# docker run -d --name=linstor-controller -p 3370:3370 drbd.io/linstor-controller
To interact with the containerized LINSTOR cluster, you can either use a LINSTOR client installed on a system using repository packages, or using the containerized LINSTOR client. To use the LINSTOR client container:
# docker run -it --rm -e LS_CONTROLLERS=<controller-host-IP-address> \
  drbd.io/linstor-client node list
From this point you would use the LINSTOR client to initialize your cluster and begin creating resources using the typical LINSTOR patterns.
To stop and remove a daemonized container and image:
# docker stop linstor-controller
# docker rm linstor-controller
2.5. Initializing your cluster
Before initializing your LINSTOR cluster, you must meet the following prerequisites on all cluster nodes:
-
The DRBD 9 kernel module is installed and loaded.
-
The
drbd-utilspackage is installed. -
LVMtools are installed. -
linstor-controllerorlinstor-satellitepackages and their dependencies are installed on appropriate nodes. -
The
linstor-clientis installed on thelinstor-controllernode.
Enable and also start the linstor-controller service on the host where it has been installed:
# systemctl enable --now linstor-controller
2.6. Using the LINSTOR client
Whenever you run the LINSTOR command line client, it needs to know on which cluster node the
linstor-controller service is running. If you do not specify this, the client will try to
reach a locally running linstor-controller service listening on IP address 127.0.0.1 port
3370. Therefore use the linstor-client on the same host as the linstor-controller.
The linstor-satellite service requires TCP ports 3366 and 3367. The
linstor-controller service requires TCP port 3370. Verify that you have this port allowed on
your firewall.
|
# linstor node list
Output from this command should show you an empty list and not an error message.
You can use the linstor command on any other machine, but then you need to tell the client how
to find the LINSTOR controller. As shown, this can be specified as a command line option, or by
using an environment variable:
# linstor --controllers=alice node list
# LS_CONTROLLERS=alice linstor node list
If you have configured HTTPS access to the LINSTOR controller REST API and you want the LINSTOR client to access the controller over HTTPS, then you need to use the following syntax:
# linstor --controllers linstor+ssl://<controller-node-name-or-ip-address>
# LS_CONTROLLERS=linstor+ssl://<controller-node-name-or-ip-address> linstor node list
2.6.1. Specifying controllers in the LINSTOR configuration file
Alternatively, you can create the /etc/linstor/linstor-client.conf file and add a
controllers= line in the global section.
[global]
controllers=alice
If you have multiple LINSTOR controllers configured you can simply specify them all in a comma-separated list. The LINSTOR client will try them in the order listed.
2.6.2. Using LINSTOR client abbreviated notation
You can use LINSTOR client commands in a much faster and convenient way by only entering the
starting letters of the commands, subcommands, or parameters. For example, rather than entering
linstor node list you can enter the LINSTOR short notation command linstor n l.
Entering the command linstor commands will show a list of possible LINSTOR client commands
along with the abbreviated notation for each command. You can use the --help flag with any of
these LINSTOR client commands to get the abbreviated notation for the command’s subcommands.
2.7. Adding nodes to your cluster
After initializing your LINSTOR cluster, the next step is to add nodes to the cluster.
# linstor node create bravo 10.43.70.3
If you omit the IP address, the LINSTOR client will try to resolve the specified node name,
bravo in the preceding example, as a hostname. If the hostname does not resolve to a host on
the network from the system where the LINSTOR controller service is running, then LINSTOR will
show an error message when you try to create the node:
Unable to resolve ip address for 'bravo': [Errno -3] Temporary failure in name resolution
2.8. Listing nodes in your cluster
You can list the nodes that you have added to your LINSTOR cluster by entering the following command:
# linstor node list
Output from the command will show a table listing the nodes in your LINSTOR cluster, along with information such as the node type assigned to the node, the node’s IP address and port used for LINSTOR communication, and the node’s state.
╭────────────────────────────────────────────────────────────╮
┊ Node   ┊ NodeType  ┊ Addresses                   ┊ State   ┊
╞════════════════════════════════════════════════════════════╡
┊ bravo  ┊ SATELLITE ┊ 10.43.70.3:3366 (PLAIN)     ┊ Offline ┊
╰────────────────────────────────────────────────────────────╯
2.8.1. Naming LINSTOR nodes
By specifying an IP address when you create a LINSTOR node, LINSTOR will not need to resolve the hostname of the node and you can give the node an arbitrary name. The LINSTOR client will show an INFO message about this when you create the node:
[...] 'arbitrary-name' and hostname 'node-1' doesn't match.
LINSTOR will automatically detect the created node’s local uname --nodename which will be
later used for DRBD resource configurations, rather than the arbitrary node name. To avoid
confusing yourself and possibly others, in most cases, it would make sense to just use a node’s
hostname when creating a LINSTOR node.
2.8.2. Starting and enabling a LINSTOR satellite node
When you use linstor node list LINSTOR will show that the new node is marked as offline. Now
start and enable the LINSTOR satellite service on the new node so that the service comes up on
reboot as well:
# systemctl enable --now linstor-satellite
Outside of troubleshooting situations or when upgrading LINSTOR, you should not need to start or stop the satellite service.
However, in some critical error situations, such as a UUID mismatch, this might be necessary.
Since linstor-server version 1.31.3, in cases where LINSTOR runs into a critical error, LINSTOR will try to recover automatically by shutting down with an exit code 70.
This will cause systemd to restart the LINSTOR satellite service for you, based on configuration within the linstor-satellite.service unit file.
|
After starting and enabling the satellite service, about 10 seconds later you will see the status in linstor node list as online. Of course
the satellite process might be started before the controller knows about the existence of the
satellite node.
In case the node which hosts your controller should also contribute storage to the LINSTOR
cluster, you have to add it as a node and also start the linstor-satellite service.
|
2.8.3. Specifying LINSTOR node types
When you create a LINSTOR node, you can also specify a node type. Node type is a label that
indicates the role that the node serves within your LINSTOR cluster. Node type can be one of
controller, auxiliary, combined, or satellite. For example to create a LINSTOR node and
label it as a controller and a satellite node, enter the following command:
# linstor node create bravo 10.43.70.3 --node-type combined
The --node-type argument is optional. If you do not specify a node type when you create a
node, LINSTOR will use a default type of satellite.
If you want to change a LINSTOR node’s assigned type after creating the node, you can enter a
linstor node modify --node-type command.
2.8.4. Listing supported storage providers and storage layers
Before you use LINSTOR to create storage objects in your cluster, or in case you are in a
troubleshooting situation, you can list the storage providers and storage layers that are
supported on the satellite nodes in your cluster. To do this, you can use the node info
command.
# linstor node info
Output from the command will show two tables. The first table will show the available
LINSTOR storage provider back ends. The second table will show the
available LINSTOR storage layers. Both tables will indicate whether a
given node supports the storage provider or storage layer. A plus sign, +, indicate “is
supported”. A minus sign, -, indicates “is not supported”.
Example output for a cluster might be similar to the following:
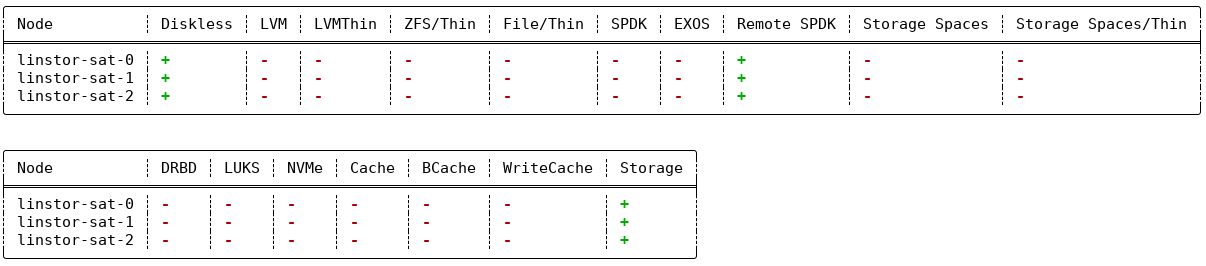
linstor node info command2.9. Storage pools
StoragePools identify storage in the context of LINSTOR. To group storage pools from multiple nodes, simply use the same name on each node. For example, one valid approach is to give all SSDs one name and all HDDs another.
2.9.1. Creating storage pools
On each host contributing storage, you need to create either an LVM volume group (VG) or a ZFS zPool. The VGs and zPools identified with one LINSTOR storage pool name might have different VG or zPool names on the hosts, but do yourself a favor, for coherency, use the same VG or zPool name on all nodes.
|
When using LINSTOR together with LVM and DRBD, set the global_filter = [ "r|^/dev/drbd|", "r|^/dev/mapper/[lL]instor|" ] This setting tells LVM to reject DRBD and other devices created or set up by LINSTOR from operations such as scanning or opening attempts. In some cases, not setting this filter might lead to increased CPU load or stuck LVM operations. |
# vgcreate vg_ssd /dev/nvme0n1 /dev/nvme1n1 [...]
After creating a volume group on each of your nodes, you can create a storage pool that is backed by the volume group on each of your nodes, by entering the following commands:
# linstor storage-pool create lvm alpha pool_ssd vg_ssd
# linstor storage-pool create lvm bravo pool_ssd vg_ssd
To list your storage pools you can enter:
# linstor storage-pool list
or using LINSTOR abbreviated notation:
# linstor sp l
2.9.2. Using storage pools to confine failure domains to a single back-end device
In clusters where you have only one kind of storage and the capability to hot swap storage devices, you might choose a model where you create one storage pool per physical backing device. The advantage of this model is to confine failure domains to a single storage device.
2.9.3. Sharing storage pools with multiple nodes
The LVM2 storage provider offers the option of multiple server nodes directly
connected to the storage array and drives. You can use the
LINSTOR storage-pool create command option --shared-space when configuring a LINSTOR pool to
use the same LVM2 volume group accessible by two or more nodes.
| Just as you should not modify or create any logical volume in a volume group that is used as the back end for a LINSTOR storage pool, it is even more important not to do these actions with shared volume groups. Calling any LVM command, for example, from an interactive shell, on a shared volume group, where the coordination of LVM commands is done by LINSTOR, can output inconsistent information or even destroy LVM metadata. Automatic activation of LVM logical volumes, for example, at boot time, also falls under this warning. Do not do these things. Use LINSTOR to manage LVM logical volumes through abstracted LINSTOR objects in these cases. |
The following example shows
using the LVM2 volume group UUID as the shared space identifier for a storage pool accessible by
nodes alpha and bravo:
# linstor storage-pool create lvm --external-locking \
  --shared-space O1btSy-UO1n-lOAo-4umW-ETZM-sxQD-qT4V87 \
  alpha pool_ssd shared_vg_ssd
# linstor storage-pool create lvm --external-locking \
  --shared-space O1btSy-UO1n-lOAo-4umW-ETZM-sxQD-qT4V87 \
  bravo pool_ssd shared_vg_ssd
This example also uses the --external-locking option. By using this option, you tell LINSTOR
not to use its internal locking mechanism for shared storage pools but rather use LVM’s
mechanism in this example.
With LVM2, the external locking service (lvmlockd) manages volume groups created
with the vgcreate command’s --shared option. To use the LINSTOR --external-locking option, you
need to have specified the LVM --shared option when entering a vgcreate command to create the
LVM volume group that backs the LINSTOR storage pool.
|
You can omit both the --shared option for vgcreate and the --external-locking option for
linstor storage-pool create. If you do this, LINSTOR will use its own mechanism to take care
that only one node in the same --shared-space grouping will use LVM. Using the LINSTOR internal
mechanism to lock LVM use will not however limit the access to single volumes. Neither the LINSTOR
nor the LVM locking mechanism, for example, will limit DRBD I/O.
2.9.4. Creating storage pools by using the physical storage command
Since linstor-server 1.5.2 and a recent linstor-client, LINSTOR can create LVM/ZFS pools on
a satellite for you. The LINSTOR client has the following commands to list possible disks and
create storage pools, but such LVM/ZFS pools are not managed by LINSTOR and there is no delete
command, so such action must be done manually on the nodes.
# linstor physical-storage list
Will give you a list of available disks grouped by size and rotational(SSD/Magnetic Disk).
It will only show disks that pass the following filters:
-
The device size must be greater than 1GiB.
-
The device is a root device (not having children), for example,
/dev/vda,/dev/sda. -
The device does not have any file system or other
blkidmarker (wipefs -amight be needed). -
The device is not a DRBD device.
With the create-device-pool command you can create a LVM pool on a disk and also directly
add it as a storage pool in LINSTOR.
# linstor physical-storage create-device-pool --pool-name lv_my_pool \
  LVMTHIN node_alpha /dev/vdc --storage-pool newpool
If the --storage-pool option was provided, LINSTOR will create a storage pool with the given
name.
For more options and exact command usage refer to the LINSTOR client --help text.
2.9.5. Mixing storage pools
With some setup and configuration, you can use storage pools of different storage provider types to back a LINSTOR resource. This is called storage pool mixing. For example, you might have a storage pool on one node that uses an LVM thick-provisioned volume while on another node you have a storage pool that uses a thin-provisioned ZFS zpool.
Because most LINSTOR deployments will use homogenous storage pools to back resources, storage pool mixing is only mentioned here so that you know that the feature exists. It might be a useful feature when migrating storage resources, for example. You can find further details about this, including prerequisites, in Mixing storage pools of different storage providers.
2.10. Using resource groups to deploy LINSTOR provisioned volumes
Using resource groups to define how you want your resources provisioned should be considered the de facto method for deploying volumes provisioned by LINSTOR. Chapters that follow which describe creating each resource from a resource definition and volume definition should only be used in special scenarios.
| Even if you choose not to create and use resource groups in your LINSTOR cluster, all resources created from resource definitions and volume definitions will exist in the ‘DfltRscGrp’ resource group. |
A simple pattern for deploying resources using resource groups would look like this:
# linstor resource-group create my_ssd_group --storage-pool pool_ssd --place-count 2
# linstor volume-group create my_ssd_group
# linstor resource-group spawn-resources my_ssd_group my_ssd_res 20G
The commands above would result in a resource named ‘my_ssd_res’ with a 20GB volume replicated twice being automatically provisioned from nodes who participate in the storage pool named ‘pool_ssd’.
A more useful pattern could be to create a resource group with settings you’ve determined are optimal for your use case. Perhaps you have to run nightly online verifications of your volumes’ consistency, in that case, you could create a resource group with the ‘verify-alg’ of your choice already set so that resources spawned from the group are pre-configured with ‘verify-alg’ set:
# linstor resource-group create my_verify_group --storage-pool pool_ssd --place-count 2
# linstor resource-group drbd-options --verify-alg crc32c my_verify_group
# linstor volume-group create my_verify_group
# for i in {00..19}; do
    linstor resource-group spawn-resources my_verify_group res$i 10G
  done
The commands above result in twenty 10GiB resources being created each with the crc32c
verify-alg pre-configured.
You can tune the settings of individual resources or volumes spawned from resource groups by
setting options on the respective resource definition or volume definition LINSTOR objects. For
example, if res11 from the preceding example is used by a very active database receiving many
small random writes, you might want to increase the al-extents for that specific resource:
# linstor resource-definition drbd-options --al-extents 6007 res11
If you configure a setting in a resource definition that is already configured on the
resource group it was spawned from, the value set in the resource definition will override
the value set on the parent resource group. For example, if the same res11 was required to
use the slower but more secure sha256 hash algorithm in its verifications, setting the
verify-alg on the resource definition for res11 would override the value set on the
resource group:
# linstor resource-definition drbd-options --verify-alg sha256 res11
| A guiding rule for the hierarchy in which settings are inherited is that the value “closer” to the resource or volume wins. Volume definition settings take precedence over volume group settings, and resource definition settings take precedence over resource group settings. |
2.12. Creating and deploying resources and volumes
You can use the LINSTOR create command to create various LINSTOR objects, such as resource
definitions, volume definitions, and resources. Some of these commands are shown below.
In the following example scenario, assume that you have a goal of creating a resource named
backups with a size of 500GiB that is replicated among three cluster nodes.
First, create a new resource definition:
# linstor resource-definition create backups
Second, create a new volume definition within that resource definition:
# linstor volume-definition create backups 500G
If you want to resize (grow or shrink) the volume definition you can do that by specifying a new
size with the set-size command:
# linstor volume-definition set-size backups 0 100G
| Since version 1.8.0, LINSTOR supports shrinking volume definition size, even for deployed resources, if the resource’s storage layers support it. Use caution when shrinking volume definition sizes for resources with data. Data loss can occur if you do not take cautionary measures such as making backups and shrinking the file system on top of the volume first. |
The parameter 0 is the number of the volume in the resource backups. You have to provide
this parameter because resources can have multiple volumes that are identified by a so-called
volume number. You can find this number by listing the volume definitions (linstor vd l). The
list table will show volume numbers for the listed resources.
So far you have only created definition objects in the LINSTOR database. However, not a single logical volume (LV) has been created on the satellite nodes. Now you have the choice of delegating the task of deploying resources to LINSTOR or else doing it yourself.
2.12.1. Manually placing resources
With the resource create command you can assign a resource definition to named nodes
explicitly.
# linstor resource create alpha backups --storage-pool pool_hdd
# linstor resource create bravo backups --storage-pool pool_hdd
# linstor resource create charlie backups --storage-pool pool_hdd
2.12.2. Automatically placing resources
When you create (spawn) a resource from a resource group, it is possible to have LINSTOR automatically select nodes and storage pools to deploy the resource to. You can use the arguments mentioned in this section to specify constraints when you create or modify a resource group. These constraints will affect how LINSTOR automatically places resources that are deployed from the resource group.
Automatically maintaining resource group placement count
Starting with LINSTOR version 1.26.0, there is a recurring LINSTOR task that tries to maintain the placement count set on a resource group for all deployed LINSTOR resources that belong to that resource group. This includes the default LINSTOR resource group and its placement count.
If you want to disable this behavior, set the BalanceResourcesEnabled property to false on the
the LINSTOR controller, LINSTOR resource groups that your resources belong to, or the resource
definitions themselves. Due to LINSTOR object hierarchy, if you set a property on a resource
group, it will override the property value on the LINSTOR controller. Likewise, if you set a
property on a resource definition, it will override the property value on the resource group
that the resource definition belongs to.
There are other additional properties related to this feature that you can set on the LINSTOR controller:
BalanceResourcesInterval-
The interval in seconds, at the LINSTOR controller level, that the balance resource placement task is triggered. By default, the interval is 3600 seconds (one hour).
BalanceResourcesGracePeriod-
The period in seconds for how long new resources (after being created or spawned) are ignored for balancing. By default, the grace period is 3600 seconds (one hour).
Placement count
By using the --place-count <replica_count> argument when you create or modify a resource
group, you can specify on how many nodes in your cluster LINSTOR should place diskful resources
created from the resource group.
|
Creating a resource group with impossible placement constraints
You can create or modify a resource group and specify a placement count or other constraint that
would be impossible for LINSTOR to fulfill. For example, you could specify a placement count of
ERROR:
Description:
    Not enough available nodes
[...]
|
Storage pool placement
In the following example, the value after the --place-count option tells LINSTOR how many
replicas you want to have. The --storage-pool option should be obvious.
# linstor resource-group create backups --place-count 3 --storage-pool pool_hdd
What might not be obvious is that you can omit the --storage-pool option. If you do this, then
LINSTOR can select a storage pool on its own when you create (spawn) resources from the resource
group. The selection follows these rules:
-
Ignore all nodes and storage pools the current user has no access to
-
Ignore all diskless storage pools
-
Ignore all storage pools not having enough free space
The remaining storage pools will be rated by different strategies.
MaxFreeSpace-
This strategy maps the rating 1:1 to the remaining free space of the storage pool. However, this strategy only considers the actually allocated space (in case of thin-provisioned storage pool this might grow with time without creating new resources)
MinReservedSpace-
Unlike the “MaxFreeSpace”, this strategy considers the reserved space. That is the space that a thin volume can grow to before reaching its limit. The sum of reserved spaces might exceed the storage pool’s capacity, which is as overprovisioning.
MinRscCount-
Simply the count of resources already deployed in a given storage pool
MaxThroughput-
For this strategy, the storage pool’s
Autoplacer/MaxThroughputproperty is the base of the score, or 0 if the property is not present. Every Volume deployed in the given storage pool will subtract its definedsys/fs/blkio_throttle_readandsys/fs/blkio_throttle_writeproperty- value from the storage pool’s max throughput. The resulting score might be negative.
The scores of the strategies will be normalized, weighted and summed up, where the scores of minimizing strategies will be converted first to allow an overall maximization of the resulting score.
You can configure the weights of the strategies to affect how LINSTOR selects a storage pool for resource placement when creating (spawning) resources for which you did not specify a storage pool. You do this by setting the following properties on the LINSTOR controller object. The weight can be an arbitrary decimal value.
linstor controller set-property Autoplacer/Weights/MaxFreeSpace <weight>
linstor controller set-property Autoplacer/Weights/MinReservedSpace <weight>
linstor controller set-property Autoplacer/Weights/MinRscCount <weight>
linstor controller set-property Autoplacer/Weights/MaxThroughput <weight>
To keep the behavior of the Autoplacer compatible with previous LINSTOR versions, all
strategies have a default-weight of 0, except the MaxFreeSpace which has a weight of 1.
|
| Neither 0 nor a negative score will prevent a storage pool from getting selected. A storage pool with these scores will just be considered later. |
Finally, LINSTOR tries to find the best matching group of storage pools meeting all
requirements. This step also considers other auto-placement restrictions such as
--replicas-on-same, --replicas-on-different, --x-replicas-on-different, --do-not-place-with,
--do-not-place-with-regex, --layer-list, and --providers.
Avoiding colocating resources when automatically placing a resource
The --do-not-place-with <resource_name_to_avoid> argument specifies that LINSTOR should try to
avoid placing a resource on nodes that already have the specified, resource_name_to_avoid
resource deployed.
By using the --do-not-place-with-regex <regular_expression> argument, you can specify that
LINSTOR should try to avoid placing a resource on nodes that already have a resource deployed
whose name matches the regular expression that you provide with the argument. In this way, you
can specify multiple resources to try to avoid placing your resource with.
Constraining automatic resource placement by using auxiliary node properties
You can constrain automatic resource placement to place (or avoid placing) a resource with nodes having a specified auxiliary node property.
This ability can be useful in a few different scenarios. One scenario is if you are trying to constrain resource placement within Kubernetes environments that use LINSTOR managed storage. For example, you might set an auxiliary node property that corresponds to a Kubernetes label. Refer to the “replicasOnSame” section within the “LINSTOR Volumes in Kubernetes” LINSTOR User Guide chapter for more details about this use case.
You can also use the --x-replicas-on-different argument to constrain automatic resource placement in a way that can be useful when using LINSTOR to manage storage resources across data centers, for example, in a stretched cluster architecture.
Because this argument takes a different form than the --replicas-on-same and --replicas-on-different arguments, it is disussed later in its own section, Ensuring automatic resource placement on different nodes for disaster recovery.
The arguments, --replicas-on-same and --replicas-on-different expect the
name of a property within the Aux/ namespace.
The --x-replicas-on-different command option also considers a LINSTOR object “different”, where the auxiliary property is not set.
For example, in a 5-satellite node cluster where nodes 1-2 have an auxiliary property site value of dc1, nodes 3-4 have a site value of dc2, and node 5 has no auxiliary property set, there would be three “different” node groups.
|
The following example shows setting an auxiliary node property, testProperty, on three LINSTOR
satellite nodes. Next, you create a resource group, testRscGrp, with a placement count of two
and a constraint to place spawned resources on nodes that have a testProperty value of 1.
After creating a volume group, you can spawn a resource from the resource group. For simplicity,
output from the following commands is not shown.
# for i in {0,2}; do linstor node set-property --aux node-$i testProperty 1; done
# linstor node set-property --aux node-1 testProperty 0
# linstor resource-group create testRscGrp --place-count 2 --replicas-on-same testProperty=1
# linstor volume-group create testRscGrp
# linstor resource-group spawn-resources testRscGrp testResource 100M
You can verify the placement of the spawned resource by using the following command:
# linstor resource list
Output from the command will show a list of resources and on which nodes resources LINSTOR has placed the resources.
╭─────────────────────────────────────────────────────────────────────────────────────╮
┊ ResourceName      ┊ Node   ┊ Port ┊ Usage  ┊ Conns ┊    State ┊ CreatedOn           ┊
╞═════════════════════════════════════════════════════════════════════════════════════╡
┊ testResource      ┊ node-0 ┊ 7000 ┊ Unused ┊ Ok    ┊ UpToDate ┊ 2022-07-27 16:14:16 ┊
┊ testResource      ┊ node-2 ┊ 7000 ┊ Unused ┊ Ok    ┊ UpToDate ┊ 2022-07-27 16:14:16 ┊
╰─────────────────────────────────────────────────────────────────────────────────────╯
Because of the --replicas-on-same constraint, LINSTOR did not place the spawned resource on
satellite node node-1, because the value of its auxiliary node property, testProperty was
0 and not 1.
You can verify the node properties of node-1, by using the list-properties command:
# linstor node list-properties node-1
╭────────────────────────────╮
┊ Key              ┊ Value   ┊
╞════════════════════════════╡
┊ Aux/testProperty ┊ 0       ┊
┊ CurStltConnName  ┊ default ┊
┊ NodeUname        ┊ node-1  ┊
╰────────────────────────────╯
Unsetting autoplacement properties
To unset an autoplacement property that you set on a resource group, you can use the following command syntax:
# linstor resource-group modify <resource-group-name> --<autoplacement-property>
Alternatively, you can follow the --<autoplacement-property> argument with an empty string, as in:
# linstor resource-group modify <resource-group-name> --<autoplacement-property> ''
For example, to unset the --replicas-on-same autoplacement property on the testRscGrp that was set in an earlier example, you could enter the following command:
# linstor resource-group modify testRscGrp --replicas-on-same
Ensuring automatic resource placement on different nodes for disaster recovery
By using the --x-replicas-on-different argument when creating or modifying various LINSTOR objects, you can ensure LINSTOR automatically places resources on different LINSTOR node groups, where different values for an auxiliary property represent different groups.
The argument takes the following form:
--x-replicas-on-different <auxiliary-property-name> <positive-integer>
The positive integer value is the maximum number of resource replicas that LINSTOR can place on nodes that have the same value for the specified auxiliary property.
The most common use case for this feature is ensuring that there is always at least two local resource replicas, for high availability, and one off-site resource replica, for disaster recovery.
For example, to label each node by its physical location, assume that you set an auxiliary property, site, as follows for a LINSTOR cluster in a stretched cluster architecture:
╭──────────────────────────────────────────────────────────────────╮
┊ Node           ┊ NodeType   ┊ Addresses  ┊ AuxProps     ┊ State  ┊
╞══════════════════════════════════════════════════════════════════╡
┊ linstor-ctrl-0 ┊ CONTROLLER ┊ [...]      ┊              ┊ Online ┊
┊ linstor-sat-0  ┊ SATELLITE  ┊ [...]      ┊ Aux/site=dc1 ┊ Online ┊
┊ linstor-sat-1  ┊ SATELLITE  ┊ [...]      ┊ Aux/site=dc1 ┊ Online ┊
┊ linstor-sat-2  ┊ SATELLITE  ┊ [...]      ┊ Aux/site=dc2 ┊ Online ┊
┊ linstor-sat-3  ┊ SATELLITE  ┊ [...]      ┊ Aux/site=dc2 ┊ Online ┊
┊ linstor-sat-4  ┊ SATELLITE  ┊ [...]      ┊ Aux/site=dc2 ┊ Online ┊
╰──────────────────────────────────────────────────────────────────╯
Further assume that you created a resource group myrg associated with the same LINSTOR storage pool on all five satellite nodes.
You can enter the following command to create a new resource, myres, and ensure that LINSTOR places two replicas on one site and a third replica at a different site:
linstor resource-group spawn \
  --x-replicas-on-different site 2 \
  --place-count 3 \
  myrg myres 200G
After LINSTOR creates the resource, a linstor resource list --resource myres command might show output similar to this:
╭─────────────────────────────────────────────────────────────────────────────────────╮
┊ ResourceName ┊ Node          ┊ Layers       ┊ Usage  ┊ Conns ┊    State ┊ CreatedOn ┊
╞═════════════════════════════════════════════════════════════════════════════════════╡
┊ myres        ┊ linstor-sat-0 ┊ DRBD,STORAGE ┊ Unused ┊ Ok    ┊ UpToDate ┊ [...]     ┊
┊ myres        ┊ linstor-sat-1 ┊ DRBD,STORAGE ┊ Unused ┊ Ok    ┊ UpToDate ┊ [...]     ┊
┊ myres        ┊ linstor-sat-2 ┊ DRBD,STORAGE ┊ Unused ┊ Ok    ┊ UpToDate ┊ [...]     ┊
╰─────────────────────────────────────────────────────────────────────────────────────╯
When creating the myres resource, by specifying 2 for the maximum number of resource replicas LINSTOR can place on either dc1 or dc2 nodes, and also specifying a place count of 3, you ensure that LINSTOR will place three resource replicas: two resources together on a site, for local high availability, and a third replica off-site, for disaster recovery purposes.
Other combinations of --x-replicas-on-different and --place-count number values are possible.
However, you should make sensible choices.
If you specified, for example, --x-replicas-on-different site 1 and --place-count 3, when creating the myres resource given the example LINSTOR cluster shown earlier, LINSTOR would refuse to create the resource and would show a “Not enough available nodes” error message.
Specifying --x-replicas-on-different $X 1 has exactly the same placement outcome as --replicas-on-different $X.
|
Here, the node labeling (by using an auxiliary property), together with the constraint that LINSTOR should place at most one resource replica on nodes with different values for the auxiliary property, while also asking LINSTOR to place three resource replicas, means that you are asking for LINSTOR to do something impossible.
You also need to know that, as implemented, the --x-replicas-on-different command considers a LINSTOR object “different”, where the auxiliary property is not set.
This is also true for the behavior of the --replicas-on-different option.
For example, consider the following LINSTOR cluster:
╭──────────────────────────────────────────────────────────────────╮
┊ Node           ┊ NodeType   ┊ Addresses  ┊ AuxProps     ┊ State  ┊
╞══════════════════════════════════════════════════════════════════╡
┊ linstor-ctrl-0 ┊ CONTROLLER ┊ [...]      ┊              ┊ Online ┊
┊ linstor-sat-0  ┊ SATELLITE  ┊ [...]      ┊ Aux/site=dc1 ┊ Online ┊
┊ linstor-sat-1  ┊ SATELLITE  ┊ [...]      ┊ Aux/site=dc1 ┊ Online ┊
┊ linstor-sat-2  ┊ SATELLITE  ┊ [...]      ┊ Aux/site=dc2 ┊ Online ┊
┊ linstor-sat-3  ┊ SATELLITE  ┊ [...]      ┊ Aux/site=dc2 ┊ Online ┊
┊ linstor-sat-4  ┊ SATELLITE  ┊ [...]      ┊ Aux/site=dc2 ┊ Online ┊
┊ linstor-sat-5  ┊ SATELLITE  ┊ [...]      ┊              ┊ Online ┊
┊ linstor-sat-6  ┊ SATELLITE  ┊ [...]      ┊              ┊ Online ┊
╰──────────────────────────────────────────────────────────────────╯
If you were to create a resource, myres, by using the “impossible” command mentioned earlier, the command would this time succeed.
linstor resource-group spawn \
  --x-replicas-on-different site 1 \
  --place-count 3 \
  myrg myres 200G
A successful resource placement that fulfills the specified constraints might be as follows:
╭─────────────────────────────────────────────────────────────────────────────────────╮
┊ ResourceName ┊ Node          ┊ Layers       ┊ Usage  ┊ Conns ┊    State ┊ CreatedOn ┊
╞═════════════════════════════════════════════════════════════════════════════════════╡
┊ myres        ┊ linstor-sat-0 ┊ DRBD,STORAGE ┊ Unused ┊ Ok    ┊ UpToDate ┊ [...]     ┊
┊ myres        ┊ linstor-sat-2 ┊ DRBD,STORAGE ┊ Unused ┊ Ok    ┊ UpToDate ┊ [...]     ┊
┊ myres        ┊ linstor-sat-5 ┊ DRBD,STORAGE ┊ Unused ┊ Ok    ┊ UpToDate ┊ [...]     ┊
╰─────────────────────────────────────────────────────────────────────────────────────╯
Because the site auxiliary property was not set on the linstor-sat-5 node, the node counted as belonging to a different group, for purposes of the --x-replicas-on-different constraint.
In this example cluster, there are three different node groups for the site auxiliary property: dc1, dc2, and a group where the auxiliary property is not set on some nodes.
For this reason, LINSTOR was able to place three resources, fulfilling the --place-count constraint, while also fulfilling the --x-replicas-on-different constraint.
Constraining automatic resource placement by LINSTOR layers or storage pool providers
You can specify the --layer-list or --providers arguments, followed by a comma-separated
values (CSV) list of LINSTOR layers or storage pool providers, to influence where LINSTOR places
resources. The possible layers and storage pool providers that you can specify in your CSV
list can be shown by using the --help option with the --auto-place option. A CSV list of
layers would constrain automatic resource placement for a specified resource group to nodes that
have storage that conformed with your list. Consider the following command:
# linstor resource-group create my_luks_rg --place-count 3 --layer-list drbd,luks
Resources that you might later create (spawn) from this resource group would be deployed across three nodes having storage pools backed by a DRBD layer backed by a LUKS layer (and implicitly backed by a “storage” layer). The order of layers that you specify in your CSV list is “top-down”, where a layer on the left in the list is above a layer on its right.
The --providers argument can be used to constrain automatic resource placement to only storage
pools that match those in a specified CSV list. You can use this argument to have explicit
control over which storage pools will back your deployed resource. If for example, you had a
mixed environment of ZFS, LVM, and LVM_THIN storage pools in your cluster, by using the
--providers LVM,LVM_THIN argument, you can specify that a resource only gets backed by either
an LVM or LVM_THIN storage pool, when using the --place-count option.
The --providers argument’s CSV list does not specify an order of priority for the list
elements. Rather, LINSTOR will use factors like additional placement constraints,
available free space, and LINSTOR storage pool selection strategies that were previously
described, when placing a resource.
|
Automatically placing resources when creating them
While using resource groups to create templates from which you can create (spawn) resources from
is the standard way to create resources, you can also create resources directly by using the
resource create command. When you use this command, it is also possible to specify arguments
that affect how LINSTOR will place the resource in your storage cluster.
With the exception of the placement count argument, the arguments that you can specify when you
use the resource create command that affect where LINSTOR places the resource are the same as
those for the resource-group create command. Specifying an --auto-place <replica_count>
argument with a resource create command is the same as specifying a --place-count
<replica_count> argument with a resource-group create command.
Using auto-place to extend existing resource deployments
Besides the argument name, there is another difference between the placement count argument for
the resource group and resource create commands. With the resource create command, you can
also specify a value of +1 with the --auto-place argument, if you want to extend existing
resource deployments.
By using this value, LINSTOR will create an additional replica, no matter
what the --place-count is configured for on the resource group that the resource
was created from.
For example, you can use an --auto-place +1 argument to deploy an additional replica of the
testResource resource used in a previous example. You will first need to set the auxiliary
node property, testProperty to 1 on node-1. Otherwise, LINSTOR will not be able to deploy
the replica because of the previously configured --replicas-on-same constraint. For
simplicity, not all output from the commands below is shown.
# linstor node set-property --aux node-1 testProperty 1
# linstor resource create --auto-place +1 testResource
# linstor resource list
╭─────────────────────────────────────────────────────────────────────────────────────╮
┊ ResourceName      ┊ Node   ┊ Port ┊ Usage  ┊ Conns ┊    State ┊ CreatedOn           ┊
╞═════════════════════════════════════════════════════════════════════════════════════╡
┊ testResource      ┊ node-0 ┊ 7000 ┊ Unused ┊ Ok    ┊ UpToDate ┊ 2022-07-27 16:14:16 ┊
┊ testResource      ┊ node-1 ┊ 7000 ┊ Unused ┊ Ok    ┊ UpToDate ┊ 2022-07-28 19:27:30 ┊
┊ testResource      ┊ node-2 ┊ 7000 ┊ Unused ┊ Ok    ┊ UpToDate ┊ 2022-07-27 16:14:16 ┊
╰─────────────────────────────────────────────────────────────────────────────────────╯
The +1 value is not valid for the resource-group create --place-count command. This
is because the command does not deploy resources, it only creates templates from which to deploy
them later.
|
2.13. Creating a file system on a storage volume
For convenience, rather than deploying storage resources and volumes and then using mkfs commands on a LINSTOR satellite node to create file systems, you can have LINSTOR create file systems automatically.
You do this by using the linstor resource-group set-property subcommand, setting the Filesystem/Type key to either ext4 or xfs, and then creating resources from the resource group.
By setting additional Filesystem properties, you can also specify the file system owner or group, or pass additional parameters specific to the file system to the mkfs command that LINSTOR uses behind-the-scenes.
For example, given a LINSTOR resource group named nfs-rg, the following command sequence creates an XFS file system on a LINSTOR storage volume for a resource named nfs-res:
linstor resource-group set-property nfs-rg FileSystem/Type xfs          (1)
linstor resource-group set-property nfs-rg FileSystem/User nobody       (2)
linstor resource-group set-property nfs-rg FileSystem/Group nobody      (2)
linstor resource-group spawn-resources nfs-rg nfs-res 100G
| 1 | Can be either ext4 or xfs. |
| 2 | Defaults to root if property is not set. |
Verify the resource group properties by entering a resource-group list-property command, for example:
linstor resource-group list-properties nfs-rg
Output will show the set properties:
╭─────────────────────────────────────╮
┊ Key                   ┊ Value       ┊
╞═════════════════════════════════════╡
┊ FileSystem/Group      ┊ nobody      ┊
┊ FileSystem/Type       ┊ xfs         ┊
┊ FileSystem/User       ┊ nobody      ┊
╰─────────────────────────────────────╯
You can use a blkid command on a satellite node to verify that LINSTOR created a file system on the storage volume:
[...]
/dev/drbd1004: UUID="[...]" TYPE="xfs"
[...]
After mounting the DRBD device to a directory on a satellite node, you can use an ls -l command to show ownership information, for example:
drwxrwxrwx. 2 nobody nobody 6 Sep 26 18:56 data
2.13.1. Specifying additional parameters when creating a file system
Besides the FileSystem/Type, FileSystem/User, and FileSystem/Group keys, you can use the FileSystem/MkfsParams to specify additional parameters to pass to the mkfs command when LINSTOR creates a file system on a storage volume.
For example, you can add a label to a file system that LINSTOR will create.
linstor resource-group set-property nfs-rg FileSystem/MkfsParams '-L nfs-data'
Refer to the mkfs.ext4 and mkfs.xfs manual pages for other parameters you might specify.
2.14. Deleting resources, resource definitions, and resource groups
You can delete LINSTOR resources, resource definitions, and resource groups by using the
delete command after the LINSTOR object that you want to delete. Depending on which object you
delete, there will be different implications for your LINSTOR cluster and other associated
LINSTOR objects.
2.14.1. Deleting a resource definition
You can delete a resource definition by using the command:
# linstor resource-definition delete <resource_definition_name>
This will remove the named resource definition from the entire LINSTOR cluster. The resource is removed from all nodes and the resource entry is marked for removal from the LINSTOR database tables. After LINSTOR has removed the resource from all the nodes, the resource entry is removed from the LINSTOR database tables.
| If your resource definition has existing snapshots, you will not be able to delete the resource definition until you delete its snapshots. See the Removing a snapshot section in this guide. |
2.14.2. Deleting a resource
You can delete a resource using the command:
# linstor resource delete <node_name> <resource_name>
Unlike deleting a resource definition, this command will only delete a LINSTOR resource from the node (or nodes) that you specify. The resource is removed from the node and the resource entry is marked for removal from the LINSTOR database tables. After LINSTOR has removed the resource from the node, the resource entry is removed from the LINSTOR database tables.
Deleting a LINSTOR resource might have implications for a cluster, beyond just removing the resource. For example, if the resource is backed by a DRBD layer, removing a resource from one node in a three node cluster could also remove certain quorum related DRBD options, if any existed for the resource. After removing such a resource from a node in a three node cluster, the resource would no longer have quorum as it would now only be deployed on two nodes in the three node cluster.
After running a linstor resource delete command to remove a resource from a single node, you
might see informational messages such as:
INFO:
    Resource-definition property 'DrbdOptions/Resource/quorum' was removed as there are not enough resources for quorum
INFO:
    Resource-definition property 'DrbdOptions/Resource/on-no-quorum' was removed as there are not enough resources for quorum
Also unlike deleting a resource definition, you can delete a resource while there are existing snapshots of the resource’s storage pool. Any existing snapshots for the resource’s storage pool will persist.
2.14.3. Deleting a resource group
You can delete a resource group by using the command:
# linstor resource-group delete <resource_group_name>
As you might expect, this command deletes the named resource group. You can only delete a resource group if it has no associated resource definitions, otherwise LINSTOR will present an error message, such as:
ERROR:
Description:
    Cannot delete resource group 'my_rg' because it has existing resource definitions.
To resolve this error so that you can delete the resource group, you can either delete the associated resource definitions, or your can move the resource definitions to another (existing) resource group:
# linstor resource-definition modify <resource_definition_name> \
--resource-group <another_resource_group_name>
You can find which resource definitions are associated with your resource group by entering the following command:
# linstor resource-definition list
2.15. Backup and restore database
Since version 1.24.0, LINSTOR has a tool that you can use to export and import a LINSTOR database.
This tool has an executable file called /usr/share/linstor-server/bin/linstor-database. This
executable has two subcommands, export-db and import-db. Both subcommands accept an optional
--config-directory argument that you can use to specify the directory containing the
linstor.toml configuration file.
| To ensure a consistent database backup, take the controller offline by stopping the controller service as shown in the commands below, before creating a backup of the LINSTOR database. |
2.15.1. Backing up the database
To backup the LINSTOR database to a new file named db_export in your home directory, enter the
following commands:
# systemctl stop linstor-controller
# /usr/share/linstor-server/bin/linstor-database export-db ~/db_export
# systemctl start linstor-controller
You can use the --config-directory argument with the linstor-database utility to
specify a LINSTOR configuration directory if needed. If you omit this argument, the utility uses
the /etc/linstor directory by default.
|
After backing up the database, you can copy the backup file to a safe place.
# cp ~/db_export <somewhere safe>
The resulting database backup is a plain JSON document, containing not just the actual data, but also some metadata about when the backup was created, from which database, and other information.
2.15.2. Restoring the database from a backup
Restoring the database from a previously made backup is similar to export-db from the
previous section.
For example, to restore the previously made backup from the db_export file, enter the
following commands:
# systemctl stop linstor-controller
# /usr/share/linstor-server/bin/linstor-database import-db ~/db_export
# systemctl start linstor-controller
You can only import a database from a previous backup if the currently installed version of LINSTOR is the same (or higher) version as the version that you created the backup from. If the currently installed LINSTOR version is higher than the version that the database backup was created from, when you import the backup the data will be restored with the same database scheme of the version used during the export. Then, the next time that the controller starts, the controller will detect that the database has an old scheme and it will automatically migrate the data to the scheme of the current version.
2.15.3. Converting databases
Since the exported database file contains some metadata, an exported database file can be imported into a different database type than it was exported from.
This allows the user to convert, for example, from an etcd setup to an SQL based setup. There
is no special command for converting the database format. You only have to specify the correct
linstor.toml configuration file by using the --config-directory argument (or updating the
default /etc/linstor/linstor.toml and specifying the database type that you want to use before
importing). See the LINSTOR User Guide for more information
about specifying a database type. Regardless of the type of database that the backup was created
from, it will be imported in the database type that is specified in the linstor.toml
configuration file.
3. Further LINSTOR tasks
3.1. Creating a highly available LINSTOR cluster
By default a LINSTOR cluster consists of exactly one active LINSTOR controller node. Making LINSTOR highly available involves providing replicated storage for the controller database, multiple LINSTOR controller nodes where only one is active at a time, and a service manager (here DRBD Reactor) that takes care of mounting and unmounting the highly available storage as well as starting and stopping the LINSTOR controller service on nodes.
3.1.1. Configuring highly available LINSTOR database storage
To configure the highly available storage, you can use LINSTOR itself. One of the benefits of having the storage under LINSTOR control is that you can easily extend the HA storage to new cluster nodes.
Creating a resource group for the HA LINSTOR database storage resource
First, create a resource group, here named linstor-db-grp, from which you will later spawn the
resource that will back the LINSTOR database. You will need to adapt the storage pool name to
match an existing storage pool in your environment.
# linstor resource-group create \
--storage-pool my-thin-pool \
--place-count 3 \
--diskless-on-remaining true \
linstor-db-grp
Next, set the necessary DRBD options on the resource group. Resources that you spawn from the resource group will inherit these options.
# linstor resource-group drbd-options \
--auto-promote=no \
--quorum=majority \
--on-suspended-primary-outdated=force-secondary \
--on-no-quorum=io-error \
--on-no-data-accessible=io-error \
linstor-db-grp
It is crucial that your cluster qualifies for auto-quorum and uses the io-error
policy (see Section Auto-quorum policies), and that auto-promote is disabled.
|
Creating a volume group for the HA LINSTOR database storage resource
Next, create a volume group that references your resource group.
# linstor volume-group create linstor-db-grp
Creating a resource for the HA LINSTOR database storage
Now you can spawn a new LINSTOR resource from the resource group that you created. The resource
is named linstor_db and will be 200MiB in size, Because of the parameters that you specified
when you created the resource group, LINSTOR will place the resource in the my-thin-pool
storage pool on three satellite nodes in your cluster.
# linstor resource-group spawn-resources linstor-db-grp linstor_db 200M
3.1.2. Moving the LINSTOR database to HA storage
After creating the linstor_db resource, you can move the LINSTOR database to the new storage
and create a systemd mount service. First, stop the current controller service and disable it,
as it will be managed by DRBD Reactor later.
# systemctl disable --now linstor-controller
Next, create the systemd mount service.
# cat << EOF > /etc/systemd/system/var-lib-linstor.mount
[Unit]
Description=Filesystem for the LINSTOR controller

[Mount]
# you can use the minor like /dev/drbdX or the udev symlink
What=/dev/drbd/by-res/linstor_db/0
Where=/var/lib/linstor
EOF

# mv /var/lib/linstor{,.orig}
# mkdir /var/lib/linstor
# chattr +i /var/lib/linstor # only if on LINSTOR >= 1.14.0
# drbdadm primary linstor_db
# mkfs.ext4 -b 4096 /dev/drbd/by-res/linstor_db/0
# systemctl start var-lib-linstor.mount
# cp -r /var/lib/linstor.orig/* /var/lib/linstor
# systemctl start linstor-controller
Copy the /etc/systemd/system/var-lib-linstor.mount mount file to all the cluster nodes that
you want to have the potential to run the LINSTOR controller service (standby controller nodes).
Again, do not systemctl enable any of these services because DRBD Reactor will manage them.
3.1.3. Installing multiple LINSTOR controllers
The next step is to install LINSTOR controllers on all nodes that have access to the
linstor_db DRBD resource (as they need to mount the DRBD volume) and which you want to become
a possible LINSTOR controller. It is important that the controllers are manged by
drbd-reactor, so verify that the linstor-controller.service is disabled on all nodes! To be
sure, execute systemctl disable linstor-controller on all cluster nodes and systemctl stop
linstor-controller on all nodes except the one it is currently running from the previous step.
Also verify that you have set chattr +i /var/lib/linstor on all potential controller nodes if
you use LINSTOR version equal or greater to 1.14.0.
3.1.4. Managing the services
For starting and stopping the mount service and the linstor-controller service, use
DRBD Reactor.
Install this component on all nodes that could become a LINSTOR controller and edit their
/etc/drbd-reactor.d/linstor_db.toml configuration file. It should contain an enabled promoter
plugin section like this:
[[promoter]] [promoter.resources.linstor_db] start = ["var-lib-linstor.mount", "linstor-controller.service"]
Depending on your requirements you might also want to set an on-stop-failure action and set
stop-services-on-exit.
After that restart drbd-reactor and enable it on all the nodes you configured it.
# systemctl restart drbd-reactor # systemctl enable drbd-reactor
Check that there are no warnings from drbd-reactor service in the logs by running systemctl
status drbd-reactor. As there is already an active LINSTOR controller things will just stay
the way they are. Run drbd-reactorctl status linstor_db to check the health of the linstor_db
target unit.
The last but nevertheless important step is to configure the LINSTOR satellite services to not
delete (and then regenerate) the resource file for the LINSTOR controller DB at its startup. Do
not edit the service files directly, but use systemctl edit. Edit the service file on all
nodes that could become a LINSTOR controller and that are also LINSTOR satellites.
# systemctl edit linstor-satellite [Service] Environment=LS_KEEP_RES=linstor_db
After this change you should execute systemctl restart linstor-satellite on all satellite
nodes.
| Be sure to configure your LINSTOR client for use with multiple controllers as described in the section titled, Using the LINSTOR client and verify that you also configured your integration plugins (for example, the Proxmox plugin) to be ready for multiple LINSTOR controllers. |
3.2. DRBD clients
By using the --drbd-diskless option instead of --storage-pool you can have a permanently
diskless DRBD device on a node. This means that the resource will appear as block device and can
be mounted to the file system without an existing storage-device. The data of the resource is
accessed over the network on another node with the same resource.
# linstor resource create delta backups --drbd-diskless
The option --diskless is deprecated. Use the --drbd-diskless or --nvme-initiator
commands instead.
|
3.3. DRBD consistency groups (multiple volumes within a resource)
The so called consistency group is a feature from DRBD. It is mentioned in this user guide, due to the fact that one of the main functions of LINSTOR is to manage storage clusters with DRBD. Multiple volumes in one resource are a consistency group.
This means that changes on different volumes from one resource are getting replicated in the same chronological order on the other Satellites.
Therefore you don’t have to worry about the timing if you have interdependent data on different volumes in a resource.
To deploy more than one volume in a LINSTOR-resource you have to create two volume-definitions with the same name.
# linstor volume-definition create backups 500G # linstor volume-definition create backups 100G
3.4. Placing volumes of one resource in different storage pools
This can be achieved by setting the StorPoolName property to the volume definitions before the
resource is deployed to the nodes:
# linstor resource-definition create backups # linstor volume-definition create backups 500G # linstor volume-definition create backups 100G # linstor volume-definition set-property backups 0 StorPoolName pool_hdd # linstor volume-definition set-property backups 1 StorPoolName pool_ssd # linstor resource create alpha backups # linstor resource create bravo backups # linstor resource create charlie backups
Since the volume-definition create command is used without the --vlmnr option LINSTOR
assigned the volume numbers starting at 0. In the following two lines the 0 and 1 refer to these
automatically assigned volume numbers.
|
Here the ‘resource create’ commands do not need a --storage-pool option. In this case LINSTOR
uses a ‘fallback’ storage pool. Finding that storage pool, LINSTOR queries the properties of the
following objects in the following order:
-
Volume definition
-
Resource
-
Resource definition
-
Node
If none of those objects contain a StorPoolName property, the controller falls back to a
hard-coded ‘DfltStorPool’ string as a storage pool.
This also means that if you forgot to define a storage pool prior deploying a resource, you will get an error message that LINSTOR could not find the storage pool named ‘DfltStorPool’.
3.5. Using LINSTOR without DRBD
LINSTOR can be used without DRBD as well. Without DRBD, LINSTOR is able to provision volumes from LVM and ZFS backed storage pools, and create those volumes on individual nodes in your LINSTOR cluster.
Currently LINSTOR supports the creation of LVM and ZFS volumes with the option of layering some combinations of LUKS, DRBD, or NVMe-oF/NVMe-TCP on top of those volumes.
For example, assume you have a Thin LVM backed storage pool defined in your LINSTOR cluster
named, thin-lvm:
# linstor storage-pool list ╭──────────────────────────────────────────────────────────────╮ ┊ StoragePool ┊ Node ┊ Driver ┊ PoolName ┊ ... ┊ ╞══════════════════════════════════════════════════════════════╡ ┊ thin-lvm ┊ linstor-a ┊ LVM_THIN ┊ drbdpool/thinpool ┊ ... ┊ ┊ thin-lvm ┊ linstor-b ┊ LVM_THIN ┊ drbdpool/thinpool ┊ ... ┊ ┊ thin-lvm ┊ linstor-c ┊ LVM_THIN ┊ drbdpool/thinpool ┊ ... ┊ ┊ thin-lvm ┊ linstor-d ┊ LVM_THIN ┊ drbdpool/thinpool ┊ ... ┊ ╰──────────────────────────────────────────────────────────────╯
You could use LINSTOR to create a Thin LVM on linstor-d that’s 100GiB in size using the
following commands:
# linstor resource-definition create rsc-1
# linstor volume-definition create rsc-1 100GiB
# linstor resource create --layer-list storage \
--storage-pool thin-lvm linstor-d rsc-1
You should then see you have a new Thin LVM on linstor-d. You can extract the device path from
LINSTOR by listing your linstor resources with the --machine-readable flag set:
# linstor --machine-readable resource list | grep device_path
"device_path": "/dev/drbdpool/rsc-1_00000",
If you wanted to layer DRBD on top of this volume, which is the default --layer-list option in
LINSTOR for ZFS or LVM backed volumes, you would use the following resource creation pattern
instead:
# linstor resource-definition create rsc-1
# linstor volume-definition create rsc-1 100GiB
# linstor resource create --layer-list drbd,storage \
--storage-pool thin-lvm linstor-d rsc-1
You would then see that you have a new Thin LVM backing a DRBD volume on linstor-d:
# linstor --machine-readable resource list | grep -e device_path -e backing_disk
"device_path": "/dev/drbd1000",
"backing_disk": "/dev/drbdpool/rsc-1_00000",
The following table shows which layer can be followed by which child-layer:
| Layer | Child layer |
|---|---|
DRBD |
CACHE, WRITECACHE, NVME, LUKS, STORAGE |
CACHE |
WRITECACHE, NVME, LUKS, STORAGE |
WRITECACHE |
CACHE, NVME, LUKS, STORAGE |
NVME |
CACHE, WRITECACHE, LUKS, STORAGE |
LUKS |
STORAGE |
STORAGE |
– |
| One layer can only occur once in the layer list. |
For information about the prerequisites for the LUKS layer, refer to the Encrypted
Volumes section of this User Guide.
|
3.5.1. NVMe-oF/NVMe-TCP LINSTOR layer
NVMe-oF/NVMe-TCP allows LINSTOR to connect diskless resources to a node with the same resource where the data is stored over NVMe fabrics. This leads to the advantage that resources can be mounted without using local storage by accessing the data over the network. LINSTOR is not using DRBD in this case, and therefore NVMe resources provisioned by LINSTOR are not replicated, the data is stored on one node.
NVMe-oF only works on RDMA-capable networks and NVMe-TCP on networks that can carry IP
traffic. You can use tools such as lshw or ethtool to verify the capabilities of your
network adapters.
|
To use NVMe-oF/NVMe-TCP with LINSTOR the package nvme-cli needs to be installed on every node
which acts as a satellite and will use NVMe-oF/NVMe-TCP for a resource. For example, on a
DEB-based system, to install the package, enter the following command:
# apt install nvme-cli
If you are not on a DEB-based system, use the suitable command for installing
packages on your operating system, for example, on SLES: zypper; on RPM-based systems: dnf.
|
To make a resource which uses NVMe-oF/NVMe-TCP an additional parameter has to be given as you create the resource-definition:
# linstor resource-definition create nvmedata -l nvme,storage
As default the -l (layer-stack) parameter is set to drbd, storage when DRBD is used. If
you want to create LINSTOR resources with neither NVMe nor DRBD you have to set the -l
parameter to only storage.
|
To use NVMe-TCP rather than the default NVMe-oF, the following property needs to be set:
# linstor resource-definition set-property nvmedata NVMe/TRType tcp
The property NVMe/TRType can alternatively be set on resource-group or controller level.
Next, create the volume-definition for your resource:
# linstor volume-definition create nvmedata 500G
Before you create the resource on your nodes you have to know where the data will be stored locally and which node accesses it over the network.
First, create the resource on the node where your data will be stored:
# linstor resource create alpha nvmedata --storage-pool pool_ssd
On the nodes where the resource-data will be accessed over the network, the resource has to be defined as diskless:
# linstor resource create beta nvmedata --nvme-initiator
Now you can mount the resource nvmedata on one of your nodes.
| If your nodes have more than one NIC you should force the route between them for NVMe-of/NVME-TCP, otherwise multiple NICs could cause troubles. |
3.5.2. Writecache layer
A DM-Writecache device is composed of two devices: one storage device and one cache device. LINSTOR can setup such a writecache device, but needs some additional information, like the storage pool and the size of the cache device.
# linstor storage-pool create lvm node1 lvmpool drbdpool # linstor storage-pool create lvm node1 pmempool pmempool # linstor resource-definition create r1 # linstor volume-definition create r1 100G # linstor volume-definition set-property r1 0 Writecache/PoolName pmempool # linstor volume-definition set-property r1 0 Writecache/Size 1% # linstor resource create node1 r1 --storage-pool lvmpool --layer-list WRITECACHE,STORAGE
The two properties set in the examples are mandatory, but can also be set on controller level
which would act as a default for all resources with WRITECACHE in their --layer-list.
However, note that the Writecache/PoolName refers to the corresponding node. If the node does
not have a storage pool named pmempool you will get an error message.
The four mandatory parameters required by
DM-Writecache
are either configured through a property or figured out by LINSTOR. The optional properties
listed in the mentioned link can also be set through a property. Refer to linstor controller
set-property --help for a list of Writecache/* property keys.
Using --layer-list DRBD,WRITECACHE,STORAGE while having DRBD configured to use external
metadata, only the backing device will use a writecache, not the device holding the external
metadata.
3.5.3. Cache layer
LINSTOR can also setup a
DM-Cache device,
which is very similar to the DM-Writecache from the previous section. The major difference is
that a cache device is composed by three devices: one storage device, one cache device and one
meta device. The LINSTOR properties are quite similar to those of the writecache but are located
in the Cache namespace:
# linstor storage-pool create lvm node1 lvmpool drbdpool # linstor storage-pool create lvm node1 pmempool pmempool # linstor resource-definition create r1 # linstor volume-definition create r1 100G # linstor volume-definition set-property r1 0 Cache/CachePool pmempool # linstor volume-definition set-property r1 0 Cache/Cachesize 1% # linstor resource create node1 r1 --storage-pool lvmpool --layer-list CACHE,STORAGE
Rather than Writecache/PoolName (as when configuring the Writecache layer) the Cache
layer’s only required property is called Cache/CachePool. The reason for this is that the
Cache layer also has a Cache/MetaPool which can be configured separately or it defaults to the
value of Cache/CachePool.
|
Refer to linstor controller set-property --help for a list of Cache/* property keys and
default values for omitted properties.
Using --layer-list DRBD,CACHE,STORAGE while having DRBD configured to use external metadata,
only the backing device will use a cache, not the device holding the external metadata.
3.5.4. Storage layer
The storage layer will provide new devices from well known volume managers like LVM, ZFS or
others. Every layer combination needs to be based on a storage layer, even if the resource
should be diskless – for that type there is a dedicated diskless provider type.
For a list of providers with their properties refer to Storage Providers.
For some storage providers LINSTOR has special properties:
StorDriver/WaitTimeoutAfterCreate-
If LINSTOR expects a device to appear after creation (for example after calls of
lvcreate,zfs create,…), LINSTOR waits per default 500ms for the device to appear. These 500ms can be overridden by this property. StorDriver/dm_stats-
If set to
trueLINSTOR callsdmstats create $deviceafter creation anddmstats delete $device --allregionsafter deletion of a volume. Currently only enabled for LVM and LVM_THIN storage providers.
3.6. Storage providers
LINSTOR has a few storage providers. The most used ones are LVM and ZFS. But also for those two providers there are already sub-types for their thin-provisioned variants.
-
Diskless: This provider type is mostly required to have a storage pool that can be configured with LINSTOR properties like
PrefNicas described in Managing Network Interface Cards. -
LVM / LVM-Thin: The administrator is expected to specify the LVM volume group or the thin-pool (in form of “LV/thinpool”) to use the corresponding storage type. These drivers support following properties for fine-tuning:
-
StorDriver/LvcreateOptions: The value of this property is appended to everylvcreate …call LINSTOR executes.
-
-
ZFS / ZFS-Thin: The administrator is expected to specify the ZPool that LINSTOR should use. These drivers support following properties for fine-tuning:
-
StorDriver/ZfscreateOptions: The value of this property is appended to everyzfs create …call LINSTOR executes.
-
-
File / FileThin: Mostly used for demonstration or experiments. LINSTOR will reserve a file in a given directory and will configure a loop device on top of that file.
-
SPDK: The administrator is expected to specify the logical volume store which LINSTOR should use. The usage of this storage provider implies the usage of the NVME Layer.
-
Remote-SPDK: This special storage provider currently requires to be run on a “special satellite”. Refer to Remote SPDK Provider for more details.
-
3.6.1. Mixing storage pools of different storage providers
While LINSTOR resources are most often backed by storage pools that consist of only one storage provider type, it is possible to use storage pools of different types to back a LINSTOR resource. This is called mixing storage pools. This might be useful when migrating storage resources but could also have some consequences. Read this section carefully before configuring mixed storage pools.
Prerequisites for mixing storage pools
Mixing storage pools has the following prerequisites:
-
LINSTOR version 1.27.0 or later
-
LINSTOR satellite nodes need to have DRBD version 9.2.7 (or 9.1.18 if on the 9.1 branch) or later
-
The LINSTOR property
AllowMixingStoragePoolDriverset totrueon the LINSTOR controller, resource group, or resource definition LINSTOR object level
Because of LINSTOR object hierarchy, if you set the AllowMixingStoragePoolDriver property on the LINSTOR controller object (linstor controller set-property AllowMixingStoragePoolDriver true), the property will apply to all LINSTOR resources, except for any resource groups or resource definitions where you have set the property to false.
|
When storage pools are considered mixed
If one of following criteria is met, LINSTOR will consider the setup as storage pool mixing:
-
The storage pools have different extent sizes. For example, by default LVM has a 4MiB extent size while ZFS (since version 2.2.0) has a 16KiB extent size.
-
The storage pools have different DRBD initial synchronization strategies, for example, a full initial synchronization, or a prepartory partial synchronization. Using
zfsandzfsthinstorage provider-backed storage pools together would not meet this criterion because they each use a preparatory partial DRBD synchronization strategy.
Consequences of mixing storage pools
When you create a LINSTOR resource that is backed by mixing storage pools, there might be consequences that affect LINSTOR features.
For example, when you mix lvm and lvmthin storage pools, any resource backed by such a mix will be considered a thick resource.
This is the mechanism by which LINSTOR allows for storage pool mixing.
An exception to this is the previously mentioned example of using zfs and zfsthin storage pools.
LINSTOR does not consider this mixing storage pools because combining a zfs and a zfsthin storage pool does not meet either of the two storage pool mixing criteria described earlier.
This is because the two storage pools will have the same extent size, and both storage pools will use the same DRBD initial synchronization strategy: day 0-based partial synchronization.
3.6.2. Remote SPDK provider
A storage pool with the type remote SPDK can only be created on a “special satellite”. For this you first need to start a new satellite using the command:
$ linstor node create-remote-spdk-target nodeName 192.168.1.110
This will start a new satellite instance running on the same machine as the controller. This special satellite will do all the REST based RPC communication towards the remote SPDK proxy. As the help message of the LINSTOR command shows, the administrator might want to use additional settings when creating this special satellite:
$ linstor node create-remote-spdk-target -h
usage: linstor node create-remote-spdk-target [-h] [--api-port API_PORT]
[--api-user API_USER]
[--api-user-env API_USER_ENV]
[--api-pw [API_PW]]
[--api-pw-env API_PW_ENV]
node_name api_host
The difference between the --api-* and their corresponding --api-\*-env versions is that
the version with the -env ending will look for an environment variable containing the actual
value to use whereas the --api-\* version directly take the value which is stored in the
LINSTOR property. Administrators might not want to save the --api-pw in plain text, which
would be clearly visible using commands like linstor node list-property <nodeName>.
Once that special satellite is up and running the actual storage pool can be created:
$ linstor storage-pool create remotespdk -h
usage: linstor storage-pool create remotespdk [-h]
[--shared-space SHARED_SPACE]
[--external-locking]
node_name name driver_pool_name
Whereas node_name is self-explanatory, name is the name of the LINSTOR storage pool and
driver_pool_name refers to the SPDK logical volume store.
Once this remotespdk storage pool is created the remaining procedure is quite similar as
using NVMe: First the target has to be created by creating a simple “diskful” resource followed
by a second resource having the --nvme-initiator option enabled.
3.7. Managing network interface cards
LINSTOR can deal with multiple network interface cards (NICs) in a machine. They are called “net interfaces” in LINSTOR speak.
When a satellite node is created a first net interface gets created implicitly with the
name default. You can use the --interface-name option of the node create command to give
it a different name, when you create the satellite node.
|
For existing nodes, additional net interfaces are created like this:
# linstor node interface create node-0 nic_10G 192.168.43.231
Net interfaces are identified by the IP address only, the name is arbitrary and is not related to the NIC name used by Linux. While the LINSTOR net interface name is arbitrary, there are some naming constraints:
-
Minimum length of three characters
-
Maximum length of 32 characters
-
Must start with a letter (case-insensitive) or an underscore (
_) -
Valid characters are alphanumeric characters, an underscore (
_), or a hypen (-)
After creating a net interface, you can then assign it to a node so that the node’s DRBD traffic will be routed through the corresponding NIC.
# linstor node set-property node-0 PrefNic nic_10G
It is also possible to set the PrefNic property on a storage pool. DRBD traffic from
resources using the storage pool will be routed through the corresponding NIC. However, you need
to be careful here. Any DRBD resource that requires Diskless storage, for example, diskless
storage acting in a tiebreaker role for DRBD quorum purposes, will go through the default
satellite node net interface, until you also set the PrefNic property for the default net
interface. Setups can become complex. It is far easier and safer, if you can get away with it,
to set the PrefNic property at the node level. This way, all storage pools on the node,
including Diskless storage pools, will use your preferred NIC.
|
If you need to add an interface for only controller-satellite traffic, you can add an
interface using the above node interface create command. Then you modify the connection to
make it the active controller-satellite connection. For example, if you added an interface named
satconn_1G on all nodes, after adding the interface, you can then tell LINSTOR to use this
interface for controller-satellite traffic by entering the following command:
# linstor node interface modify node-0 satconn_1G --active
You can verify this change by using the linstor node interface list node-0 command. Output
from the command should show that the StltCon label applies to the satconn_1G interface.
While this method routes DRBD traffic through a specified NIC, it is not possible through
linstor commands only, to route LINSTOR controller-client traffic through a specific NIC, for
example, commands that you issue from a LINSTOR client to the controller. To achieve this, you
can either:
-
Specify a LINSTOR controller by using methods outlined in Using the LINSTOR client and have the only route to the controller as specified be through the NIC that you want to use for controller-client traffic.
-
Use Linux tools such as
ip routeandiptablesto filter LINSTOR client-controller traffic, port number 3370, and route it through a specific NIC.
3.7.1. Creating multiple DRBD paths with LINSTOR
To use
multiple
network paths for DRBD setups, the PrefNic property is not sufficient. Instead the linstor
node interface and linstor resource-connection path commands should be used, as shown below.
# linstor node interface create alpha nic1 192.168.43.221 # linstor node interface create alpha nic2 192.168.44.221 # linstor node interface create bravo nic1 192.168.43.222 # linstor node interface create bravo nic2 192.168.44.222 # linstor resource-connection path create alpha bravo myResource path1 nic1 nic1 # linstor resource-connection path create alpha bravo myResource path2 nic2 nic2
The first four commands in the example define a network interface (nic1 and nic2) for each
node (alpha and bravo) by specifying the network interface’s IP address. The last two
commands create network path entries in the DRBD .res file that LINSTOR generates. This is the
relevant part of the resulting .res file:
resource myResource {
...
connection {
path {
host alpha address 192.168.43.221:7000;
host bravo address 192.168.43.222:7000;
}
path {
host alpha address 192.168.44.221:7000;
host bravo address 192.168.44.222:7000;
}
}
}
While it is possible to specify a port number to be used for LINSTOR satellite traffic
when creating a node interface, this port number is ignored when creating a DRBD resource
connection path. Instead, the command will assign a port number dynamically, starting from port
number 7000 and incrementing up. If you want to change the port number range that LINSTOR uses
when dynamically assigning ports, you can set the TcpPortAutoRange property on the LINSTOR
controller object. Refer to linstor controller set-property --help for more details. The
default range is 7000-7999.
|
How adding a new DRBD path affects the default path
The NIC that is first in order on a LINSTOR satellite node is named the default net interface.
DRBD traffic traveling between two nodes that do not have an explicitly configured resource
connection path will take an implicit path that uses the two nodes’ default net interfaces.
When you add a resource connection path between two nodes for a DRBD-backed resource, DRBD
traffic between the two nodes will use this new path only, although a default network
interface will still exist on each node. This can be significant if your new path uses different
NICs than the implicit default path.
To use the default path again, in addition to any new paths, you will need to explicitly add it. For example:
# linstor resource-connection path create alpha bravo myResource path3 default default
Although the newly created path3 uses net interfaces that are named default on the two
nodes, the path itself is not a default path because other paths exist, namely path1 and
path2. The new path, path3, will just act as a third possible path, and DRBD traffic and
path selection behavior will be as described in the next section.
Multiple DRBD paths behavior
The behavior of a multiple DRBD paths configuration will be different depending on the DRBD transport type. From the DRBD User Guide[4]:
“The TCP transport uses one path at a time. If the backing TCP connections get dropped, or show timeouts, the TCP transport implementation tries to establish a connection over the next path. It goes over all paths in a round-robin fashion until a connection gets established.
“The RDMA transport uses all paths of a connection concurrently and it balances the network traffic between the paths evenly.”
3.8. Encrypted volumes
LINSTOR can handle transparent encryption of DRBD volumes. dm-crypt is used to encrypt the provided storage from the storage device.
To use dm-crypt, verify that cryptsetup is installed before
you start the satellite.
|
Basic steps to use encryption:
-
Create a master passphrase
-
Add
luksto the layer-list. Note that all plugins (e.g., Proxmox) require a DRBD layer as the top most layer if they do not explicitly state otherwise. -
Don’t forget to re-enter the master passphrase after a controller restart.
3.8.1. Encryption commands
Below are details about the commands.
Before LINSTOR can encrypt any volume a master passphrase needs to be created. This can be done with the LINSTOR client.
# linstor encryption create-passphrase
crypt-create-passphrase will wait for the user to input the initial master passphrase
(as all other crypt commands will with no arguments).
If you ever want to change the master passphrase this can be done with:
# linstor encryption modify-passphrase
The luks layer can be added when creating the resource-definition or the resource
itself, whereas the former method is recommended since it will be automatically applied
to all resource created from that resource-definition.
# linstor resource-definition create crypt_rsc --layer-list luks,storage
To enter the master passphrase (after controller restart) use the following command:
# linstor encryption enter-passphrase
| Whenever the linstor-controller is restarted, the user has to send the master passphrase to the controller, otherwise LINSTOR is unable to reopen or create encrypted volumes. |
3.8.2. Automatic passphrase
It is possible to automate the process of creating and re-entering the master passphrase.
To use this, either an environment variable called MASTER_PASSPHRASE or an entry in
/etc/linstor/linstor.toml containing the master passphrase has to be created.
The required linstor.toml looks like this:
[encrypt] passphrase="example"
If either one of these is set, then every time the controller starts it will check whether a master passphrase already exists. If there is none, it will create a new master passphrase as specified. Otherwise, the controller enters the passphrase.
If a master passphrase is already configured, and it is not the same one as specified
in the environment variable or linstor.toml, the controller will be unable to re-enter the
master passphrase and react as if the user had entered a wrong passphrase. This can only be
resolved through manual input from the user, using the same commands as if the controller was
started without the automatic passphrase.
|
In case the master passphrase is set in both an environment variable and the
linstor.toml, only the master passphrase from the linstor.toml will be used.
|
3.9. Checking cluster state
LINSTOR provides various commands to check the state of your cluster. These commands start with a ‘list’ precursor, after which, various filtering and sorting options can be used. The ‘–groupby’ option can be used to group and sort the output in multiple dimensions.
# linstor node list # linstor storage-pool list --groupby Size
3.10. Evacuating a node
You can use the LINSTOR command node evacuate to evacuate a node of its resources, for
example, if you are preparing to delete a node from your cluster, and you need the node’s
resources moved to other nodes in the cluster. After successfully evacuating a node, the node’s
LINSTOR status will show as “EVACUATE” rather than “Online”, and it will have no LINSTOR
resources on it.
| If you are evacuating a node where LINSTOR is deployed within another environment, such as Kubernetes, or OpenNebula, you need to move the node’s LINSTOR-backed workload to another node in your cluster before evacuating its resources, or else reduce the replica count by one, for each resource that the node is hosting. For special actions and considerations within a Kubernetes environment, see the Evacuating a node in Kubernetes section. For a LINSTOR node in OpenNebula, you need to perform a live migration of the OpenNebula LINSTOR-backed virtual machines that your node hosts, to another node in your cluster, before evacuating the node’s resources. |
Evacuate a node using the following steps:
-
Determine if any resources on the node that you want to evacuate are “InUse”. The “InUse” status corresponds to a resource being in a DRBD Primary state. Before you can evacuate a node successfully, none of the resources on the node should be “InUse”, otherwise LINSTOR will fail to remove the “InUse” resources from the node as part of the evacuation process.
-
Run
linstor node evacuate <node_name>. You will get a warning if there is no suitable replacement node for a resource on the evacuating node. For example, if you have three nodes and you want to evacuate one, but your resource group sets a placement count of three, you will get a warning that will prevent the node from removing the resources from the evacuating node. This is because resource replicas on an evacuating node can only be reassigned to meet their current replica counts if you have at least one more node in your cluster that participates in the LINSTOR storage pool(s) that back(s) LINSTOR resources on the node that you are evacuating. -
Verify that the status of
linstor node listfor your node is “EVACUATE” rather than “Online”. -
Check the “State” status of resources on your node, by using the
linstor resource listcommand. You should see syncing activity that will last for sometime, depending on the size of the data sets in your node’s resources. -
List the remaining resources on the node by using the command
linstor resource list --nodes <node_name>. If any are left, verify whether they are just waiting for the sync to complete. -
Verify that there are no resources on the node, by using the
linstor resource listcommand. -
Remove the node from the cluster by using the command
linstor node delete <node_name>.
3.10.1. Evacuating multiple nodes
Some evacuation cases might need special planning. For example, if you are evacuating more than one node, you can exclude the nodes from being a candidate in the LINSTOR resource autoplacement strategy. You can do this by using the following command on each node that you want to evacuate:
# linstor node set-property <node_name> AutoplaceTarget false
This ensures that LINSTOR will not place resources from a node that you are evacuating onto another node that you plan on evacuating.
3.10.2. Restoring an evacuating node
If you already ran a node evacuate command that has either completed or still has resources in
an “Evacuating” state, you can remove the “Evacuating” state from a node by using the node
restore command. This will work if you have not yet run a node delete command.
After restoring the node, you should use the node set-property <node_name> AutoplaceTarget
true command, if you previously set the AutoplaceTarget property to “false”. This way,
LINSTOR can again place resources onto the node automatically, to fulfill placement count
properties that you might have set for resources in your cluster.
If LINSTOR has already evacuated resources when running a node restore command,
evacuated resources will not automatically return to the node. If LINSTOR is still in the
process of evacuating resources, this process will continue until LINSTOR has placed the
resources on other nodes. You will need to manually “move” the resources that were formerly on
the restored node. You can do this by first creating the resources on the restored node and then
deleting the resources from another node where LINSTOR might have placed them. You can use the
resource list command to show you on which nodes your resources are placed.
|
3.11. Working with resource snapshots and backups
LINSTOR supports taking snapshots of resources that are backed by thin LVM or ZFS storage pools. By creating and shipping snapshots, you can back up LINSTOR resources to other storage: either to S3 storage or to storage in another (or the same!) LINSTOR cluster. The following sub-sections describe various aspects of working with snapshots and backups.
3.11.1. Creating a snapshot
Assuming a resource definition named ‘resource1’ which has been placed on some nodes, you can create a snapshot of the resource by entering the following command:
# linstor snapshot create resource1 snap1
This will create a snapshot on all nodes where the resource is present. LINSTOR will create consistent snapshots, even when the resource is in active use.
Setting the resource definition property AutoSnapshot/RunEvery LINSTOR will automatically
create snapshots every X minutes. The optional property AutoSnapshot/Keep can be used to
clean up old snapshots which were created automatically. No manually created snapshot will be
cleaned up or deleted. If AutoSnapshot/Keep is omitted (or ⇐ 0), LINSTOR will keep the last
10 snapshots by default.
# linstor resource-definition set-property AutoSnapshot/RunEvery 15 # linstor resource-definition set-property AutoSnapshot/Keep 5
3.11.2. Restoring a snapshot
The following steps restore a snapshot to a new resource. This is possible even when the original resource has been removed from the nodes where the snapshots were taken.
First define the new resource with volumes matching those from the snapshot:
# linstor resource-definition create resource2 # linstor snapshot volume-definition restore --from-resource resource1 \ --from-snapshot snap1 --to-resource resource2
At this point, additional configuration can be applied if necessary. Then, when ready, create resources based on the snapshots:
# linstor snapshot resource restore --from-resource resource1 \ --from-snapshot snap1 --to-resource resource2
This will place the new resource on all nodes where the snapshot is present. The nodes on which
to place the resource can also be selected explicitly; see the help (linstor snapshot resource
restore --help).
3.11.3. Rolling back to a snapshot
LINSTOR can roll a resource back to a snapshot state. The resource must not be in use. That is, the resource must not be mounted on any nodes or be primary on DRBD. If the resource is in use, consider whether you can achieve your goal by restoring the snapshot instead.
Rollback is performed as follows:
# linstor snapshot rollback <resource-name> <snapshot-name>
The snapshot rollback feature in LINSTOR versions since 1.31.2, has different behavior than previous versions. In previous LINSTOR versions, you could only roll back resources from a snapshot if the snapshot existed on all diskful nodes hosting the resource. For example, in previous LINSTOR versions, if you created a snapshot of a resource that was deployed diskfully on two nodes, then deployed the resource on another node or nodes, you would no longer be able to roll back the resource from the snapshot you created earlier. If you tried to roll back the resource, you would get an error message saying that you cannot roll back the resource because the snapshot does not exist on the new node.
This limitation does not exist in LINSTOR versions since 1.31.2 because the new node can simply create an empty resource and synchronize the data from another diskful node, after the snapshot rollback. However, the snapshot rollback behavior since version 1.31.2 has a counterintuitive side effect. If you delete a resource with a snapshot from a node or nodes, then roll back the resource from a snapshot, the resource will be restored on diskful nodes for the resource, including the node or nodes that you deleted the resource from. While this side effect can result in the resource being placed on more nodes than you might expect, after a snapshot rollback the LINSTOR periodic “balance resource task” will eventually restore the number of diskful resources in your cluster to the resource’s placement count.
3.12. Shipping snapshots
Snapshots can be shipped between nodes in the same LINSTOR cluster, between different LINSTOR clusters, or to S3 storage such as Amazon S3 or MinIO.
The following tools need to be installed on the satellites that are going to send or receive snapshots:
-
zstdis needed to compress the data before it is being shipped -
thin-send-recvis needed to ship data when using LVM thin-provisioned volumes
| You need to restart the satellite node (or nodes) after installing these tools, otherwise LINSTOR will not be able to use them. |
3.12.1. Working with snapshot shipping remotes
In a LINSTOR cluster, a snapshot shipping target is called a remote. Currently, there are two different types of remotes that you can use when shipping snapshots: LINSTOR remotes and S3 remotes. LINSTOR remotes are used to ship snapshots to a different LINSTOR cluster or within the same LINSTOR cluster. S3 remotes are used to ship snapshots to AWS S3, MinIO, or any other service using S3 compatible object storage. A shipped snapshot on a remote is also called a backup.
| Since a remote needs to store sensitive data, such as passwords, it is necessary to have encryption enabled whenever you want to use a remote in any way. How to set up LINSTOR encryption is described here. |
Creating an S3 remote
To create an S3 remote, LINSTOR will need to know the endpoint (that is, the URL of the target S3 server), the name of the target bucket, the region the S3 server is in, and the access-key and secret-key used to access the bucket. If the command is sent without adding the secret-key, a prompt will pop up to enter it in. The command should look like this:
# linstor remote create s3 myRemote s3.us-west-2.amazonaws.com \ my-bucket us-west-2 admin password
Usually, LINSTOR uses the endpoint and bucket to create an URL using the
virtual-hosted-style for its access to the given bucket (for example
my-bucket.s3.us-west-2.amazonaws.com). Should your setup not allow access this way, change the
remote to path-style access (for example s3.us-west-2.amazonaws.com/my-bucket) by adding the
--use-path-style argument to make LINSTOR combine the parameters accordingly.
|
Creating a LINSTOR remote
To create a LINSTOR remote, you only need to specify a name for the remote and the URL or IP address of the controller of the target cluster. An example command is as follows:
# linstor remote create linstor myRemote 192.168.0.15
To ship a snapshot between two LINSTOR clusters, or within the same LINSTOR cluster, besides
creating a remote on the source cluster that points to the target cluster, on the target
cluster, you also need to create a LINSTOR remote that points to the source cluster. This is to
prevent your target cluster from accepting backup shipments from unknown sources. You can create
such a remote on your target cluster by specifying the cluster ID of the source cluster in an
additional argument to the remote create command. Refer to
Shipping a snapshot of a resource to a LINSTOR remote for details.
Listing, modifying, and deleting remotes
To see all the remotes known to the local cluster, use linstor remote list. To delete a
remote, use linstor remote delete myRemoteName. If you need to modify an existing remote, use
linstor remote modify to change it.
Specifying a LINSTOR passphrase when creating a remote
When the snapshot that you want to ship contains a LUKS layer, the remote on the target cluster also needs the passphrase of the source cluster set when you create the remote. This is because the LINSTOR passphrase is used to encrypt the LUKS passphrase. To specify the source cluster’s LINSTOR passphrase when you create a LINSTOR remote on the target cluster, enter:
$ linstor --controllers <TARGET_CONTROLLER> remote create linstor \ --cluster-id <SOURCE_CLUSTER_ID> --passphrase <SOURCE_CONTROLLER_PASSPHRASE> <NAME> <URL>
For LINSTOR to LINSTOR snapshot shipping, you must also create a LINSTOR remote on the source cluster. For simplicity sake, although not strictly necessary, you can specify the target cluster’s LINSTOR passphrase when you create a LINSTOR remote for the target cluster on the source cluster, before you ship backups or snapshots. On the source cluster, enter:
$ linstor --controllers <SOURCE_CONTROLLER> remote create linstor \ --cluster-id <TARGET_CLUSTER_ID> --passphrase <TARGET_CONTROLLER_PASSPHRASE> <NAME> <URL>
| If you are specifying a LINSTOR controller node (perhaps because you have a highly available controller), when creating a remote, you can specify the controller either by an IP address or a resolvable hostname. |
3.12.2. Shipping snapshots to an S3 remote
To ship a snapshot to an S3 remote, that is, to create a backup of a resource on an S3 remote,
all you need to do is to specify an S3 remote that the current cluster can reach and then
specify the resource that should be shipped. The following command will create a snapshot of a
resource, myRsc, and ship it to the given S3 remote, myRemote:
# linstor backup create myRemote myRsc
If this isn’t the first time you shipped a backup of this resource (to that remote) and the
snapshot of the previous backup hasn’t been deleted yet, an incremental backup will be shipped.
To force the creation of a full backup, add the --full argument to the command. Getting a
specific node to ship the backup is also possible by using --node myNode, but if the specified
node is not available or only has the resource diskless, a different node will be chosen.
3.12.3. Shipping snapshots to a LINSTOR remote
You can ship a snapshot between two LINSTOR clusters by specifying a LINSTOR remote. Snapshot shipping to a LINSTOR remote also requires at least one diskful resource on the source side (where you issue the shipping command).
Creating a remote for a LINSTOR target cluster
Before you can ship a snapshot to a LINSTOR target cluster, on the target side, you need to create a LINSTOR remote and specify the cluster ID of the source cluster as the remote:
$ linstor remote create linstor --cluster-id <SOURCE_CLUSTER_ID> <NAME> <URL>
If you do not specify the cluster ID of your source cluster when you create a LINSTOR
remote on your target cluster, you will receive an “Unknown Cluster” error when you try to ship
a backup. To get the cluster ID of your source cluster, you can enter the command linstor
controller list-properties|grep -i cluster from the source cluster.
|
| If you might be creating and shipping snapshots of resources that have a LUKS layer, then you also need to specify a passphrase when creating a remote, as described in the Specifying a LINSTOR passphrase when creating a remote section. |
In the remote create command shown above, <NAME> is an arbitrary name that you specify to
identify the remote. <URL> is either the IP address of the source (remote) LINSTOR controller
or its resolvable hostname. If you have configured a highly available LINSTOR controller, use
its virtual IP address (VIP) or the VIP’s resolvable name.
Shipping a snapshot of a resource to a LINSTOR remote
To create a snapshot of a resource from your source LINSTOR cluster and ship it to your target LINSTOR cluster, enter the following command:
# linstor backup ship myRemote localRsc targetRsc
This command essentially creates a backup of your local resource on your target LINSTOR remote.
Additionally, you can use --source-node to specify which node should send and --target-node
to specify which node should receive the backup. In case those nodes are not available, the
LINSTOR controller will choose different nodes automatically.
If targetRsc is already a deployed resource on the remote cluster, snapshots in the
backup shipping for localRsc will ship to the remote cluster but they will not be restored to
the remote cluster. The same is true if you specify the --download-only option with the
linstor backup ship command.
|
Shipping a snapshot of a resource to a LINSTOR remote over a WAN
If you will be shipping backup snapshots to a remote LINSTOR cluster over a WAN, you will also need to create a node net interface on LINSTOR satellite nodes that will be shipping backups. The node net interface should correspond to the NIC through which a satellite node can reach the remote cluster. An example command for this might be:
# linstor node interface create <node-name> <net-interface-name> <remote-cluster-wan-ip>
The <remote-cluster-wan-ip> would be the WAN IP address of the remote LINSTOR controller node.
When you ship a backup, use the --target-net-if argument to specify the network interface that you created having the WAN IP address of your remote LINSTOR cluster.
An example command structure would be:
# linstor backup ship myRemote localRsc targetRsc --target-net-if <net-interface-name>
3.12.4. Snapshot shipping within a single LINSTOR cluster
If you want to ship a snapshot inside the same cluster, you just need to create a LINSTOR remote that points to the local controller. To do this if you are logged into your LINSTOR controller, for example, enter the following command:
# linstor remote create linstor --cluster-id <CLUSTER_ID> <NAME> localhost
You can then follow the instructions to ship a snapshot to a LINSTOR remote.
3.12.5. Listing backups on a remote
To show which backups exist on a specific S3 remote, use linstor backup list myS3Remote. A
resource-name can be added to the command as a filter to only show backups of that specific
resource by using the argument --resource myRsc. If you use the --other argument, only
entries in the bucket that LINSTOR does not recognize as a backup will be shown. LINSTOR always
names backups in a certain way, and if an item in the remote is named according to this schema,
it is assumed that it is a backup created by LINSTOR – so this list will show everything else.
To show which backups exist on a LINSTOR remote, use the linstor snapshot list command on your
LINSTOR target cluster.
3.12.6. Deleting backups on a remote
There are several options when it comes to deleting backups:
-
linstor backup delete all myRemote: This command deletes ALL S3-objects on the given remote, provided that they are recognized to be backups, that is, fit the expected naming schema. There is the option--clusterto only delete backups that were created by the current cluster. -
linstor backup delete id myRemote my-rsc_back_20210824_072543: This command deletes a single backup from the given remote – namely the one with the given id, which consists of the resource-name, the automatically generated snapshot-name (back_timestamp) and, if set, thebackup-suffix. The option--prefixlets you delete all backups starting with the given id. The option--cascadedeletes not only the specified backup, but all other incremental backups depending on it. -
linstor backup delete filter myRemote …: This command has a few different arguments to specify a selection of backups to delete.-t 20210914_120000will delete all backups made before 12 o’clock on the 14th of September, 2021.-n myNodewill delete all backups uploaded by the given node.-r myRscwill delete all backups with the given resource name. These filters can be combined as needed. Finally,--cascadedeletes not only the selected backup(s), but all other incremental backups depending on any of the selected backups. -
linstor backup delete s3key myRemote randomPictureInWrongBucket: This command will find the object with the given S3-key and delete it – without considering anything else. This should only be used to either delete non-backup items from the remote, or to clean up a broken backup that you are no longer able to delete by other means. Using this command to delete a regular, working backup will break that backup, so beware!
All commands that have the --cascade option will NOT delete a backup that has
incremental backups depending on it unless you explicitly add that option.
|
All linstor backup delete … commands have the --dry-run option, which will give you a
list of all the S3-objects that will be deleted. This can be used to ensure nothing that should
not be deleted is accidentally deleted.
|
3.12.7. Restoring backups from a remote
Maybe the most important task after creating a backup is restoring it. To restore a backup from
an S3 remote, you can use the linstor backup restore command.
With this command, you specify the name of the S3 remote to restore a backup from, the name of the target node, and a target resource to restore to on the node. If the resource name does not match an existing resource definition, LINSTOR will create the resource definition and resource.
Additionally, you need to specify the name of the resource on the remote that has the backup.
You do this by using either the --resource or --id arguments but not both.
By using the --resource option, you can restore the latest backup of the resource that you
specify, for example:
# linstor backup restore myRemote myNode targetRsc --resource sourceRsc
By using the --id option, you can restore the exact backup that you specify, for example, to
restore a backup of a resource other than the most recent. To get backup IDs, refer to
Listing backups on a remote.
# linstor backup restore myRemote myNode targetRsc --id sourceRsc_back_20210824_072543
When shipping a snapshot to a LINSTOR (not S3) remote, the snapshot is restored
immediately to the specified resource on the target (remote) cluster, unless you use the
--download-only option or else if the target resource has at least one replica.
|
When you restore a backup to a resource, LINSTOR will download all the snapshots from the last
full backup of the resource, up to the backup that you specified (when using the --id option)
or up to the latest backup (when using the --resource option). After downloading these
snapshots, LINSTOR restores the snapshots into a new resource. You can skip restoring the
snapshots into a new resources by adding the --download-only option to your backup restore
command.
LINSTOR can download backups to restore from any cluster, not just the one that uploaded them,
provided that the setup is correct. Specifically, the target resource cannot have any existing
resources or snapshots, and the storage pool(s) used need to have the same storage providers. If
the storage pool(s) on the target node has the exact same name(s) as on the cluster the backup
was created on, no extra action is necessary. If the nodes have different storage pool names,
then you need to use the --storpool-rename option with your backup restore command. This
option expects at least one oldname=newname pair. For every storage pool of the original
backup that is not named in that list, LINSTOR assumes that the storage pool name is exactly the
same on the target node.
To find out exactly which storage pools you will need rename, and how big the download and the
restored resource will be, you can use the command linstor backup info myRemote …. Similar
to the restore command, you need to specify either the --resource or --id option. When used
with the backup info command, these options have the same restrictions as when used with the
backup restore command. To show how much space will be left over in the local storage pools
after a restore, you can add the argument -n myNode. The same as with an actual restore
operation, the backup info command assumes that the storage pool names are exactly the same on
the target and source nodes. If that is not the case, you can use the --storpool-rename
option, just as with the restore command.
Restoring backups that have a LUKS layer
If the backup to be restored includes a LUKS layer, the --passphrase argument is required.
With it, the passphrase of the original cluster of the backup needs to be set so that LINSTOR
can decrypt the volumes after download and re-encrypt them with the local passphrase.
Controlling how many shipments are active at the same time
There might be cases where an automated task (such as LINSTOR scheduled backup shipping or an external tool) starts too many shipments at once, leading to an overload of the network or some of the nodes sending the backups.
In a case such as this, the solution is to reduce the amount of shipments that can happen at the
same time on the same node. This is done by using the property
BackupShipping/MaxConcurrentBackupsPerNode. This property can be set either on the controller
or on a specific node.
The expected value for this property is a number. Setting it to any negative number will be interpreted as “no limit”, while setting it to zero will result in this specific node not being eligible to ship any backups – or completely disabling backup shipping if the property is set to 0 on the controller.
Any other positive number is treated as a limit of concurrently active shipments per node. To determine which node will send a backup shipment, LINSTOR uses the following logic in the order shown:
-
The node specified in the command (
--source-nodefor shipping to another LINSTOR cluster,--nodefor shipping to S3 compatible storage) will ship the backup. -
The node that has the most available backup slots will ship the backup.
-
If no node has an available backup slot, the shipment will be added to a queue and started as soon as a different shipment has finished which leads to a backup slot becoming available.
Shipping a snapshot in the same cluster
Before you can ship a snapshot to a different node within the same LINSTOR cluster, you need to create a LINSTOR remote object that specifies your LINSTOR cluster’s ID. Refer to the Shipping a snapshot of a resource to a LINSTOR remote section for instructions on how to get your LINSTOR cluster’s ID and create such a remote. An example command would be:
# linstor remote create linstor self 127.0.0.1 --cluster-id <LINSTOR_CLUSTER_ID>
self is a user-specified, arbitrary name for your LINSTOR remote. You can specify a
different name if you want.
|
Both, the source and the target node have to have the resource for snapshot shipping deployed. Additionally, the target resource has to be deactivated.
# linstor resource deactivate nodeTarget resource1
| You cannot reactivate a resource with DRBD in its layer-list after deactivating such a resource. However, a successfully shipped snapshot of a DRBD resource can still be restored into a new resource. To manually start the snapshot shipping, use: |
# linstor backup ship self localRsc targetRsc
The snapshot ship command is considered deprecated and any bugs found with it will
not be fixed. Instead, to ship a snapshot in the same LINSTOR cluster, use the backup ship
command, as shown in the example above, with a remote pointing to your local controller. For
more details about configuring a LINSTOR cluster as a remote, see the
Shipping snapshots to a LINSTOR remote section.
|
By default, the snapshot shipping feature uses TCP ports from the range 12000-12999. To change
this range, the property SnapshotShipping/TcpPortRange, which accepts a to-from range, can be
set on the controller:
# linstor controller set-property SnapshotShipping/TcpPortRange 10000-12000
A resource can also be periodically shipped. To accomplish this, it is mandatory to set the
properties SnapshotShipping/TargetNode and SnapshotShipping/RunEvery on the
resource-definition. SnapshotShipping/SourceNode can also be set, but if omitted LINSTOR will
choose an active resource of the same resource-definition.
To allow incremental snapshot-shipping, LINSTOR has to keep at least the last shipped snapshot
on the target node. The property SnapshotShipping/Keep can be used to specify how many
snapshots LINSTOR should keep. If the property is not set (or ⇐ 0) LINSTOR will keep the last
10 shipped snapshots by default.
# linstor resource-definition set-property resource1 SnapshotShipping/TargetNode nodeTarget # linstor resource-definition set-property resource1 SnapshotShipping/SourceNode nodeSource # linstor resource-definition set-property resource1 SnapshotShipping/RunEvery 15 # linstor resource-definition set-property resource1 SnapshotShipping/Keep 5
3.13. Scheduled backup shipping
Starting with LINSTOR Controller version 1.19.0 and working with LINSTOR client version 1.14.0 or above, you can configure scheduled backup shipping for deployed LINSTOR resources.
Scheduled backup shipping consists of three parts:
-
A data set that consists of one or more deployed LINSTOR resources that you want to backup and ship
-
A remote destination to ship backups to (another LINSTOR cluster or an S3 instance)
-
A schedule that defines when the backups should ship
| LINSTOR backup shipping only works for deployed LINSTOR resources that are backed by thin-provisioned LVM and ZFS storage pools, because these are the storage pool types with snapshot support in LINSTOR. |
3.13.1. Creating a backup shipping schedule
You create a backup shipping schedule by using the LINSTOR client schedule create command and
defining the frequency of backup shipping using cron syntax. You also need to set options
that name the schedule and define various aspects of the backup shipping, such as on-failure
actions, the number of local and remote backup copies to keep, and whether to also schedule
incremental backup shipping.
At a minimum, the command needs a schedule name and a full backup cron schema to create a backup shipping schedule. An example command would look like this:
# linstor schedule create \ --incremental-cron '* * * * *' \ (1) --keep-local 5 \ (2) --keep-remote 4 \ (3) --on-failure RETRY \ (4) --max-retries 10 \ (5) <schedule_name> \ (6) '* * * * *' # full backup cron schema (7)
| Enclose cron schemas within single or double quotation marks. |
| 1 | If specified, the incremental cron schema describes how frequently to create and ship incremental backups. New incremental backups are based on the most recent full backup. |
| 2 | The --keep-local option allows you to specify how many snapshots that a full backup is
based upon should be kept at the local backup source. If unspecified, all snapshots will be
kept. [OPTIONAL] |
| 3 | The --keep-remote option allows you to specify how many full backups should be kept at the
remote destination. This option only works with S3 remote backup destinations, because you would
not want to allow a cluster node to delete backups from a node in another cluster. All
incremental backups based on a deleted full backup will also be deleted at the remote
destination. If unspecified, the --keep-remote option defaults to “all”. [OPTIONAL] |
| 4 | Specifies whether to “RETRY” or “SKIP” the scheduled backup shipping if it fails. If “SKIP”
is specified, LINSTOR will ignore the failure and continue with the next scheduled backup
shipping. If “RETRY” is specified, LINSTOR will wait 60 seconds and then try the backup shipping
again. The LINSTOR schedule create command defaults to “SKIP” if no --on-failure option is
given. [OPTIONAL] |
| 5 | The number of times to retry the backup shipping if a scheduled backup shipping fails and
the --on-failure RETRY option has been given. Without this option, the LINSTOR controller will
retry the scheduled backup shipping indefinitely, until it is successful. [OPTIONAL] |
| 6 | The name that you give the backup schedule so that you can reference it later with the schedule list, modify, delete, enable, or disable commands. [REQUIRED] |
| 7 | This cron schema describes how frequently LINSTOR creates snapshots and ships full backups. |
| If you specify an incremental cron schema that has overlap with the full cron schema that you specify, at the times when both types of backup shipping would occur simultaneously, LINSTOR will only make and ship a full backup. For example, if you specify that a full backup be made every three hours, and an incremental backup be made every hour, then every third hour, LINSTOR will only make and ship a full backup. For this reason, specifying the same cron schema for both your incremental and full backup shipping schedules would be useless, because incremental backups will never be made. |
3.13.2. Modifying a backup shipping schedule
You can modify a backup shipping schedule by using the LINSTOR client schedule modify command.
The syntax for the command is the same as that for the schedule create command. The name that
you specify with the schedule modify command must be an already existing backup schedule. Any
options to the command that you do not specify will retain their existing values. If you want to
set the keep-local or keep-remote options back to their default values, you can set them to
“all”. If you want to set the max-retries option to its default value, you can set it to
“forever”.
3.13.3. Configuring the number of local snapshots and remote backups to keep
Your physical storage is not infinite and your remote storage has a cost, so you will likely want to set limits on the number of snapshots and backups you keep.
Both the --keep-remote and --keep-local options deserve special mention as they have
implications beyond what might be obvious. Using these options, you specify how many snapshots or
full backups should be kept, either on the local source or the remote destination.
Configuring the keep-local option
For example, if a --keep-local=2 option is set, then the backup shipping schedule, on first
run, will make a snapshot for a full backup. On the next scheduled full backup shipping, it will
make a second snapshot for a full backup. On the next scheduled full backup shipping, it makes a
third snapshot for a full backup. This time, however, after successful completion, LINSTOR
deletes the first (oldest) full backup shipping snapshot. If snapshots were made for any
incremental backups based on this full snapshot, they will also be deleted from the local source
node. On the next successful full backup shipping, LINSTOR will delete the second full backup
snapshot and any incremental snapshots based upon it, and so on, with each successive backup
shipping.
| If there are local snapshots remaining from failed shipments, these will be deleted first, even if they were created later. |
If you have enabled a backup shipping schedule and then later manually delete a LINSTOR snapshot, LINSTOR might not be able to delete everything it was supposed to. For example, if you delete a full backup snapshot definition, on a later full backup scheduled shipping, there might be incremental snapshots based on the manually deleted full backup snapshot that will not be deleted.
Configuring the keep-remote option
As mentioned in the callouts for the example linstor schedule create command above, the
keep-remote option only works for S3 remote destinations. Here is an example of how the
option works. If a --keep-remote=2 option is set, then the backup shipping schedule, on first
run, will make a snapshot for a full backup and ship it to the remote destination. On the next
scheduled full backup shipping, a second snapshot is made and a full backup shipped to the
remote destination. On the next scheduled full backup shipping, a third snapshot is made and a
full backup shipped to the remote destination. This time, additionally, after the third snapshot
successfully ships, the first full backup is deleted from the remote destination. If any
incremental backups were scheduled and made between the full backups, any that were made from
the first full backup would be deleted along with the full backup.
| This option only deletes backups at the remote destination. It does not delete snapshots that the full backups were based upon at the local source node. |
3.13.4. Listing a backup shipping schedule
You can list your backup shipping schedules by using the linstor schedule list command.
For example:
# linstor schedule list ╭──────────────────────────────────────────────────────────────────────────────────────╮ ┊ Name ┊ Full ┊ Incremental ┊ KeepLocal ┊ KeepRemote ┊ OnFailure ┊ ╞══════════════════════════════════════════════════════════════════════════════════════╡ ┊ my-bu-schedule ┊ 2 * * * * ┊ ┊ 3 ┊ 2 ┊ SKIP ┊ ╰──────────────────────────────────────────────────────────────────────────────────────╯
3.13.5. Deleting a backup shipping schedule
The LINSTOR client schedule delete command completely deletes a backup shipping schedule
LINSTOR object. The command’s only argument is the schedule name that you want to delete. If the
deleted schedule is currently creating or shipping a backup, the scheduled shipping process is
stopped. Depending on at which point the process stops, a snapshot, or a backup, or both, might
not be created and shipped.
This command does not affect previously created snapshots or successfully shipped backups. These will be retained until they are manually deleted.
3.13.6. Enabling scheduled backup shipping
You can use the LINSTOR client backup schedule enable command to enable a previously created
backup shipping schedule. The command has the following syntax:
# linstor backup schedule enable \ [--node source_node] \ (1) [--rg resource_group_name | --rd resource_definition_name] \ (2) remote_name \ (3) schedule_name (4)
| 1 | This is a special option that allows you to specify the controller node that will be used as a source for scheduled backup shipments, if possible. If you omit this option from the command, then LINSTOR will choose a source node at the time a scheduled shipping is made. [OPTIONAL] |
| 2 | You can set here either the resource group or the resource definition (but not both) that you want to enable the backup shipping schedule for. If you omit this option from the command, then the command enables scheduled backup shipping for all deployed LINSTOR resources that can make snapshots. [OPTIONAL] |
| 3 | The name of the remote destination that you want to ship backups to. [REQUIRED] |
| 4 | The name of a previously created backup shipping schedule. [REQUIRED] |
3.13.7. Disabling a backup shipping schedule
To disable a previously enabled backup shipping schedule, you use the LINSTOR client backup
schedule disable command. The command has the following syntax:
# linstor backup schedule disable \ [--rg resource_group_name | --rd resource_definition_name] \ remote_name \ (3) schedule_name (4)
If you include the option specifying either a resource group or resource definition, as
described in the backup schedule enable command example above, then you disable the schedule
only for that resource group or resource definition.
For example, if you omitted specifying a resource group or resource definition in an earlier
backup schedule enable command, LINSTOR would schedule backup shipping for all its deployed
resources that can make snapshots. Your disable command would then only affect the resource
group or resource definition that you specify with the command. The backup shipping schedule
would still apply to any deployed LINSTOR resources besides the specified resource group or
resource definition.
The same as for the backup schedule enable command, if you specify neither a resource group
nor a resource definition, then LINSTOR disables the backup shipping schedule at the controller
level for all deployed LINSTOR resources.
3.13.8. Deleting aspects of a backup shipping schedule
You can use the linstor backup schedule delete command to granularly delete either a specified
resource definition or a resource group from a backup shipping schedule, without deleting the
schedule itself. This command has the same syntax and arguments as the backup schedule disable
command. If you specify neither a resource group nor a resource definition, the backup shipping
schedule you specify will be deleted at the controller level.
It might be helpful to think about the backup schedule delete command as a way that you can
remove a backup shipping schedule-remote pair from a specified LINSTOR object level, either a
resource definition, a resource group, or at the controller level if neither is specified.
The backup schedule delete command does not affect previously created snapshots or
successfully shipped backups. These will be retained until they are manually deleted, or until
they are removed by the effects of a still applicable keep-local or keep-remote option.
You might want to use this command when you have disabled a backup schedule for multiple LINSTOR
object levels and later want to affect a granular change, where a backup schedule enable
command might have unintended consequences.
For example, consider a scenario where you have a backup schedule-remote pair that you enabled
at a controller level. This controller has a resource group, myresgroup that has several
resource definitions, resdef1 through resdef9, under it. For maintenance reasons perhaps,
you disable the schedule for two resource definitions, resdef1 and resdef2. You then realize
that further maintenance requires that you disable the backup shipping schedule at the resource
group level, for your myresgroup resource group.
After completing some maintenance, you are able to enable the backup shipping schedule for
resdef3 through resdef9, but you are not yet ready to resume (enable) backup shipping for
resdef1 and resdef2. You can enable backup shipping for each resource definition
individually, resdef3 through resdef9, or you can use the backup schedule delete command
to delete the backup shipping schedule from the resource group, myresgroup. If you use the
backup schedule delete command, backups of resdef3 through resdef9 will ship again because
the backup shipping schedule is enabled at the controller level, but resdef1 and resdef2
will not ship because the backup shipping schedule is still disabled for them at the resource
definition level.
When you complete your maintenance and are again ready to ship backups for resdef1 and
resdef2, you can delete the backup shipping schedule for those two resource definitions to
return to your starting state: backup shipping scheduled for all LINSTOR deployed resources at
the controller level. To understand this it might be helpful to refer to the decision tree diagram
for how LINSTOR decides whether or not to ship a backup in the
How the LINSTOR controller determines scheduled backup shipping subsection.
In the example scenario above, you might have enabled backup shipping on the resource
group, after completing some maintenance. In this case, backup shipping would resume for
resource definitions resdef3 through resdef9 but continue not to ship for resource
definitions resdef1 and resdef2 because backup shipping was still disabled for those
resource definitions. After you completed all maintenance, you could delete the backup shipping
schedule on resdef1 and resdef2. Then all of your resource definitions would be shipping
backups, as they were before your maintenance, because the schedule-remote pair was enabled at
the resource group level. However, this would remove your option to globally stop all scheduled
shipping at some later point in time at the controller level because the enabled schedule at the
resource group level would override any schedule disable command applied at the controller
level.
|
3.13.9. Listing backup shipping schedules by resource
You can list backup schedules by resource, using the LINSTOR client schedule list-by-resource
command. This command will show LINSTOR resources and how any backup shipping schedules apply
and to which remotes they are being shipped. If resources are not being shipped then the command
will show:
-
Whether resources have no schedule-remote-pair entries (empty cells)
-
Whether they have schedule-remote-pair entries but they are disabled (“disabled”)
-
Whether they have no resources, so no backup shipments can be made, regardless of whether any schedule-remote-pair entries are enabled or not (“undeployed”)
If resources have schedule-remote-pairs and are being shipped, the command output will show when the last backup was shipped and when the next backup is scheduled to ship. It will also show whether the next and last backup shipments were full or incremental backups. Finally, the command will show when the next planned incremental (if any) and full backup shipping will occur.
You can use the --active-only flag with the schedule list-by-resource command to filter out
all resources that are not being shipped.
3.13.10. How the LINSTOR controller determines scheduled backup shipping
To determine if the LINSTOR Controller will ship a deployed LINSTOR resource with a certain backup schedule for a given remote destination, the LINSTOR Controller uses the following logic:

As the diagram shows, enabled or disabled backup shipping schedules have effect in the following order:
-
Resource definition level
-
Resource group level
-
Controller level
A backup shipping schedule-remote pair that is enabled or disabled at a preceding level will override the enabled or disabled status for the same schedule-remote pair at a later level.
3.13.11. Determining how scheduled backup shipping affects a resource
To determine how a LINSTOR resource will be affected by scheduled backup shipping, you can use
the LINSTOR client schedule list-by-resource-details command for a specified LINSTOR resource.
The command will output a table that shows on what LINSTOR object level a backup shipping schedule is either not set (empty cell), enabled, or disabled.
By using this command, you can determine on which level you need to make a change to enable, disable, or delete scheduled backup shipping for a resource.
Example output could look like this:
# linstor schedule list-by-resource-details my_linstor_resource_name ╭───────────────────────────────────────────────────────────────────────────╮ ┊ Remote ┊ Schedule ┊ Resource-Definition ┊ Resource-Group ┊ Controller ┊ ╞═══════════════════════════════════════════════════════════════════════════╡ ┊ rem1 ┊ sch1 ┊ Disabled ┊ ┊ Enabled ┊ ┊ rem1 ┊ sch2 ┊ ┊ Enabled ┊ ┊ ┊ rem2 ┊ sch1 ┊ Enabled ┊ ┊ ┊ ┊ rem2 ┊ sch5 ┊ ┊ Enabled ┊ ┊ ┊ rem3 ┊ sch4 ┊ ┊ Disabled ┊ Enabled ┊ ╰───────────────────────────────────────────────────────────────────────────╯
3.14. Setting DRBD options for LINSTOR objects
You can use LINSTOR commands to set DRBD options. Configurations in files that are not managed
by LINSTOR, such as /etc/drbd.d/global_common.conf, will be ignored. The syntax for this
command is generally:
# linstor <LINSTOR_object> drbd-options --<DRBD_option> <value> <LINSTOR_object_identifiers>
In the syntax above, <LINSTOR_ object_identifiers> is a placeholder for identifiers such as a
node name, node names, or a resource name, or a combination of these identifiers.
For example, to set the DRBD replication protocol for a resource definition named backups,
enter:
# linstor resource-definition drbd-options --protocol C backups
You can enter a LINSTOR object along with drbd-options and the --help, or -h, flag to
show the command usage, available options, and the default value for each option. For example:
# linstor controller drbd-options -h
3.14.1. Setting DRBD peer options for LINSTOR resources or resource connections
The LINSTOR resource object is an exception to the general syntax for setting DRBD options for
LINSTOR objects. With the LINSTOR resource object, you can use the drbd-peer-options to set
DRBD options at the connection level between the two nodes that you specify. Specifying
drbd-peer-options for a LINSTOR resource object between two nodes is equivalent to using
the`linstor resource-connection drbd-peer-options` for a resource between two nodes.
For example, to set the DRBD maximum buffer size to 8192 at a connection level, for a resource
named backups, between two nodes, node-0 and node-1, enter:
# linstor resource drbd-peer-options --max-buffers 8192 node-0 node-1 backups
The command above is equivalent to the following:
# linstor resource-connection drbd-peer-options --max-buffers 8192 node-0 node-1 backups
Indeed, when using the linstor --curl command to examine the two commands actions on the
LINSTOR REST API, the output is identical:
# linstor --curl resource drbd-peer-options --max-buffers 8192 node-0 node-1 backups
curl -X PUT -H "Content-Type: application/json" -d '{"override_props": {"DrbdOptions/Net/max-buffers": "8192"}}' http://localhost:3370/v1/resource-definitions/backups/resource-connections/node-0/node-1
# linstor --curl resource-connection drbd-peer-options --max-buffers 8192 node-0 node-1 backups
curl -X PUT -H "Content-Type: application/json" -d '{"override_props": {"DrbdOptions/Net/max-buffers": "8192"}}' http://localhost:3370/v1/resource-definitions/backups/resource-connections/node-0/node-1
The connection section of the LINSTOR-generated resource file backups.res on node-0 will
look something like this:
connection {
_peer_node_id 1;
path {
_this_host ipv4 192.168.222.10:7000;
_remote_host ipv4 192.168.222.11:7000;
}
path {
_this_host ipv4 192.168.121.46:7000;
_remote_host ipv4 192.168.121.220:7000;
}
net {
[...]
max-buffers 8192;
_name "node-1";
}
}
If there are multiple paths between the two nodes, as in the example above, DRBD options
that you set using the resource drbd-peer-options command will apply to all of them.
|
3.14.2. Setting DRBD options for node connections
You can use the drbd-peer-options argument to set DRBD options at a connection level, between
two nodes, for example:
# linstor node-connection drbd-peer-options --ping-timeout 299 node-0 node-1
The preceding command would set the DRBD ping-timeout option to 29.9 seconds at a connection
level between two nodes, node-0 and node-1.
3.14.3. Verifying options for LINSTOR objects
You can verify a LINSTOR object’s set properties by using the list-properties command, for
example:
# linstor resource-definition list-properties backups ╭──────────────────────────────────────────────────────╮ ┊ Key ┊ Value ┊ ╞══════════════════════════════════════════════════════╡ ┊ DrbdOptions/Net/protocol ┊ C ┊ [...]
3.14.4. Removing DRBD options from LINSTOR objects
To remove a previously set DRBD option, prefix the option name with unset-. For example:
# linstor resource-definition drbd-options --unset-protocol backups
The same syntax applies to any drbd-peer-options set either on a LINSTOR resource, resource
connection, or node connection. For example:
# linstor resource-connection drbd-peer-options --unset-max-buffers node-0 node-1 backups
Removing a DRBD option or DRBD peer option will return the option to its default value. Refer to
the linstor <LINSTOR_object> drbd-options --help (or drbd-peer-options --help) command
output for the default values of options. You can also refer to the drbd.conf-9.0 man page to
get information about DRBD options.
3.15. Over provisioning storage in LINSTOR
Since LINSTOR server version 1.26.0, it is possible to control how LINSTOR limits over
provisioning storage by using three LINSTOR object properties: MaxOversubscriptionRatio,
MaxFreeCapacityOversubscriptionRatio, and MaxTotalCapacityOversubscriptionRatio. You can set
these properties on either a LINSTOR storage pool or a LINSTOR controller object. Setting these
properties at the controller level will affect all LINSTOR storage pools in the cluster, unless
the same property is also set on a specific storage pool. In this case, the property value set
on the storage pool will take precedence over the property value set on the controller.
By setting values for over subscription ratios, you can control how LINSTOR limits the over provisioning that you can do with your storage pools. This might be useful in cases where you do not want over provisioning of storage to reach a level that you cannot account for physically, if you needed to.
The following subsections discuss the different over provisioning limiting properties.
3.15.1. Configuring a maximum free capacity over provisioning ratio
In LINSTOR server versions before 1.26.0, configuring over provisioning of a storage pool backed
by a thin-provisioned LVM volume or ZFS zpool was based on the amount of free space left in the
storage pool. In LINSTOR server versions from 1.26.0, this method of over provisioning is still
possible. You do this by setting a value for the MaxFreeCapacityOversubscriptionRatio property
on either a LINSTOR storage pool or the LINSTOR controller. When you configure a value for this
ratio, the remaining free space in a storage pool is multiplied by the ratio value and this
becomes the maximum allowed size for a new volume that you can provision from the storage pool.
By default, the MaxFreeCapacityOversubscriptionRatio has a value of 20.
To configure a different value for the MaxFreeCapacityOversubscriptionRatio property on a
LINSTOR storage pool named my_thin_pool on three LINSTOR satellite nodes in a cluster, named
node-0 through node-2, enter the following command:
# for node in node-{0..2}; do \
linstor storage-pool set-property $node my_thin_pool MaxFreeCapacityOversubscriptionRatio 10
done
If you had already deployed some storage resources and the storage pool had 10GiB free capacity
remaining (shown by entering linstor storage-pool list), then when provisioning a new storage
resource from the storage pool, you could at most provision a 100GiB volume.
Before spawning new LINSTOR resources (and volumes) from a resource group, you can list the
maximum volume size that LINSTOR will let you provision from the resource group. To do this,
enter a resource-group query-size-info command. For example, to list information about the
DfltRscGrp resource group, enter the following command:
# linstor resource-group query-size-info DfltRscGrp
Output from the command will show a table of values for the specified resource group:
╭───────────────────────────────────────────────────────────────────╮ ┊ MaxVolumeSize ┊ AvailableSize ┊ Capacity ┊ Next Spawn Result ┊ ╞═══════════════════════════════════════════════════════════════════╡ ┊ 99.72 GiB ┊ 9.97 GiB ┊ 9.97 GiB ┊ my_thin_pool on node-0 ┊ ┊ ┊ ┊ ┊ my_thin_pool on node-2 ┊ ╰───────────────────────────────────────────────────────────────────╯
3.15.2. Configuring a maximum total capacity over provisioning ratio
Since LINSTOR server version 1.26.0, there is an additional way that you can limit over
provisioning storage. By setting a value for the MaxTotalCapacityOversubscriptionRatio on
either a LINSTOR storage pool or LINSTOR controller, LINSTOR will limit the maximum size of a
new volume that you can deploy from a storage pool, based on the total capacity of the storage
pool.
This is a more relaxed way to limit over provisioning, compared to limiting the maximum volume size based on the amount of free space that remains in a storage pool. As you provision and use more storage in a storage pool, the free space decreases. However, the total capacity of a storage pool does not change, unless you add more backing storage to the storage pool.
By default, the MaxTotalCapacityOversubscriptionRatio has a value of 20.
To configure a different value for the MaxTotalCapacityOversubscriptionRatio property on a
LINSTOR storage pool named my_thin_pool on three LINSTOR satellite nodes in a cluster, named
node-0 through node-2, enter the following command:
# for node in node-{0..2}; do \
linstor storage-pool set-property $node my_thin_pool MaxTotalCapacityOversubscriptionRatio 4
done
If you had a storage pool backed by a thin-provisioned logical volume that had a total capacity of 10GiB, then each new storage resource that you created from the storage pool could have a maximum size of 40GiB, regardless of how much free space remained in the storage pool.
3.15.3. Configuring a maximum over subscription ratio for over provisioning
If you set the MaxOversubscriptionRatio property on either a LINSTOR storage pool or LINSTOR
controller object, it can act as the value for both the MaxFreeCapacityOversubscriptionRatio
and MaxTotalCapacityOversubscriptionRatio properties. However, the MaxOversubscriptionRatio
property will only act as the value for either of the other two over subscription properties if
the other property is not set. By default, the value for the MaxOversubscriptionRatio property
is 20, the same as the default values for the other two over subscription properties.
To configure a different value for the MaxOversubscriptionRatio property on a LINSTOR
controller, for example, enter the following command:
# linstor controller set-property MaxOversubscriptionRatio 5
By setting the property value to 5 in the command example, you would be able to over provision a 10GiB storage pool, for example, by up to 40GiB.
3.15.4. The effects of setting values on multiple over provisioning properties
As previously mentioned, the default value for each of the three over provisioning limiting LINSTOR properties is 20. If you set the same property on a storage pool and the controller, then the value of the property set on the storage pool takes precedence for that storage pool.
If either MaxTotalCapacityOversubscriptionRatio or MaxFreeCapacityOversubscriptionRatio is
not set, the value of MaxOversubscriptionRatio is used as the value for the unset property
or properties.
For example, consider the following commands:
# for node in node-{0..2}; do \
linstor storage-pool set-property $node my_thin_pool MaxOversubscriptionRatio 4
done
# for node in node-{0..2}; do \
linstor storage-pool set-property $node my_thin_pool MaxTotalCapacityOversubscriptionRatio 3
done
Because you set the MaxTotalCapacityOversubscriptionRatio property to 3, LINSTOR will use that
value for the property, rather than the value that you set for the MaxOversubscriptionRatio
property. Because you did not set the MaxFreeCapacityOversubscriptionRatio property, LINSTOR
will use the value that you set for the MaxOversubscriptionRatio property, 4, for the
MaxFreeCapacityOversubscriptionRatio property.
When determining resource placement, that is, when LINSTOR decides whether or not a resource can
be placed in a storage pool, LINSTOR will compare two values: the ratio set by the
MaxTotalCapacityOversubscriptionRatio property multiplied by the total capacity of the storage
pool, and the ratio set by the MaxFreeCapacityOversubscriptionRatio property multiplied by the
available free space of the storage pool. LINSTOR will use the lower of the two calculated
values to determine whether the storage pool has enough space to place the resource.
Consider the case of values set by earlier commands and given a total capacity of 10GiB for the storage pool. Also assume that there are no deployed LINSTOR resources associated with the storage pool and that the available free space of the storage pool is also 10GiB.
| This example is simplistic. It might be the case that depending on the storage provider that backs the storage pool, for example, ZFS or LVM, free space might not be equal to total capacity in a storage pool with no deployed resources. This is because there might be overhead from the storage provider infrastructure that uses storage pool space, even before deploying resources. |
In this example, MaxTotalCapacityOversubscriptionRatio, 3, multiplied by the total capacity,
10GiB, is less than the MaxFreeCapacityOversubscriptionRatio, 4, multiplied by the free
capacity, 10GiB. Remember here that because the MaxFreeCapacityOversubscriptionRatio is unset,
LINSTOR uses the MaxOversubscriptionRatio value.
Therefore, when deploying a new resource backed by the storage pool, LINSTOR would use the total capacity calculation, rather than the free capacity calculation, to limit over provisioning the storage pool and determine whether a new resource can be placed. However, as you deploy more storage resources and they fill up with data, the available free space in the storage pool will decrease. For this reason, it might not always be the case that LINSTOR will use the total capacity calculation to limit over provisioning the storage pool, even though its ratio is less that the free capacity ratio.
3.16. Toggling a resource between diskful and diskless
LINSTOR can change whether a resource is backed by physical storage (is diskful) or else has no
associated backing physical storage and instead performs I/O operations over the network to
other peer nodes (is diskless). You can toggle a resource between diskful and diskless by using
the resource toggle-disk command, which has syntax similar to resource create.
| Conceptually, this is similar to the “target” (diskful) and “initiator” (diskless) relationship in iSCSI or NVMe-oF attached storage. |
For example, to create a physical replica on backing storage, implied by the storage pool option, to a diskless
resource backups on node alpha, enter the following command:
# linstor resource toggle-disk alpha backups --storage-pool pool_ssd
To toggle the resource back to being diskless, enter the following command:
# linstor resource toggle-disk alpha backups --diskless
3.16.1. Recovering stuck resources from failed toggle disk operations
Toggling a LINSTOR resource can sometimes fail, for example, due to back-end storage issues or LINSTOR satellite service disconnection. A resource might then become “stuck” in a toggling state. Since LINSTOR version 1.34.0, is it possible to retry or cancel a failed toggle disk operation if a resource becomes stuck.
After resolving the root cause of the failed toggle disk operation, you can retry the operation by re-entering the original resource toggle-disk command.
Alternatively, you can cancel a failed toggle disk operation by entering the “opposite” command.
For example, to cancel the linstor resource toggle-disk --diskless command shown earlier, if it became stuck, enter a linstor resource toggle-disk --storage-pool pool_ssd command.
If a diskless resource becomes stuck when trying to toggle it to a diskful state, you would enter a linstor resource toggle-disk --diskless command to cancel the operation.
3.16.2. Migrating a resource to another node
To move a resource between nodes without reducing redundancy at any point, you can use the
LINSTOR disk migration feature. First, create a diskless resource on the target node, and then
toggle the resource to diskful by using the --migrate-from option. This LINSTOR client
operation will wait until the data has been synced to the new disk and then it will remove the
source disk.
For example, to migrate a resource backups from ‘alpha’ to ‘bravo’:
# linstor resource create bravo backups --drbd-diskless # linstor resource toggle-disk bravo backups --storage-pool pool_ssd --migrate-from alpha
3.17. Configuring DRBD Proxy by using LINSTOR
LINSTOR expects DRBD Proxy to be running on the nodes which are involved in the relevant connections. It does not currently support connections through DRBD Proxy on a separate node.
Suppose your cluster consists of nodes ‘alpha’ and ‘bravo’ in a local network and ‘charlie’ at a
remote site, with a resource definition named backups deployed to each of the nodes. Then DRBD
Proxy can be enabled for the connections to ‘charlie’ as follows:
# linstor drbd-proxy enable alpha charlie backups # linstor drbd-proxy enable bravo charlie backups
The DRBD Proxy configuration can be tailored with commands such as:
# linstor drbd-proxy options backups --memlimit 100000000 # linstor drbd-proxy compression zlib backups --level 9
LINSTOR does not automatically optimize the DRBD configuration for long-distance replication, so you will probably want to set some configuration options such as the protocol:
# linstor resource-connection drbd-peer-options alpha charlie backups --protocol A # linstor resource-connection drbd-peer-options bravo charlie backups --protocol A
Contact LINBIT for assistance optimizing your configuration.
3.17.1. Automatically enabling DRBD Proxy
LINSTOR can also be configured to automatically enable the above mentioned Proxy connection between two nodes. For this automation, LINSTOR first needs to know on which site each node is.
# linstor node set-property alpha Site A # linstor node set-property bravo Site A # linstor node set-property charlie Site B
As the Site property might also be used for other site-based decisions in future features, the
DrbdProxy/AutoEnable also has to be set to true:
# linstor controller set-property DrbdProxy/AutoEnable true
This property can also be set on node, resource-definition, resource and resource-connection level (from left to right in increasing priority, whereas the controller is the leftmost, that is, the least prioritized level).
Once this initialization steps are completed, every newly created resource will automatically check if it has to enable DRBD Proxy to any of its peer-resources.
3.18. External database providers
It is possible to have LINSTOR working with an external database provider like PostgreSQL, MariaDB and since version 1.1.0 even etcd key value store is supported.
To use an external database there are a few additional steps to configure. You have to create a
DB/Schema and user to use for linstor, and configure this in the /etc/linstor/linstor.toml.
3.18.1. PostgreSQL
A sample PostgreSQL linstor.toml looks like this:
[db] user = "linstor" password = "linstor" connection_url = "jdbc:postgresql://localhost/linstor"
3.18.2. MariaDB
A sample MariaDB linstor.toml looks like this:
[db] user = "linstor" password = "linstor" connection_url = "jdbc:mariadb://localhost/LINSTOR?createDatabaseIfNotExist=true"
The LINSTOR schema/database is created as LINSTOR so verify that the MariaDB connection
string refers to the LINSTOR schema, as in the example above.
|
3.18.3. etcd
etcd is a distributed key-value store that makes it easy to keep your LINSTOR database
distributed in a HA-setup. The etcd driver is already included in the LINSTOR-controller
package and only needs to be configured in the linstor.toml.
More information about how to install and configure etcd can be found here: etcd docs
And here is a sample [db] section from the linstor.toml:
[db] ## only set user/password if you want to use authentication, only since LINSTOR 1.2.1 # user = "linstor" # password = "linstor" ## for etcd ## do not set user field if no authentication required connection_url = "etcd://etcdhost1:2379,etcdhost2:2379,etcdhost3:2379" ## if you want to use TLS, only since LINSTOR 1.2.1 # ca_certificate = "ca.pem" # client_certificate = "client.pem" ## if you want to use client TLS authentication too, only since LINSTOR 1.2.1 # client_key_pkcs8_pem = "client-key.pkcs8" ## set client_key_password if private key has a password # client_key_password = "mysecret"
3.19. Configuring the LINSTOR controller service
The LINSTOR controller service has a configuration file that is and has to be placed into the following
path: /etc/linstor/linstor.toml.
The default configuration file is written with all available options (commented out) when the LINSTOR controller is first initialized.
3.19.1. LINSTOR REST API
To make LINSTOR administrative tasks more accessible and also available for web-based front ends, there is a
LINSTOR REST API. The REST API is embedded in the LINSTOR controller and since LINSTOR
0.9.13 configured through the linstor.toml configuration file.
[http] enabled = true port = 3370 listen_addr = "127.0.0.1" # to disable remote access
If you want to use the REST API the current documentation can be found on the following link: https://app.swaggerhub.com/apis-docs/Linstor/Linstor/
3.19.2. LINSTOR REST API HTTPS
The HTTP REST API can also run secured by HTTPS and is highly recommended if you use any features that require authorization. To do so you have to create a Java keystore file with a valid certificate that will be used to encrypt all HTTPS traffic.
Here is a simple example on how you can create a self signed certificate with the keytool that
is included in the Java Runtime:
keytool -keyalg rsa -keysize 2048 -genkey -keystore ./keystore_linstor.jks\ -alias linstor_controller\ -dname "CN=localhost, OU=SecureUnit, O=ExampleOrg, L=Vienna, ST=Austria, C=AT"
keytool will ask for a password to secure the generated keystore file and is needed for the
LINSTOR Controller configuration. In your linstor.toml file you have to add the following
section:
[https] keystore = "/path/to/keystore_linstor.jks" keystore_password = "linstor"
Now (re)start the linstor-controller and the HTTPS REST API should be available on port 3371.
More information about how to import other certificates can be found here: https://docs.oracle.com/javase/8/docs/technotes/tools/unix/keytool.html
After enabling HTTPS access, all requests to the HTTP v1 REST API will be redirected
to the HTTPS redirect. If your have not
specified a LINSTOR controller in the
LINSTOR configuration TOML file (/etc/linstor/linstor.toml), then you will need to use a
different syntax when using the LINSTOR client (linstor) as described in
Using the LINSTOR client.
|
LINSTOR REST API HTTPS restricted client access
Client access can be restricted by using a SSL/TLS truststore on the Controller. Basically you create a certificate for your client and add it to your truststore and the client then uses this certificate for authentication.
First create a client certificate:
keytool -keyalg rsa -keysize 2048 -genkey -keystore client.jks\ -storepass linstor -keypass linstor\ -alias client1\ -dname "CN=Client Cert, OU=client, O=Example, L=Vienna, ST=Austria, C=AT"
Next, import this certificate to your controller truststore:
keytool -importkeystore\ -srcstorepass linstor -deststorepass linstor -keypass linstor\ -srckeystore client.jks -destkeystore truststore_client.jks
And enable the truststore in the linstor.toml configuration file:
[https] keystore = "/path/to/keystore_linstor.jks" keystore_password = "linstor" truststore = "/path/to/truststore_client.jks" truststore_password = "linstor"
Now restart the Controller and it will no longer be possible to access the controller API without a correct certificate.
The LINSTOR client needs the certificate in PEM format, so before you can use it, you have to convert the java keystore certificate to the PEM format.
# Convert to pkcs12 keytool -importkeystore -srckeystore client.jks -destkeystore client.p12\ -storepass linstor -keypass linstor\ -srcalias client1 -srcstoretype jks -deststoretype pkcs12 # use openssl to convert to PEM openssl pkcs12 -in client.p12 -out client_with_pass.pem
To avoid entering the PEM file password all the time it might be convenient to remove the password.
openssl rsa -in client_with_pass.pem -out client1.pem openssl x509 -in client_with_pass.pem >> client1.pem
Now this PEM file can easily be used in the client:
linstor --certfile client1.pem node list
The --certfile parameter can also added to the client configuration file, see
Using the LINSTOR client for more details.
3.20. Configuring the LINSTOR satellite service
The LINSTOR Satellite software has an optional configuration file that uses the TOML file syntax
and has to be put into the following path /etc/linstor/linstor_satellite.toml.
A recent configuration example can be found here: linstor_satellite.toml-example
3.21. Logging
LINSTOR uses SLF4J with logback as binding.
This gives LINSTOR the possibility to distinguish between the log levels ERROR, WARN,
INFO, DEBUG and TRACE (in order of increasing verbosity). The following are
the different ways that you can set the logging level, ordered by priority (first has highest
priority):
-
Since LINSTOR client version 1.20.1, you can use the command
controller set-log-levelto change the log level used by the LINSTOR running configuration. Various arguments can be used with this command. Refer to the command’s--helptext for details. For example, to set the log level toTRACEon the LINSTOR controller and all satellites, enter the following command:$ linstor controller set-log-level --global TRACE
To change the LINSTOR log level on a particular node, you can use the LINSTOR client (since version 1.20.1) command
node set-log-level.Changes that you make to the log level by using the LINSTOR client will not persist LINSTOR service restarts, for example, if a node reboots. -
TRACEmode can beenabledordisabledusing the debug console:Command ==> SetTrcMode MODE(enabled) SetTrcMode Set TRACE level logging mode New TRACE level logging mode: ENABLED
-
When starting the controller or satellite a command line argument can be passed:
java ... com.linbit.linstor.core.Controller ... --log-level TRACE java ... com.linbit.linstor.core.Satellite ... --log-level TRACE
-
The recommended place is the
loggingsection in the configuration file. The default configuration file location is/etc/linstor/linstor.tomlfor the controller and/etc/linstor/linstor_satellite.tomlfor the satellite. Configure the logging level as follows:[logging] level="TRACE"
-
As LINSTOR is using logback as an implementation,
/usr/share/linstor-server/lib/logback.xmlcan also be used. Currently only this approach supports different log levels for different components, like shown in the example below:<?xml version="1.0" encoding="UTF-8"?> <configuration scan="false" scanPeriod="60 seconds"> <!-- Values for scanPeriod can be specified in units of milliseconds, seconds, minutes or hours https://logback.qos.ch/manual/configuration.html --> <appender name="STDOUT" class="ch.qos.logback.core.ConsoleAppender"> <!-- encoders are assigned the type ch.qos.logback.classic.encoder.PatternLayoutEncoder by default --> <encoder> <pattern>%d{HH:mm:ss.SSS} [%thread] %-5level %logger - %msg%n</pattern> </encoder> </appender> <appender name="FILE" class="ch.qos.logback.core.rolling.RollingFileAppender"> <file>${log.directory}/linstor-${log.module}.log</file> <append>true</append> <encoder class="ch.qos.logback.classic.encoder.PatternLayoutEncoder"> <Pattern>%d{yyyy_MM_dd HH:mm:ss.SSS} [%thread] %-5level %logger - %msg%n</Pattern> </encoder> <rollingPolicy class="ch.qos.logback.core.rolling.FixedWindowRollingPolicy"> <FileNamePattern>logs/linstor-${log.module}.%i.log.zip</FileNamePattern> <MinIndex>1</MinIndex> <MaxIndex>10</MaxIndex> </rollingPolicy> <triggeringPolicy class="ch.qos.logback.core.rolling.SizeBasedTriggeringPolicy"> <MaxFileSize>2MB</MaxFileSize> </triggeringPolicy> </appender> <logger name="LINSTOR/Controller" level="TRACE" additivity="false"> <appender-ref ref="STDOUT" /> <!-- <appender-ref ref="FILE" /> --> </logger> <logger name="LINSTOR/Satellite" level="TRACE" additivity="false"> <appender-ref ref="STDOUT" /> <!-- <appender-ref ref="FILE" /> --> </logger> <root level="WARN"> <appender-ref ref="STDOUT" /> <!-- <appender-ref ref="FILE" /> --> </root> </configuration>
See the logback manual to find more details about
logback.xml.
When none of the configuration methods above is used LINSTOR will default to INFO log level.
3.22. Monitoring
Since LINSTOR 1.8.0, a Prometheus /metrics HTTP path is provided with
LINSTOR and JVM specific exports.
The /metrics path also supports three GET arguments to reduce the data that LINSTOR reports:
-
resource -
storage_pools -
error_reports
These all default to true. To disable, for example, error report data use:
http://localhost:3370/metrics?error_reports=false.
3.23. Secure satellite connections
It is possible to have the LINSTOR use SSL/TLS secure TCP connection between controller and
satellite connections. Without going into further details on how Java’s SSL/TLS engine works we
will give you command line snippets using the keytool from Java’s runtime environment on how
to configure a three node setup using secure connections.
The node setup looks like this:
Node alpha is just the controller. Node bravo and node charlie are just satellites.
Here are the commands to generate such a keystore setup, values should of course be edited for your environment.
# create directories to hold the key files mkdir -p /tmp/linstor-ssl cd /tmp/linstor-ssl mkdir alpha bravo charlie # create private keys for all nodes keytool -keyalg rsa -keysize 2048 -genkey -keystore alpha/keystore.jks\ -storepass linstor -keypass linstor\ -alias alpha\ -dname "CN=Max Mustermann, OU=alpha, O=Example, L=Vienna, ST=Austria, C=AT" keytool -keyalg rsa -keysize 2048 -genkey -keystore bravo/keystore.jks\ -storepass linstor -keypass linstor\ -alias bravo\ -dname "CN=Max Mustermann, OU=bravo, O=Example, L=Vienna, ST=Austria, C=AT" keytool -keyalg rsa -keysize 2048 -genkey -keystore charlie/keystore.jks\ -storepass linstor -keypass linstor\ -alias charlie\ -dname "CN=Max Mustermann, OU=charlie, O=Example, L=Vienna, ST=Austria, C=AT" # import truststore certificates for alpha (needs all satellite certificates) keytool -importkeystore\ -srcstorepass linstor -deststorepass linstor -keypass linstor\ -srckeystore bravo/keystore.jks -destkeystore alpha/certificates.jks keytool -importkeystore\ -srcstorepass linstor -deststorepass linstor -keypass linstor\ -srckeystore charlie/keystore.jks -destkeystore alpha/certificates.jks # import controller certificate into satellite truststores keytool -importkeystore\ -srcstorepass linstor -deststorepass linstor -keypass linstor\ -srckeystore alpha/keystore.jks -destkeystore bravo/certificates.jks keytool -importkeystore\ -srcstorepass linstor -deststorepass linstor -keypass linstor\ -srckeystore alpha/keystore.jks -destkeystore charlie/certificates.jks # now copy the keystore files to their host destinations ssh root@alpha mkdir /etc/linstor/ssl scp alpha/* root@alpha:/etc/linstor/ssl/ ssh root@bravo mkdir /etc/linstor/ssl scp bravo/* root@bravo:/etc/linstor/ssl/ ssh root@charlie mkdir /etc/linstor/ssl scp charlie/* root@charlie:/etc/linstor/ssl/ # generate the satellite ssl config entry echo '[netcom] type="ssl" port=3367 server_certificate="ssl/keystore.jks" trusted_certificates="ssl/certificates.jks" key_password="linstor" keystore_password="linstor" truststore_password="linstor" ssl_protocol="TLSv1.2" ' | ssh root@bravo "cat > /etc/linstor/linstor_satellite.toml" echo '[netcom] type="ssl" port=3367 server_certificate="ssl/keystore.jks" trusted_certificates="ssl/certificates.jks" key_password="linstor" keystore_password="linstor" truststore_password="linstor" ssl_protocol="TLSv1.2" ' | ssh root@charlie "cat > /etc/linstor/linstor_satellite.toml"
Now just start controller and satellites and add the nodes with --communication-type SSL.
3.24. Configuring LINSTOR API token authentication
Since LINSTOR version 1.34, you can secure the LINSTOR REST API by using token-based authentication.
When enabled, all API requests must include a valid bearer token in the Authorization HTTP header.
Tokens are randomly generated 32-character strings.
Only the SHA-256 hash of each token is stored on the controller.
| The raw token is shown only once at creation time, so store it securely. |
Token authentication can be used as an alternative or complement to LDAP authentication or HTTPS client certificate authentication.
| It is recommended that you configure LINSTOR REST API HTTPS to protect token-bearing traffic from interception. The initialization command automatically enables HTTPS unless you opt out. |
3.24.1. Initializing token authentication
To enable token authentication on your LINSTOR cluster, enter the following command:
linstor controller auth init <description>
This command performs several actions:
-
Creates an initial API token with the given description
-
Enables token authentication on the LINSTOR controller node
-
Automatically enables HTTPS on the REST API (unless
--no-httpsis specified) -
Creates and distributes authentication tokens to all connected LINSTOR satellite nodes
The initial token is saved to your client configuration file (~/.config/linstor/linstor-client.conf by default), so later linstor commands will authenticate automatically.
| The raw token string is displayed only after you create it. If you lose it, you will need to create a new token. |
The init command accepts the following options:
--no-https-
Do not automatically enable HTTPS on the REST API. Use this if you have already configured HTTPS manually or are operating in a secured network.
--only-satellites-
Only create and distribute satellite tokens. Use this if token authentication is already enabled and you need to re-initialize satellite tokens.
--do-not-save-token-
Do not save the created token to the client configuration file.
3.24.2. Managing LINSTOR API tokens
After initializing token authentication, you can create additional tokens, list existing tokens, modify token properties, or revoke tokens.
Creating a token
To create an additional LINSTOR API token:
linstor controller auth create <description>
Unlike the init command, the create command does not save the token to the client configuration by default.
Use --save-token to save it.
Optional controller auth create command options and parameters:
--ip-filter <filter>-
Restrict the token to requests from the specified IP address or range.
--expires-at <datetime>-
Set an expiration date for the token in ISO 8601 format (for example,
2026-12-31). After this date, the token will no longer be accepted. --save-token-
Save the created token to the client configuration file.
Listing tokens
To list all user-created tokens:
linstor controller auth list
By default, only user-created tokens are shown.
To also show system tokens (such as satellite tokens), use the --all flag:
linstor controller auth list --all
Modifying a token
To modify an existing token, specify the token ID (shown in the list output) and the properties to change, for example:
linstor controller auth modify <id> --active false
Available controller auth modify command options:
--description <text>-
Update the token description.
--active true|false-
Enable or disable the token without revoking it.
--ip-filter <filter>-
Update the IP address filter. Use an empty string (
'') to remove the filter.
3.24.3. Using a LINSTOR API token
There are several ways to authenticate with a token, described in the following sections.
LINSTOR client configuration
The recommended approach is to save the token in your client configuration file (at ~/.config/linstor/linstor-client.conf by default):
[global] auth-token = <your_token>
The init command saves the token to the LINSTOR client configuration file by default.
For tokens created with the create command, use the --save-token flag or add the token manually.
Command line argument
You can pass the token directly for individual commands:
linstor --auth-token <your_token> <command>
REST API header
When accessing the REST API directly, include the token as a bearer token in the Authorization header:
Authorization: Bearer <your_token>
Satellite authentication
LINSTOR satellites nodes authenticate automatically.
During initialization, the controller node creates and distributes individual tokens to each connected satellite.
These tokens are stored at /var/lib/linstor.d/auth.json on the satellite node and are rotated automatically when a satellite reconnects.
3.24.4. Disabling token authentication
If you need to disable token authentication, for example, because you have lost all tokens and are locked out of the REST API, you can use the linstor-config tool.
The linstor-config tool operates directly on the LINSTOR database.
You will need to stop the linstor-controller service before using this command.
|
systemctl stop linstor-controller linstor-config disable-token-auth /etc/linstor/linstor.toml systemctl start linstor-controller
This removes the token authentication setting from the database. After restarting the controller service, the REST API will be accessible without authentication.
| If all tokens are revoked or expired, the authentication filter is bypassed automatically, even if token authentication is still marked as enabled. |
3.25. Configuring LDAP authentication
You can configure LINSTOR to use LDAP authentication to limit access to the LINSTOR Controller.
This feature is disabled by default but you can enable and configure it by editing the LINSTOR
configuration TOML file. After editing the configuration file, you will need to restart the
linstor-controller.service. An example LDAP section within the configuration file looks like
this:
[ldap]
  enabled = true (1)

  # allow_public_access: if no authorization fields are given allow
  # users to work with the public context
  allow_public_access = false (2)

  # uniform resource identifier: LDAP URI to use
  # for example, "ldaps://hostname" (LDAPS) or "ldap://hostname" (LDAP)
  uri = "ldaps://ldap.example.com"

  # distinguished name: {user} can be used as template for the username
  dn = "uid={user}" (3)

  # search base for the search_filter field
  search_base = "dc=example,dc=com" (4)

  # search_filter: ldap filter to restrict users on memberships
  search_filter = "(&(uid={user})(memberof=ou=storage-services,dc=example,dc=com))" (5)
| 1 | enabled is a Boolean value. Authentication is disabled by default. |
| 2 | allow_public_access is a Boolean value. If set to true, and LDAP authentication is
enabled, then users will be allowed to work with the LINSTOR Controller’s public context. If
set to false and LDAP authentication is enabled, then users without LDAP authenticating
credentials will be unable to access the LINSTOR Controller for all but the most trivial tasks,
such as displaying version or help information. |
| 3 | dn is a string value where you can specify the LDAP distinguished name to query the LDAP
directory. Besides the user ID (uid), the string can consist of other distinguished name
attributes, for example:
dn = "uid={user},ou=storage-services,o=ha,dc=example"
|
| 4 | search_base is a string value where you can specify the starting point in the LDAP
directory tree for the authentication query, for example:
search_base = "ou=storage-services" |
| 5 | search_filter is a string value where you can specify an LDAP object restriction for
authentication, such as user and group membership, for example:
search_filter = "(&(uid={user})(memberof=ou=storage-services,dc=example,dc=com))"
|
| It is highly recommended that you configure LINSTOR REST API HTTPS and LDAPS to protect potentially sensitive traffic passing between the LINSTOR Controller and an LDAP server. |
3.25.1. Running LINSTOR commands as an authenticated user
After configuring the LINSTOR Controller to authenticate users through LDAP (or LDAPS), and the LINSTOR REST API HTTPS, you will need to enter LINSTOR commands as follows:
$ linstor --user <LDAP_user_name> <command>
If you have configured LDAP authentication without also configuring
LINSTOR REST API HTTPS, you will need to explicitly enable password
authentication over HTTP, by using the --allow-insecure-path flag with your linstor
commands. This is not recommended outside of a secured and isolated LAN, as you will be sending
credentials in plain text.
$ linstor --allow-insecure-auth --user <LDAP_user_name> <command>
The LINSTOR Controller will prompt you for the user’s password, in each of the above examples.
You can optionally use the --password argument to supply the user’s password on the command
line, with all the warnings of caution that would go along with doing so.
3.26. Automatisms for DRBD resources
This section details some LINSTOR automatisms for DRBD resources.
3.26.1. Auto-quorum policies
LINSTOR automatically configures quorum policies on resources when quorum is achievable. This means, whenever you have at least two diskful and one or more diskless resource assignments, or three or more diskful resource assignments, LINSTOR will enable quorum policies for your resources automatically.
Inversely, LINSTOR will automatically disable quorum policies whenever there are less than the minimum required resource assignments to achieve quorum.
You can control this behavior through the DrbdOptions/auto-quorum property which can be applied to the
linstor-controller, resource-group, and resource-definition LINSTOR objects. Accepted
values for the DrbdOptions/auto-quorum property are disabled, suspend-io, and io-error.
Setting the DrbdOptions/auto-quorum property to disabled will allow you to manually, or more
granularly, control the quorum policies of your resources should you want to.
The default policies for DrbdOptions/auto-quorum are quorum majority, and on-no-quorum
io-error. For more information about DRBD’s quorum features and their behavior, refer to the
quorum section of the DRBD User Guide.
|
The DrbdOptions/auto-quorum policies will override any manually configured
properties if DrbdOptions/auto-quorum is not disabled.
|
For example, to manually set the quorum policies of a resource group named my_ssd_group, you
would use the following commands:
# linstor resource-group set-property my_ssd_group DrbdOptions/auto-quorum disabled
# linstor resource-group set-property my_ssd_group DrbdOptions/Resource/quorum majority
# linstor resource-group set-property my_ssd_group DrbdOptions/Resource/on-no-quorum suspend-io
You might want to disable DRBD’s quorum features completely. To do that, you would need to first
disable DrbdOptions/auto-quorum on the appropriate LINSTOR object, and then set the DRBD
quorum features accordingly. For example, use the following commands to disable quorum
entirely on the my_ssd_group resource group:
# linstor resource-group set-property my_ssd_group DrbdOptions/auto-quorum disabled
# linstor resource-group set-property my_ssd_group DrbdOptions/Resource/quorum off
# linstor resource-group set-property my_ssd_group DrbdOptions/Resource/on-no-quorum
Setting DrbdOptions/Resource/on-no-quorum to an empty value in the commands above
deletes the property from the object entirely.
|
3.26.2. Auto-evict
If a satellite is offline for a prolonged period of time, LINSTOR can be configured to declare that node as evicted. This triggers an automated reassignment of the affected DRBD resources to other nodes to ensure a minimum replica count is kept.
This feature uses the following properties to adapt the behavior.
-
DrbdOptions/AutoEvictMinReplicaCountsets the number of replicas that should always be present. You can set this property on the controller to change a global default, or on a specific resource definition or resource group to change it only for that resource definition or resource group. If this property is left empty, the place count set for the Autoplacer of the corresponding resource group will be used. -
DrbdOptions/AutoEvictAfterTimedescribes how long a node can be offline in minutes before the eviction is triggered. You can set this property on the controller to change a global default, or on a single node to give it a different behavior. The default value for this property is 60 minutes. -
DrbdOptions/AutoEvictMaxDisconnectedNodessets the percentage of nodes that can be not reachable (for whatever reason) at the same time. If more than the given percent of nodes are offline at the same time, the auto-evict will not be triggered for any node. This is because, in this case, LINSTOR assumes connection problems from the controller. This property can only be set for the controller, and only accepts a value between 0 and 100. The default value is 34. If you want to turn the auto-evict-feature off, simply set this property to 0. If you want to always trigger the auto-evict, regardless of how many satellites are unreachable, set it to 100. -
DrbdOptions/AutoEvictAllowEvictionis an additional property that can stop a node from being evicted. This can be useful for various cases, for example if you need to shut down a node for maintenance. You can set this property on the controller to change a global default, or on a single node to give it a different behavior. It accepts true and false as values and per default is set to true on the controller. You can use this property to turn the auto-evict feature off by setting it to false on the controller, although this might not work completely if you already set different values for individual nodes, since those values take precedence over the global default.
After the LINSTOR controller loses the connection to a satellite, aside from trying to
reconnect, it starts a timer for that satellite. As soon as that timer exceeds
DrbdOptions/AutoEvictAfterTime and all of the DRBD connections to the DRBD resources on that
satellite are broken, the controller will check whether or not
DrbdOptions/AutoEvictMaxDisconnectedNodes has been met. If it has not, and
DrbdOptions/AutoEvictAllowEviction is true for the node in question, the satellite will be
marked as EVICTED. At the same time, the controller will check for every DRBD-resource whether
the number of resources is still above DrbdOptions/AutoEvictMinReplicaCount. If it is, the
resource in question will be marked as DELETED. If it isn’t, an auto-place with the settings
from the corresponding resource-group will be started. Should the auto-place fail, the
controller will try again later when changes that might allow a different result, such as adding
a new node, have happened. Resources where an auto-place is necessary will only be marked as
DELETED if the corresponding auto-place was successful.
The evicted satellite itself will not be able to reestablish connection with the controller. Even if the node is up and running, a manual reconnect will fail. It is also not possible to delete the satellite, even if it is working as it should be. The satellite can, however, be restored. This will remove the EVICTED-flag from the satellite and allow you to use it again. Previously configured network interfaces, storage pools, properties and similar entities, non-DRBD-related resources, and resources that LINSTOR could not autoplace somewhere else will still be on the satellite. To restore a satellite, use the following command:
# linstor node restore [nodename]
Should you want to instead throw everything that once was on that node, including the node
itself, away, you need to use the node lost command instead.
3.26.3. Auto-diskful and related options
You can set the LINSTOR auto-diskful and auto-diskful-allow-cleanup properties for various
LINSTOR objects, for example, a resource definition, to have LINSTOR help automatically make
a Diskless node Diskful and perform appropriate cleanup actions afterwards.
This is useful when a Diskless node has been in a Primary state for a DRBD resource for more than a specified number of minutes. This could happen in cases where you integrate LINSTOR managed storage with other orchestrating and scheduling platforms, such as OpenStack, OpenNebula, and others. On some platforms that you integrate LINSTOR with, you might not have a way to influence where in your cluster a storage volume will be used.
The auto-diskful options give you a way to use LINSTOR to sensibly delegate the roles of your storage nodes in response to an integrated platform’s actions that are beyond your control.
Setting the auto-diskful option
By setting the DrbdOptions/auto-diskful option on a LINSTOR resource definition , you are
configuring the LINSTOR controller to make a Diskless DRBD resource Diskful if the resource
has been in a DRBD Primary state for more than the specified number of minutes. After the
specified number of minutes, LINSTOR will automatically use the
resource toggle-disk command to toggle the resource state on the
Diskless node, for the given resource.
To set this property, for example, on a LINSTOR resource definition named myres with a
threshold of five minutes, enter the command:
# linstor resource-definition set-property myres DrbdOptions/auto-diskful 5
Setting the auto-diskful option on a resource group or controller
You can also set the DrbdOptions/auto-diskful option on LINSTOR controller or
resource-group objects. By setting the option at the controller level, the option will affect
all LINSTOR resource definitions in your LINSTOR cluster that do not have this option set,
either on the resource definition itself, or else on the resource group that you might have
created the resource from.
Setting the option on a LINSTOR resource group will affect all resource definitions that are spawned from the group, unless a resource definition has the option set on it.
The order of priority, from highest to lowest, for the effect of setting the auto-diskful
option is:
-
Resource definition
-
Resource group
-
Controller
Unsetting the auto-diskful option
To unset the LINSTOR auto-diskful option, enter:
# linstor <controller|resource-definition|resource-group> set-property DrbdOptions/auto-diskful
Setting the auto-diskful-allow-cleanup option
A companion option to the LINSTOR auto-diskful option is the
DrbdOptions/auto-diskful-allow-cleanup option.
You can set this option on the following LINSTOR objects: node, resource, resource definition,
or resource group. The default value for this option is True, but the option has no effect
unless the auto-diskful option has also been set.
After LINSTOR has toggled a resource to Diskful, because the threshold number of minutes has
passed where a Diskless node was in the Primary role for a resource, and after DRBD has
synchronized the data to this previously Diskless and now Primary node, LINSTOR will remove
the resource from any Secondary nodes when that action is necessary to fulfill a replica count
constraint that the resource might have. This could be the case, for example, if you have
specified number of replicas for a resource by using the --auto-place option.
3.26.4. SkipDisk
If a device is throwing I/O errors, for example, due to physical failure, DRBD detects this state and automatically detaches from the local disk. All read and write requests are forwarded to a still healthy peer, allowing the application to continue without interruption.
This automatic detaching causes new event entries in the
drbdsetup events2
stream, changing the state of a DRBD volume from UpToDate to Failed and finally to Diskless.
LINSTOR detects these state changes, and automatically sets the DrbdOptions/SkipDisk property to
True on the given resource. This property causes the LINSTOR satellite service running on the node
with the device throwing I/O errors to attach a --skip-disk to all drbdadm adjust commands.
If this property is set, the linstor resource list command also shows it accordingly:
# linstor r l
╭──────────────────────────────────────────────────────────────────────────────────────────────╮
┊ ResourceName ┊ Node  ┊ Port ┊ Usage  ┊ Conns ┊                   State ┊ CreatedOn           ┊
╞══════════════════════════════════════════════════════════════════════════════════════════════╡
┊ rsc          ┊ bravo ┊ 7000 ┊ Unused ┊ Ok    ┊ UpToDate, Skip-Disk (R) ┊ 2024-03-18 11:48:08 ┊
╰──────────────────────────────────────────────────────────────────────────────────────────────╯
The (R) in this case already states that the property is set on the resource. The indicator would
change to (R, N) if the property DrbdOptions/SkipDisk were to be set on the resource and on
node levels.
Although this property is automatically enabled by LINSTOR, after you resolve the cause of the I/O
errors, you need to manually remove the property to get back to a healthy UpToDate state:
# linstor resource set-property bravo rsc DrbdOptions/SkipDisk
3.27. Using external DRBD metadata
By default, LINSTOR uses
internal DRBD
metadata when creating DRBD resources. If you want to use
external DRBD
metadata, you can do this by setting the StorPoolNameDrbdMeta property to the name of a
LINSTOR storage pool within your cluster.
You can set the StorPoolNameDrbdMeta property on the following LINSTOR objects, listed in
increasing order of priority:
-
node -
resource-group -
resource-definition -
resource -
volume-group -
volume-definition
For example, setting the property at the node level will apply to all LINSTOR objects higher in the order of priority. However, if the property is also set on a higher-priority LINSTOR object or objects, then the property value set on the highest-priority LINSTOR object takes precedence for applicable DRBD resources.
When using LINSTOR to create a new DRBD resource, if the StorPoolNameDrbdMeta property applies
to the DRBD resource, based on which LINSTOR object you set the property, then LINSTOR will
create two new logical volumes within the storage pool. One volume will be for resource data
storage and a second volume will be for storing the resource’s DRBD metadata.
Setting, modifying, or deleting the StorPoolNameDrbdMeta property will not affect existing
LINSTOR-managed DRBD resources.
3.27.1. Setting the external DRBD metadata LINSTOR property
To set the property at the node level, for example, enter the following command:
# linstor node set-property <node-name> StorPoolNameDrbdMeta <storage-pool-name>
3.27.2. Listing the external DRBD metadata LINSTOR property
To verify that the property is set on a specified LINSTOR object, you can use the
list-properties subcommand.
# linstor node list-properties node-0
Output from the command will show a table of set properties and their values for the specified LINSTOR object.
╭─────────────────────────────────────╮
┊ Key                  ┊ Value        ┊
╞═════════════════════════════════════╡
[...]
┊ StorPoolNameDrbdMeta ┊ my_thin_pool ┊
╰─────────────────────────────────────╯
3.28. QoS settings
LINSTOR implements QoS for managed resources by using sysfs properties that correspond to kernel variables related to block I/O operations. These sysfs properties can be limits on either bandwidth (bytes per second), or IOPS, or both.
The sysfs files and their corresponding LINSTOR properties are as follows:
sysfs (/sys/fs/) |
LINSTOR Property |
|---|---|
|
|
|
|
|
|
|
|
3.28.1. Setting QoS using LINSTOR sysfs properties
These LINSTOR properties can be set by using the set-property command and can be set on the
following objects: volume, storage pool, resource, controller, or node. You can also set these
QoS properties on resource groups, volume groups, resource definitions, or volume definitions.
When you set a QoS property on a group or definition, resources created from the group or
definition will inherit the QoS settings.
| Settings made to a group or definition will affect both existing and new resources created from the group or definition. |
The following example shows creating a resource group, then creating a volume group, then applying QoS settings to the volume group, and then spawning resources from the resource group. A verification command will show that the spawned resources inherit the QoS settings. The example uses an assumed previously created LINSTOR storage pool named pool1. You will need to replace this name with a storage pool name that exists in your environment.
# linstor resource-group create qos_limited --storage-pool pool1 --place-count 3
# linstor volume-group create qos_limited
# linstor volume-group set-property qos_limited 0 sys/fs/blkio_throttle_write 1048576
# linstor resource-group spawn-resources qos_limited qos_limited_res 200M
To verify that the spawned resources inherited the QoS setting, you can show the contents of the corresponding sysfs file, on a node that contributes storage to the storage pool.
# cat /sys/fs/cgroup/blkio/blkio.throttle.write_bps_device
252:4 1048576
| As the QoS properties are inherited and not copied, you will not see the property listed in any “child” objects that have been spawned from the “parent” group or definition. |
3.28.2. QoS settings for a LINSTOR volume having multiple DRBD devices
A single LINSTOR volume can be composed of multiple DRBD devices. For example, DRBD with
external metadata will have three backing devices: a data (storage) device, a metadata device,
and the composite DRBD device (volume) provided to LINSTOR. If the data and metadata devices
correspond to different backing disks, then if you set a sysfs property for such a LINSTOR
volume, only the local data (storage) backing device will receive the property value in the
corresponding /sys/fs/cgroup/blkio/ file. Neither the device backing DRBD’s metadata, nor
the composite backing device provided to LINSTOR would receive the value. However, when DRBD’s
data and its metadata share the same backing disk, QoS settings will affect the performance of
both data and metadata operations.
3.28.3. QoS settings for NVMe
In case a LINSTOR resource definition has an nvme-target and an nvme-initiator
resource, both data (storage) backing devices of each node will receive the sysfs property
value. In case of the target, the data backing device will be the volume of either LVM or ZFS,
whereas in case of the initiator, the data backing device will be the connected nvme-device,
regardless of which other LINSTOR layers, such as LUKS, NVMe, DRBD, and others (see
Using LINSTOR without DRBD), are above that.
3.29. Getting help
3.29.1. From the command line
A quick way to list available commands on the command line is to enter linstor.
Further information about subcommands, for example, listing nodes) can be retrieved in two ways:
# linstor node list -h
# linstor help node list
Using the ‘help’ subcommand is especially helpful when LINSTOR is executed in interactive mode
(linstor interactive).
One of the most helpful features of LINSTOR is its rich tab-completion, which can be used to complete nearly every object that LINSTOR knows about, for example, node names, IP addresses, resource names, and others. The following examples show some possible completions, and their results:
# linstor node create alpha 1<tab> # completes the IP address if hostname can be resolved
# linstor resource create b<tab> c<tab> # linstor assign-resource backups charlie
If tab-completion does not work upon installing the LINSTOR client, try to source the appropriate file:
# source /etc/bash_completion.d/linstor # or
# source /usr/share/bash_completion/completions/linstor
For Z shell users, the linstor-client command can generate a Z shell compilation file,
that has basic support for command and argument completion.
# linstor gen-zsh-completer > /usr/share/zsh/functions/Completion/Linux/_linstor
3.29.2. Generating SOS reports
If something goes wrong and you need help finding the cause of the issue, you can enter the following command:
# linstor sos-report create
The command above will create a new sos-report in the /var/log/linstor/controller directory on
the controller node. Alternatively you can enter the following command:
# linstor sos-report download
This command will create a new SOS report and download that report to the current working directory on your local machine.
This SOS report contains logs and useful debug-information from several sources (LINSTOR logs,
dmesg, versions of external tools used by LINSTOR, ip a, database dump and many more).
These information are stored for each node in plain text in the resulting .tar.gz file.
3.29.3. From the community
For help from the community of LINBIT software users, visit the LINBIT community forum: https://forums.linbit.com
3.29.4. GitHub
To file bug or feature request, check out the LINBIT GitHub page https://github.com/linbit
3.29.5. Paid support and development
Alternatively, if you need to purchase remote installation services, 24×7 support, access to certified repositories, or feature development, contact us: +1-877-454-6248 (1-877-4LINBIT) , International: +43-1-8178292-0 | [email protected]
Using the LINBIT GUI for LINSTOR Administration
4. LINBIT GUI
The LINBIT GUI is an open source graphical alternative to the LINSTOR® CLI client. By using the LINBIT GUI, you can adminster a LINSTOR cluster through the convenience of a graphical management console accessed through a web browser.
4.1. Prerequisites
To install and use the LINBIT GUI, you will need to have:
-
Access to LINBIT customer or public repositories, or else you will need to build the LINBIT GUI from source by using the project’s open source codebase
-
An up and running LINSTOR controller node
4.2. Installing the LINBIT GUI by using a package manager
Install the linstor-gui package on the the LINSTOR controller node in your cluster and restart the linstor-controller service.
If you have made the LINSTOR controller service highly available in your cluster, also install the linstor-gui package on other nodes that can potentially run the service.
To install the LINBIT GUI on RPM-based distributions, enter the command:
dnf install -y linstor-guiTo install the LINBIT GUI on DEB-based distributions, enter the command:
apt install -y linstor-guiWith LINSTOR in Kubernetes deployments, the LINBIT GUI is a built-in feature since linstor-controller v1.15.0.
4.3. Using the LINBIT GUI to administer a LINSTOR cluster
You can access the LINBIT GUI by opening an HTTP connection with the active LINSTOR controller node via TCP port 3370.
For example, if your LINSTOR controller’s IP address is 192.168.222.250, you would enter http://192.168.222.250:3370 into your web browser’s address bar to access the LINBIT GUI.
LINSTOR Integrations
5. LINSTOR volumes in Kubernetes
This chapter describes the usage of LINSTOR® in Kubernetes (K8s) as managed by the operator and with volumes provisioned using the LINSTOR CSI plugin.
This chapter goes into great detail regarding all the install time options and various configurations possible with LINSTOR and Kubernetes. The chapter begins with some explanatory remarks and then moves onto deployment instructions. After that, there are instructions for getting started with LINSTOR to configure storage within a Kubernetes deployment. Following that, more advanced topics and configurations, such as snapshots and monitoring, are covered.
5.1. Kubernetes introduction
Kubernetes is a container orchestrator. Kubernetes defines the behavior of
containers and related services, using declarative specifications. In this guide,
we will focus on using kubectl to manipulate YAML files that define the
specifications of Kubernetes objects.
5.2. Deploying LINSTOR on kubernetes
LINBIT® provides a LINSTOR Operator to commercial support customers. The Operator eases deployment of LINSTOR on Kubernetes by installing DRBD®, managing satellite and controller pods, and other related functions.
| LINBIT’s container image repository (https://drbd.io), used by LINSTOR Operator, is only available to LINBIT customers or through LINBIT customer trial accounts. Contact LINBIT for information on pricing or to begin a trial. Alternatively, you can use the LINSTOR SDS upstream project named Piraeus, without being a LINBIT customer. |
LINSTOR Operator v2 is the recommended way of deploying LINBIT SDS for Kubernetes on new clusters. Users of existing Operator v1 deployments should continue to use their Helm deployments and skip to the, Operator v1 deployment instructions.
5.3. Deploying LINSTOR Operator v2
You can deploy the LINSTOR Operator v2 by using either
the Kustomize tool,
integrated with kubectl, or else by using Helm and a LINBIT Helm chart.
| If you have already deployed LINSTOR Operator v1 into your cluster, you can upgrade your LINBIT SDS deployment in Kubernetes to Operator v2 by following the instructions at charts.linstor.io. |
5.3.1. Creating the Operator v2 by using Kustomize
To deploy the Operator, create a kustomization.yaml file. This will declare your pull secret for drbd.io and
allow you to pull in the Operator deployment. The Operator will be deployed in a new namespace linbit-sds.
Make sure to replace MY_LINBIT_USER and MY_LINBIT_PASSWORD with your own credentials. You can find the latest
releases on charts.linstor.io.
apiVersion: kustomize.config.k8s.io/v1beta1
kind: Kustomization
namespace: linbit-sds
resources:
  - https://charts.linstor.io/static/v2.10.0.yaml (1)
generatorOptions:
  disableNameSuffixHash: true
secretGenerator:
  - name: drbdio-pull-secret
    type: kubernetes.io/dockerconfigjson
    literals:
- .dockerconfigjson={"auths":{"drbd.io":{"username":"MY_LINBIT_USER","password":"MY_LINBIT_PASSWORD"}}} (2)| 1 | Replace with the latest release manifest from charts.linstor.io. |
| 2 | Replace MY_LINBIT_USER and MY_LINBIT_PASSWORD with your my.linbit.com credentials. |
Then, apply the kustomization.yaml file, by using kubectl command, and wait for the Operator to start:
$ kubectl apply -k .
namespace/linbit-sds created
...
$ kubectl -n linbit-sds  wait pod --for=condition=Ready --all
pod/linstor-operator-controller-manager-6d9847d857-zc985 condition met
The Operator is now ready to deploy LINBIT SDS for Kubernetes.
5.3.2. Deploying LINBIT SDS for Kubernetes by using the command line tool
Deploying LINBIT SDS for Kubernetes with the Operator v2 is as simple as creating a new LinstorCluster resource and
waiting for the Operator to complete the setup:
$ kubectl create -f - <<EOF
apiVersion: piraeus.io/v1
kind: LinstorCluster
metadata:
  name: linstorcluster
spec: {}
EOF
$ kubectl wait pod --for=condition=Ready -n linbit-sds --timeout=3m --all
Output should eventually show that the wait-for condition has been met and the LINBIT SDS pods are up and running.
pod/ha-controller-4tgcg condition met
pod/k8s-1-26-10.test condition met
pod/linstor-controller-76459dc6b6-tst8p condition met
pod/linstor-csi-controller-75dfdc967d-dwdx6 condition met
pod/linstor-csi-node-9gcwj condition met
pod/linstor-operator-controller-manager-6d9847d857-zc985 condition met
5.3.3. Creating the Operator v2 by using Helm
To create the LINSTOR Operator v2 by Using Helm, first enter the following commands to add the
linstor Helm chart repository:
$ MY_LINBIT_USER=<my-linbit-customer-username>
$ MY_LINBIT_PASSWORD=<my-linbit-customer-password>
$ helm repo add linstor https://charts.linstor.io
Next, enter the following command to install the LINSTOR Operator v2:
$ helm install linstor-operator linstor/linstor-operator \
  --namespace linbit-sds \
  --create-namespace \
  --set imageCredentials.username=$MY_LINBIT_USER \
  --set imageCredentials.password=$MY_LINBIT_PASSWORD \
  --wait
5.3.4. Deploying LINBIT SDS for Kubernetes by using Helm
After output from the command shows that the Operator v2 was installed, you can use Helm to
deploy LINBIT SDS by installing the linbit-sds chart:
$ helm install -n linbit-sds linbit-sds linstor/linbit-sds
Output from this final helm install command should show a success message.
[...]
LinstorCluster: linbit-sds

Successfully deployed!
[...]
5.3.5. Configuring storage with Operator v2
By default, LINBIT SDS for Kubernetes does not configure any storage. To add storage, you can configure a
LinstorSatelliteConfiguration, which the Operator uses to configure one or more satellites.
The following example creates a simple FILE_THIN pool and it does not require any additional set up on the host:
$ kubectl apply -f - <<EOF
apiVersion: piraeus.io/v1
kind: LinstorSatelliteConfiguration
metadata:
  name: storage-pool
spec:
  storagePools:
    - name: pool1
      fileThinPool:
        directory: /var/lib/linbit-sds/pool1
EOF
Other types of storage pools can be configured as well. Refer to the examples upstream.
5.3.6. Securing Operator v2 deployment
By configuring key and certificate based encryption, you can make communication between certain LINSTOR components, for example, between LINSTOR satellite nodes and a LINSTOR controller node, or between the LINSTOR client and the LINSTOR API, more secure.
Configuring TLS between the LINSTOR controller and satellite
To secure traffic between the LINSTOR controller and satellite nodes, you can configure TLS, either by using cert-manager or OpenSSL to create TLS certificates to encrypt the traffic.
Provisioning keys and certificates by using cert-manager
This method requires a working cert-manager deployment in your cluster. For an alternative way to provision keys and certificates, see the OpenSSL section below.
The LINSTOR controller and satellite only need to trust each other. For that reason, you should only have a certificate authority (CA) for those components. Apply the following YAML configuration to your deployment to create a new cert-manager Issuer resource:
---
apiVersion: cert-manager.io/v1
kind: Issuer
metadata:
  name: ca-bootstrapper
  namespace: linbit-sds
spec:
  selfSigned: { }
---
apiVersion: cert-manager.io/v1
kind: Certificate
metadata:
  name: linstor-internal-ca
  namespace: linbit-sds
spec:
  commonName: linstor-internal-ca
  secretName: linstor-internal-ca
  duration: 87600h # 10 years
  isCA: true
  usages:
    - signing
    - key encipherment
    - cert sign
  issuerRef:
    name: ca-bootstrapper
    kind: Issuer
---
apiVersion: cert-manager.io/v1
kind: Issuer
metadata:
  name: linstor-internal-ca
  namespace: linbit-sds
spec:
  ca:
    secretName: linstor-internal-ca
Next, configure the new issuer resource to let the LINSTOR Operator provision the certificates needed to encrypt the controller and satellite traffic, by applying the following YAML configuration:
---
apiVersion: piraeus.io/v1
kind: LinstorCluster
metadata:
  name: linstorcluster
spec:
  internalTLS:
    certManager:
      name: linstor-internal-ca
      kind: Issuer
---
apiVersion: piraeus.io/v1
kind: LinstorSatelliteConfiguration
metadata:
  name: internal-tls
spec:
  internalTLS:
    certManager:
      name: linstor-internal-ca
      kind: Issuer
After applying the configurations above to your deployment, you can verify that TLS traffic encryption is working.
Provisioning keys and certificates by using OpenSSL
If you completed the Provisioning Keys and Certificates By Using cert-manager section above, you can skip this section and go to the Verifying TLS Configuration section.
This method requires the openssl program on the command line.
First, create a new CA by using a new key and a self-signed certificate. You can change options such as the encryption algorithm and expiry time to suit the requirements of your deployment.
# openssl req -new -newkey rsa:4096 -days 3650 -nodes -x509 \
-subj "/CN=linstor-internal-ca" \
-keyout ca.key -out ca.crt
Next, create two new keys, one for the LINSTOR controller, one for all satellites:
# openssl genrsa -out controller.key 4096
# openssl genrsa -out satellite.key 4096
Next, create a certificate for each key, valid for 10 years, signed by the CA that you created earlier:
# openssl req -new -sha256 -key controller.key -subj "/CN=linstor-controller" -out controller.csr
# openssl req -new -sha256 -key satellite.key -subj "/CN=linstor-satellite" -out satellite.csr
# openssl x509 -req -in controller.csr -CA ca.crt -CAkey ca.key \
-CAcreateserial -out controller.crt -days 3650 -sha256
# openssl x509 -req -in satellite.csr -CA ca.crt -CAkey ca.key \
-CAcreateserial -out satellite.crt -days 3650 -sha256
Next, create Kubernetes secrets from the created keys and certificates:
# kubectl create secret generic linstor-controller-internal-tls -n linbit-sds \
--type=kubernetes.io/tls --from-file=ca.crt=ca.crt --from-file=tls.crt=controller.crt \
--from-file=tls.key=controller.key
# kubectl create secret generic linstor-satellite-internal-tls -n linbit-sds \
--type=kubernetes.io/tls --from-file=ca.crt=ca.crt --from-file=tls.crt=satellite.crt \
--from-file=tls.key=satellite.key
Finally, configure the Operator resources to reference the newly created secrets, by applying the following YAML configuration to your deployment:
---
apiVersion: piraeus.io/v1
kind: LinstorCluster
metadata:
  name: linstorcluster
spec:
  internalTLS:
    secretName: linstor-controller-internal-tls
---
apiVersion: piraeus.io/v1
kind: LinstorSatelliteConfiguration
metadata:
  name: internal-tls
spec:
  internalTLS:
    secretName: linstor-satellite-internal-tls
Verifying TLS configuration
After configuring LINSTOR controller and satellite traffic encryption, you can next verify the secure TLS connection between the LINSTOR controller and a satellite by examining the output of a kubectl linstor node list command. If TLS is enabled, the output will show (SSL) next to an active satellite address.
# kubectl linstor node list
╭─────────────────────────────────────────────────────────────────────╮
┊ Node               ┊ NodeType  ┊ Addresses                 ┊ State  ┊
╞═════════════════════════════════════════════════════════════════════╡
┊ node01.example.com ┊ SATELLITE ┊ 10.116.72.142:3367 (SSL)  ┊ Online ┊
┊ node02.example.com ┊ SATELLITE ┊ 10.127.183.140:3367 (SSL) ┊ Online ┊
┊ node03.example.com ┊ SATELLITE ┊ 10.125.97.50:3367 (SSL)   ┊ Online ┊
╰─────────────────────────────────────────────────────────────────────╯
The above command relies on the kubectl-linstor command to simplify entering LINSTOR client commands in Kubernetes. You can install the tool by following the instructions in Simplifying LINSTOR Client Command Entry.
|
If the output shows (PLAIN) rather than (SSL), this indicates that the TLS configuration was not applied successfully. Check the status of the LinstorCluster and LinstorSatellite resources.
If the output shows (SSL), but the node remains offline, this usually indicates that a certificate is not trusted by the other party. Verify that the controller’s tls.crt is trusted by the satellite’s ca.crt and vice versa. The following shell function provides a quick way to verify that one TLS certificate is trusted by another:
function k8s_secret_trusted_by() {
	kubectl get secret -n linbit-sds \
    -ogo-template='{{ index .data "tls.crt" | base64decode }}' \
    "$1" > $1.tls.crt
	kubectl get secret -n linbit-sds \
    -ogo-template='{{ index .data "ca.crt" | base64decode }}' \
    "$2" > $2.ca.crt
	openssl verify -CAfile $2.ca.crt $1.tls.crt
}
# k8s_secret_trusted_by satellite-tls controller-tls
If TLS encryption was properly configured, output from running the above function should be:
satellite-tls.tls.crt: OK
Reference documentation from the upstream Piraeus project shows all available LinstorCluster and LinstorSatelliteConfiguration resources options related to TLS.
Configuring TLS for the LINSTOR API
This section describes how to set up TLS for the LINSTOR API. The API, served by the LINSTOR controller, is used by clients such as the CSI Driver and the Operator itself to control the LINSTOR cluster.
To follow the instructions in this section, you should be familiar with:
-
Editing
LinstorClusterresources -
Using either cert-manager or OpenSSL to create TLS certificates
Provisioning keys and certificates by using cert-manager
This method requires a working cert-manager deployment in your cluster. For an alternative way to provision keys and certificates, see the OpenSSL section below.
When using TLS, the LINSTOR API uses client certificates for authentication. It is good practice to have a separate CA just for these certificates. To do this, first apply the following YAML configuration to your deployment to create a certificate issuer.
---
apiVersion: cert-manager.io/v1
kind: Issuer
metadata:
  name: ca-bootstrapper
  namespace: linbit-sds
spec:
  selfSigned: { }
---
apiVersion: cert-manager.io/v1
kind: Certificate
metadata:
  name: linstor-api-ca
  namespace: linbit-sds
spec:
  commonName: linstor-api-ca
  secretName: linstor-api-ca
  duration: 87600h # 10 years
  isCA: true
  usages:
    - signing
    - key encipherment
    - cert sign
  issuerRef:
    name: ca-bootstrapper
    kind: Issuer
---
apiVersion: cert-manager.io/v1
kind: Issuer
metadata:
  name: linstor-api-ca
  namespace: linbit-sds
spec:
  ca:
    secretName: linstor-api-ca
Next, configure this issuer to let the Operator provision the needed certificates, by applying the following configuration.
---
apiVersion: piraeus.io/v1
kind: LinstorCluster
metadata:
  name: linstorcluster
spec:
  apiTLS:
    certManager:
      name: linstor-api-ca
      kind: Issuer
This completes the necessary steps for securing the LINSTOR API with TLS by using cert-manager. Skip to the Verifying LINSTOR API TLS Configuration section to verify that TLS is working.
Provisioning keys and certificates by using OpenSSL
This method requires the openssl program on the command line. For an alternative way to provision keys and certificates, see the cert-manager section above.
First, create a new certificate authority (CA) by using a new key and a self-signed certificate. You can change options such as the encryption algorithm and expiry time to suit the requirements of your deployment.
# openssl req -new -newkey rsa:4096 -days 3650 -nodes -x509 \
-subj "/CN=linstor-api-ca" \
-keyout ca.key -out ca.crt
Next, create two new keys, one for the LINSTOR API server, and one for all LINSTOR API clients:
# openssl genrsa -out api-server.key 4096
# openssl genrsa -out api-client.key 4096
Next, create a certificate for the server. Because the clients might use different shortened service names, you need to specify multiple subject names:
# cat /etc/ssl/openssl.cnf > api-csr.cnf
# cat >> api-csr.cnf <<EOF
[ v3_req ]
subjectAltName = @alt_names
[ alt_names ]
DNS.0 = linstor-controller.linbit-sds.svc.cluster.local
DNS.1 = linstor-controller.linbit-sds.svc
DNS.2 = linstor-controller
EOF
# openssl req -new -sha256 -key api-server.key \
-subj "/CN=linstor-controller" -config api-csr.cnf \
-extensions v3_req -out api-server.csr
# openssl x509 -req -in api-server.csr -CA ca.crt -CAkey ca.key \
-CAcreateserial -config api-csr.cnf \
-extensions v3_req -out api-server.crt \
-days 3650 -sha256
For the client certificate, setting one subject name is enough.
# openssl req -new -sha256 -key api-client.key \
-subj "/CN=linstor-client" -out api-client.csr
# openssl x509 -req -in api-client.csr \
-CA ca.crt -CAkey ca.key -CAcreateserial \
-out api-client.crt \
-days 3650 -sha256
Next, create Kubernetes secrets from the created keys and certificates.
# kubectl create secret generic linstor-api-tls -n linbit-sds \
--type=kubernetes.io/tls --from-file=ca.crt=ca.crt --from-file=tls.crt=api-server.crt \
--from-file=tls.key=api-server.key
# kubectl create secret generic linstor-client-tls -n linbit-sds \
--type=kubernetes.io/tls --from-file=ca.crt=ca.crt --from-file=tls.crt=api-client.crt \
--from-file=tls.key=api-client.key
Finally, configure the Operator resources to reference the newly created secrets. For simplicity, you can configure the same client secret for all components.
apiVersion: piraeus.io/v1
kind: LinstorCluster
metadata:
  name: linstorcluster
spec:
  apiTLS:
    apiSecretName: linstor-api-tls
    clientSecretName: linstor-client-tls
    csiControllerSecretName: linstor-client-tls
    csiNodeSecretName: linstor-client-tls
Verifying LINSTOR API TLS configuration
You can verify that the API is running, secured by TLS, by manually connecting to the HTTPS endpoint using a curl command.
# kubectl exec -n linbit-sds deploy/linstor-controller -- \
curl --key /etc/linstor/client/tls.key \
--cert /etc/linstor/client/tls.crt \
--cacert /etc/linstor/client/ca.crt \
https://linstor-controller.linbit-sds.svc:3371/v1/controller/version
If the command is successful, the API is using HTTPS, clients are able to connect to the controller with their certificates, and the command output should show something similar to this:
{"version":"1.20.2","git_hash":"58a983a5c2f49eb8d22c89b277272e6c4299457a","build_time":"2022-12-14T14:21:28+00:00","rest_api_version":"1.16.0"}%
If the command output shows an error, verify that the client certificates are trusted by the API secret, and vice versa. The following shell function provides a quick way to verify that one TLS certificate is trusted by another:
function k8s_secret_trusted_by() {
    kubectl get secret -n linbit-sds \
    -ogo-template='{{ index .data "tls.crt" | base64decode }}' \
    "$1" > $1.tls.crt
    kubectl get secret -n linbit-sds \
    -ogo-template='{{ index .data "ca.crt" | base64decode }}' \
    "$2" > $2.ca.crt
    openssl verify -CAfile $2.ca.crt $1.tls.crt
}
# k8s_secret_trusted_by satellite-tls controller-tls
If TLS encryption was properly configured, output from running the above function should be:
satellite-tls.tls.crt: OK
Another issue might be the API endpoint using a certificate that is not using the expected service name. A typical error message for this issue would be:
curl: (60) SSL: no alternative certificate subject name matches target host name 'linstor-controller.piraeus-datastore.svc'
In this case, make sure you have specified the right subject names when provisioning the certificates.
All available options are documented in the upstream Piraeus project’s reference documentation for LinstorCluster.
Creating a passphrase for LINSTOR
LINSTOR can use a passphrase for operations such as encrypting volumes and storing access credentials for backups.
To configure a LINSTOR passphrase in a Kubernetes deployment, the referenced secret must exist in the same namespace as the operator (by default linbit-sds), and have a MASTER_PASSPHRASE entry.
The following example YAML configuration for the .spec.linstorPassphraseSecret configures a passphrase example-passphrase.
| Choose a different passphrase for your deployment. |
---
apiVersion: v1
kind: Secret
metadata:
  name: linstor-passphrase
  namespace: linbit-sds
data:
  # CHANGE THIS TO USE YOUR OWN PASSPHRASE!
  # Created by: echo -n "example-passphrase" | base64
  MASTER_PASSPHRASE: ZXhhbXBsZS1wYXNzcGhyYXNl
---
apiVersion: piraeus.io/v1
kind: LinstorCluster
metadata:
  name: linstorcluster
spec:
  linstorPassphraseSecret: linstor-passphrase
5.3.7. Using CustomResourceDefinitions in Operator v2 deployments
Within LINSTOR Operator v2 deployments, you can change the cluster state by modifying LINSTOR related Kubernetes CustomResourceDefinitions (CRDs) or check the status of a resource. An overview list of these resources follows. Refer to the upstream Piraeus project’s API reference (linked for each resource below) for more details.
LinstorCluster-
This resource controls the state of the LINSTOR cluster and integration with Kubernetes.
LinstorSatelliteConfiguration-
This resource controls the state of the LINSTOR satellites, optionally applying it to only a subset of nodes.
LinstorSatellite-
This resource controls the state of a single LINSTOR satellite. This resource is not intended to be changed directly, rather it is created by the LINSTOR Operator by merging all matching
LinstorSatelliteConfigurationresources. LinstorNodeConnection-
This resource controls the state of the LINSTOR node connections.
5.3.8. Next steps after deploying LINSTOR Operator v2
After deploying LINBIT SDS for Kubernetes, you can continue with the Getting started with LINBIT SDS storage in Kubernetes, Configuring the DRBD module loader in Operator v2 deployments, Using the host network for DRBD replication in Operator v2 deployments sections in this chapter, or refer to the available tutorials in the upstream Piraeus project.
5.4. Deploying LINSTOR Operator v1
| If you plan to deploy LINSTOR Operator on a new cluster, you should use Operator v2. If you have already deployed the LINSTOR Operator v2, you can skip this section and proceed to other topics in the chapter, beginning with Deploying with an external LINSTOR controller. |
The Operator v1 is installed using a Helm v3 chart as follows:
-
Create a Kubernetes secret containing your my.linbit.com credentials:
kubectl create secret docker-registry drbdiocred --docker-server=drbd.io \
  --docker-username=<YOUR_LOGIN> --docker-email=<YOUR_EMAIL> --docker-password=<YOUR_PASSWORD>
The name of this secret must match the one specified in the Helm values, by default
drbdiocred. -
Configure the LINSTOR database back end. By default, the chart configures etcd as database back end. The Operator can also configure LINSTOR to use Kubernetes as datastore directly. If you go the etcd route, you should configure persistent storage for it:
-
Use an existing storage provisioner with a default
StorageClass. -
Disable persistence, for basic testing only. This can be done by adding
--set etcd.persistentVolume.enabled=falseto thehelm installcommand below.
-
-
Read the storage guide and configure a basic storage setup for LINSTOR
-
Read the section on securing the deployment and configure as needed.
-
Select the appropriate kernel module injector using
--setwith thehelm installcommand in the final step.-
Choose the injector according to the distribution you are using. Select the latest version from one of
drbd9-rhel7,drbd9-rhel8, and others, shown as available when browsing the LINBIT container registry. Thedrbd9-rhel8image should also be used for RHCOS (OpenShift). For the SUSE CaaS Platform use the SLES injector that matches the base system of the CaaS Platform you are using, such asdrbd9-sles15sp1. For example:operator.satelliteSet.kernelModuleInjectionImage=drbd.io/drbd9-rhel8:v9.1.8
-
Only inject modules that are already present on the host machine. If a module is not found, it will be skipped.
operator.satelliteSet.kernelModuleInjectionMode=DepsOnly
-
Disable kernel module injection if you are installing DRBD by other means. Deprecated by
DepsOnlyoperator.satelliteSet.kernelModuleInjectionMode=None
-
-
Finally create a Helm deployment named
linstor-opthat will set up everything.helm repo add linstor https://charts.linstor.io helm install linstor-op linstor/linstor
Further deployment customization is discussed in the advanced deployment section
5.4.1. Kubernetes back end for LINSTOR
The LINSTOR controller can use the Kubernetes API directly to persist its cluster state. To enable this back end, use the following override file during the chart installation:
etcd:
  enabled: false
operator:
  controller:
dbConnectionURL: k8s| It is possible to migrate an existing cluster that uses an etcd back end to a Kubernetes API back end, by following the migration instructions at charts.linstor.io. |
5.4.2. Creating persistent storage volumes
You can use the pv-hostpath Helm templates to create hostPath persistent
volumes. Create as many PVs as needed to satisfy your configured etcd
replicas (default 1).
Create the hostPath persistent volumes, substituting cluster node
names accordingly in the nodes= option:
helm repo add linstor https://charts.linstor.io
helm install linstor-etcd linstor/pv-hostpath
By default, a PV is created on every control-plane node. You can manually select the storage nodes by
passing --set "nodes={<NODE0>,<NODE1>,<NODE2>}" to the install command.
The correct value to reference the node is the value of the kubernetes.io/hostname label. You can list the
value for all nodes by running kubectl get nodes -o custom-columns="Name:{.metadata.name},NodeName:{.metadata.labels['kubernetes\.io/hostname']}"
|
5.4.3. Using an existing database
LINSTOR can connect to an existing PostgreSQL, MariaDB or etcd database. For instance, for a PostgreSQL instance with the following configuration:
POSTGRES_DB: postgresdb
POSTGRES_USER: postgresadmin
POSTGRES_PASSWORD: admin123
The Helm chart can be configured to use this database rather than deploying an etcd cluster, by adding the following to the Helm install command:
--set etcd.enabled=false --set "operator.controller.dbConnectionURL=jdbc:postgresql://postgres/postgresdb?user=postgresadmin&password=admin123"
5.4.4. Configuring storage with Operator v1
The LINSTOR Operator v1 can automate some basic storage set up for LINSTOR.
Configuring storage pool creation
The LINSTOR Operator can be used to create LINSTOR storage pools. Creation is under control of the
LinstorSatelliteSet resource:
$ kubectl get LinstorSatelliteSet.linstor.linbit.com linstor-op-ns -o yaml
kind: LinstorSatelliteSet
metadata:
[...]
spec:
  [...]
  storagePools:
    lvmPools:
    - name: lvm-thick
      volumeGroup: drbdpool
    lvmThinPools:
    - name: lvm-thin
      thinVolume: thinpool
      volumeGroup: ""
    zfsPools:
    - name: my-linstor-zpool
      zPool: for-linstor
      thin: true
Creating storage pools at installation time
At installation time, by setting the value of operator.satelliteSet.storagePools when running the helm install command.
First create a file with the storage configuration such as:
operator:
  satelliteSet:
    storagePools:
      lvmPools:
      - name: lvm-thick
        volumeGroup: drbdpool
This file can be passed to the Helm installation by entering the following command:
helm install -f <file> linstor-op linstor/linstorCreating storage pools after installation
On a cluster with the operator already configured (that is, after helm install),
you can edit the LinstorSatelliteSet configuration by entering the following command:
$ kubectl edit LinstorSatelliteSet.linstor.linbit.com <satellitesetname>The storage pool configuration can be updated as in the example above.
Preparing physical devices
By default, LINSTOR expects the referenced VolumeGroups, ThinPools and so on to be present. You can use the
devicePaths: [] option to let LINSTOR automatically prepare devices for the pool. Eligible for automatic configuration
are block devices that:
-
Are a root device (no partition)
-
do not contain partition information
-
have more than 1 GiB
To enable automatic configuration of devices, set the devicePaths key on storagePools entries:
  storagePools:
    lvmPools:
    - name: lvm-thick
      volumeGroup: drbdpool
      devicePaths:
      - /dev/vdb
    lvmThinPools:
    - name: lvm-thin
      thinVolume: thinpool
      volumeGroup: linstor_thinpool
      devicePaths:
      - /dev/vdc
      - /dev/vdd
Currently, this method supports creation of LVM and LVMTHIN storage pools.
Configuring LVM storage pools
The available keys for lvmPools entries are:
-
namename of the LINSTOR storage pool. [Required] -
volumeGroupname of the VG to create. [Required] -
devicePathsdevices to configure for this pool. Must be empty and >= 1GiB to be recognized. [Optional] -
raidLevelLVM raid level. [Optional] -
vdoEnable [VDO] (requires VDO tools in the satellite). [Optional] -
vdoLogicalSizeKibSize of the created VG (expected to be bigger than the backing devices by using VDO). [Optional] -
vdoSlabSizeKibSlab size for VDO. [Optional]
Configuring LVM thin pools
-
namename of the LINSTOR storage pool. [Required] -
volumeGroupVG to use for the thin pool. If you want to usedevicePaths, you must set this to"". This is required because LINSTOR does not allow configuration of the VG name when preparing devices.thinVolumename of the thin pool. [Required] -
devicePathsdevices to configure for this pool. Must be empty and >= 1GiB to be recognized. [Optional] -
raidLevelLVM raid level. [Optional]
| The volume group created by LINSTOR for LVM thin pools will always follow the scheme “linstor_$THINPOOL”. |
Configuring ZFS storage pools
-
namename of the LINSTOR storage pool. [Required] -
zPoolname of thezpoolto use. Must already be present on all machines. [Required] -
thintrueto use thin provisioning,falseotherwise. [Required]
Automatic storage type provisioning (DEPRECATED)
ALL eligible devices will be prepared according to the value of operator.satelliteSet.automaticStorageType, unless
they are already prepared using the storagePools section. Devices are added to a storage pool based on the device
name (that is, all /dev/nvme1 devices will be part of the pool autopool-nvme1)
The possible values for operator.satelliteSet.automaticStorageType:
-
Noneno automatic set up (default) -
LVMcreate a LVM (thick) storage pool -
LVMTHINcreate a LVM thin storage pool -
ZFScreate a ZFS based storage pool (UNTESTED)
5.4.5. Securing Operator v1 deployment
This section describes the different options for enabling security features available when using a LINSTOR Operator v1 deployment (using Helm) in Kubernetes.
Secure communication with an existing etcd instance
Secure communication to an etcd instance can be enabled by providing a CA certificate to the operator in form of a
Kubernetes secret. The secret has to contain the key ca.pem with the PEM encoded CA certificate as value.
The secret can then be passed to the controller by passing the following argument to helm install
--set operator.controller.dbCertSecret=<secret name>
Authentication with etcd using certificates
If you want to use TLS certificates to authenticate with an etcd database, you need to set the following option on
Helm install:
--set operator.controller.dbUseClientCert=true
If this option is active, the secret specified in the above section must contain two additional keys:
-
client.certPEM formatted certificate presented toetcdfor authentication -
client.keyprivate key in PKCS8 format, matching the above client certificate.
Keys can be converted into PKCS8 format using openssl:
openssl pkcs8 -topk8 -nocrypt -in client-key.pem -out client-key.pkcs8
5.4.6. Configuring secure communication between LINSTOR components in Operator v1 deployments
The default communication between LINSTOR components is not secured by TLS. If this is needed for your setup, choose one of three methods:
Generating keys and certificates using cert-manager
Requires cert-manager to be installed in your cluster.
Set the following options in your Helm override file:
linstorSslMethod: cert-manager
linstorHttpsMethod: cert-manager
Generate keys and certificates using Helm
Set the following options in your Helm override file:
linstorSslMethod: helm
linstorHttpsMethod: helm
Generating keys and certificates manually
Create a private key and self-signed certificate for your certificate authorities:
openssl req -new -newkey rsa:2048 -days 5000 -nodes -x509 -keyout ca.key \
  -out ca.crt -subj "/CN=linstor-system"
openssl req -new -newkey rsa:2048 -days 5000 -nodes -x509 -keyout client-ca.key \
  -out client-ca.crt -subj "/CN=linstor-client-ca"
Create private keys, two for the controller, one for all nodes and one for all clients:
openssl genrsa -out linstor-control.key 2048
openssl genrsa -out linstor-satellite.key 2048
openssl genrsa -out linstor-client.key 2048
openssl genrsa -out linstor-api.key 2048
Create trusted certificates for controller and nodes:
openssl req -new -sha256 -key linstor-control.key -subj "/CN=system:control" \
  -out linstor-control.csr
openssl req -new -sha256 -key linstor-satellite.key -subj "/CN=system:node" \
  -out linstor-satellite.csr
openssl req -new -sha256 -key linstor-client.key -subj "/CN=linstor-client" \
  -out linstor-client.csr
openssl req -new -sha256 -key linstor-api.key -subj "/CN=linstor-controller" \
  -out  linstor-api.csr
openssl x509 -req -in linstor-control.csr -CA ca.crt -CAkey ca.key -CAcreateserial \
  -out linstor-control.crt -days 5000 -sha256
openssl x509 -req -in linstor-satellite.csr -CA ca.crt -CAkey ca.key -CAcreateserial \
  -out linstor-satellite.crt -days 5000 -sha256
openssl x509 -req -in linstor-client.csr -CA client-ca.crt -CAkey client-ca.key \
  -CAcreateserial -out linstor-client.crt -days 5000 -sha256
openssl x509 -req -in linstor-api.csr -CA client-ca.crt -CAkey client-ca.key \
  -CAcreateserial -out linstor-api.crt -days 5000 -sha256 -extensions 'v3_req' \
  -extfile <(printf '%s\n' '[v3_req]' extendedKeyUsage=serverAuth \
  subjectAltName=DNS:linstor-op-cs.default.svc)
linstor-op-cs.default.svc in the last command needs to match create service name. With Helm, this is always
<release-name>-cs.<namespace>.svc.
|
Create Kubernetes secrets that can be passed to the controller and node pods:
kubectl create secret generic linstor-control --type=kubernetes.io/tls \
  --from-file=ca.crt=ca.crt --from-file=tls.crt=linstor-control.crt \
  --from-file=tls.key=linstor-control.key
kubectl create secret generic linstor-satellite --type=kubernetes.io/tls \
  --from-file=ca.crt=ca.crt --from-file=tls.crt=linstor-satellite.crt \
  --from-file=tls.key=linstor-satellite.key
kubectl create secret generic linstor-api --type=kubernetes.io/tls \
  --from-file=ca.crt=client-ca.crt --from-file=tls.crt=linstor-api.crt \
  --from-file=tls.key=linstor-api.key
kubectl create secret generic linstor-client --type=kubernetes.io/tls \
  --from-file=ca.crt=client-ca.crt --from-file=tls.crt=linstor-client.crt \
  --from-file=tls.key=linstor-client.key
Pass the names of the created secrets to helm install:
linstorHttpsControllerSecret: linstor-api
linstorHttpsClientSecret: linstor-client
operator:
  controller:
    sslSecret: linstor-control
  satelliteSet:
    sslSecret: linstor-satellite
Automatically set the passphrase for LINSTOR
LINSTOR needs to store confidential data to support encrypted information. This data is protected by a master passphrase. A passphrase is automatically generated on the first chart install.
If you want to use a custom passphrase, store it in a secret:
kubectl create secret generic linstor-pass --from-literal=MASTER_PASSPHRASE=<password>
On install, add the following arguments to the Helm command:
--set operator.controller.luksSecret=linstor-pass
5.4.7. Helm installation examples for Operator v1
All the below examples use the following sp-values.yaml file. Feel
free to adjust this for your uses and environment. See Configuring storage pool creation
for further details.
operator:
  satelliteSet:
    storagePools:
      lvmThinPools:
      - name: lvm-thin
        thinVolume: thinpool
        volumeGroup: ""
        devicePaths:
        - /dev/sdb
| Default install. This does not setup any persistence for the backing etcd key-value store. |
| This is not suggested for any use outside of testing. |
kubectl create secret docker-registry drbdiocred --docker-server=drbd.io \
  --docker-username=<YOUR_LOGIN> --docker-password=<YOUR_PASSWORD>
helm repo add linstor https://charts.linstor.io
helm install linstor-op linstor/linstor
The LINBIT container image repository (https://drbd.io), used in the previous and
upcoming kubectl create commands, is only available to LINBIT customers or through LINBIT
customer trial accounts. Contact LINBIT for information on
pricing or to begin a trial. Alternatively, you can use the LINSTOR SDS upstream project named
Piraeus, without being a LINBIT
customer.
|
Install with LINSTOR storage-pools defined at install through
sp-values.yaml, persistent hostPath volumes, three etcd replicas, and by
compiling the DRBD kernel modules for the host kernels.
This should be adequate for most basic deployments. Note that
this deployment is not using the pre-compiled DRBD kernel modules just
to make this command more portable. Using the pre-compiled binaries
will make for a much faster install and deployment. Using the
Compile option would not be suggested for use in a large Kubernetes clusters.
kubectl create secret docker-registry drbdiocred --docker-server=drbd.io \
  --docker-username=<YOUR_LOGIN> --docker-password=<YOUR_PASSWORD>
helm repo add linstor https://charts.linstor.io
helm install linstor-etcd linstor/pv-hostpath --set "nodes={<NODE0>,<NODE1>,<NODE2>}"
helm install -f sp-values.yaml linstor-op linstor/linstor \
  --set etcd.replicas=3 \
  --set operator.satelliteSet.kernelModuleInjectionMode=Compile
Install with LINSTOR storage-pools defined at install through
sp-values.yaml, use an already created PostgreSQL DB (preferably
clustered), rather than etcd, and use already compiled kernel modules for
DRBD.
The PostgreSQL database in this particular example is reachable through a
service endpoint named postgres. PostgreSQL itself is configured with
POSTGRES_DB=postgresdb, POSTGRES_USER=postgresadmin, and
POSTGRES_PASSWORD=admin123
kubectl create secret docker-registry drbdiocred --docker-server=drbd.io \
  --docker-username=<YOUR_LOGIN> --docker-email=<YOUR_EMAIL> --docker-password=<YOUR_PASSWORD>
helm repo add linstor https://charts.linstor.io
helm install -f sp-values.yaml linstor-op linstor/linstor \
  --set etcd.enabled=false \
  --set "operator.controller.dbConnectionURL=jdbc:postgresql://postgres/postgresdb?user=postgresadmin&password=admin123"
5.4.8. Terminating Helm deployment
To protect the storage infrastructure of the cluster from accidentally deleting vital components, it is necessary to perform some manual steps before deleting a Helm deployment.
-
Delete all volume claims managed by LINSTOR components. You can use the following command to get a list of volume claims managed by LINSTOR:
kubectl get pvc --all-namespaces -o=jsonpath='{range .items[?(@.metadata.annotations.volume\.beta\.kubernetes\.io/storage-provisioner=="linstor.csi.linbit.com")]}kubectl delete pvc --namespace {.metadata.namespace} {.metadata.name}{"\n"}{end}'Output from the command might show something such as:
kubectl delete pvc --namespace default data-mysql-0
kubectl delete pvc --namespace default data-mysql-1
kubectl delete pvc --namespace default data-mysql-2
After checking that none of the listed volumes still hold needed data, you can delete them using the generated
kubectl deletecommands shown in the output.These volumes, once deleted, cannot be recovered. -
Delete the LINSTOR controller and satellite resources.
Deployment of LINSTOR satellite and controller is controlled by the
LinstorSatelliteSetandLinstorControllerresources. You can delete the resources associated with your deployment by usingkubectlkubectl delete linstorcontroller <helm-deploy-name>-cs kubectl delete linstorsatelliteset <helm-deploy-name>-ns
After a short wait, the controller and satellite pods should terminate. If they continue to run, you can check the above resources for errors (they are only removed after all associated pods have terminated).
-
Delete the Helm deployment.
If you removed all PVCs and all LINSTOR pods have terminated, you can uninstall the Helm deployment
helm uninstall linstor-op
Due to the Helm’s current policy, the Custom Resource Definitions named LinstorControllerandLinstorSatelliteSetwill not be deleted by the command. More information regarding Helm’s current position on CRDs can be found here.
5.4.9. Advanced deployment options for Operator v1
The Helm charts provide a set of further customization options for advanced use cases.
| The LINBIT container image repository (https://drbd.io), used in the Helm chart below, is only available to LINBIT customers or through LINBIT customer trial accounts. Contact LINBIT for information on pricing or to begin a trial. Alternatively, you can use the LINSTOR SDS upstream project named Piraeus, without being a LINBIT customer. |
global:
  imagePullPolicy: IfNotPresent # empty pull policy means k8s default is used ("always" if tag == ":latest", "ifnotpresent" else) (1)
  setSecurityContext: true # Force non-privileged containers to run as non-root users
# Dependency charts
etcd:
  enabled: true
  persistentVolume:
    enabled: true
    storage: 1Gi
  replicas: 1 # How many instances of etcd will be added to the initial cluster. (2)
  resources: {} # resource requirements for etcd containers (3)
  image:
    repository: gcr.io/etcd-development/etcd
    tag: v3.4.15
stork:
  enabled: false
  storkImage: docker.io/openstorage/stork:2.8.2
  schedulerImage: registry.k8s.io/kube-scheduler
  schedulerTag: ""
  replicas: 1 (2)
  storkResources: {} # resources requirements for the stork plugin containers (3)
  schedulerResources: {} # resource requirements for the kube-scheduler containers (3)
  podsecuritycontext: {}
csi:
  enabled: true
  pluginImage: "drbd.io/linstor-csi:v1.1.0"
  csiAttacherImage: registry.k8s.io/sig-storage/csi-attacher:v4.3.0
  csiLivenessProbeImage: registry.k8s.io/sig-storage/livenessprobe:v2.10.0
  csiNodeDriverRegistrarImage: registry.k8s.io/sig-storage/csi-node-driver-registrar:v2.8.0
  csiProvisionerImage: registry.k8s.io/sig-storage/csi-provisioner:v3.5.0
  csiSnapshotterImage: registry.k8s.io/sig-storage/csi-snapshotter:v6.2.1
  csiResizerImage: registry.k8s.io/sig-storage/csi-resizer:v1.8.0
  csiAttacherWorkerThreads: 10 (9)
  csiProvisionerWorkerThreads: 10 (9)
  csiSnapshotterWorkerThreads: 10 (9)
  csiResizerWorkerThreads: 10 (9)
  controllerReplicas: 1 (2)
  nodeAffinity: {} (4)
  nodeTolerations: [] (4)
  controllerAffinity: {} (4)
  controllerTolerations: [] (4)
  enableTopology: true
  resources: {} (3)
  customLabels: {}
  customAnnotations: {}
  kubeletPath: /var/lib/kubelet (7)
  controllerSidecars: []
  controllerExtraVolumes: []
  nodeSidecars: []
  nodeExtraVolumes: []
priorityClassName: ""
drbdRepoCred: drbdiocred
linstorSslMethod: "manual" # <- If set to 'helm' or 'cert-manager' the certificates will be generated automatically
linstorHttpsMethod: "manual" # <- If set to 'helm' or 'cert-manager' the certificates will be generated automatically
linstorHttpsControllerSecret: "" # <- name of secret containing linstor server certificates+key. See docs/security.md
linstorHttpsClientSecret: "" # <- name of secret containing linstor client certificates+key. See docs/security.md
controllerEndpoint: "" # <- override to the generated controller endpoint. use if controller is not deployed via operator
psp:
  privilegedRole: ""
  unprivilegedRole: ""
operator:
  replicas: 1 # <- number of replicas for the operator deployment (2)
  image: "drbd.io/linstor-operator:v1.10.4"
  affinity: {} (4)
  tolerations: [] (4)
  resources: {} (3)
  customLabels: {}
  customAnnotations: {}
  podsecuritycontext: {}
  args:
    createBackups: true
    createMonitoring: true
  sidecars: []
  extraVolumes: []
  controller:
    enabled: true
    controllerImage: "drbd.io/linstor-controller:v1.23.0"
    dbConnectionURL: ""
    luksSecret: ""
    dbCertSecret: ""
    dbUseClientCert: false
    sslSecret: ""
    affinity: {} (4)
    httpBindAddress: ""
    httpsBindAddress: ""
    tolerations: (4)
      - key: node-role.kubernetes.io/master
        operator: Exists
        effect: NoSchedule
      - key: node-role.kubernetes.io/control-plane
        operator: Exists
        effect: NoSchedule
    resources: {} (3)
    replicas: 1 (2)
    additionalEnv: [] (5)
    additionalProperties: {} (6)
    sidecars: []
    extraVolumes: []
    customLabels: {}
    customAnnotations: {}
  satelliteSet:
    enabled: true
    satelliteImage: "drbd.io/linstor-satellite:v1.23.0"
    storagePools: {}
    sslSecret: ""
    automaticStorageType: None
    affinity: {} (4)
    tolerations: [] (4)
    resources: {} (3)
    monitoringImage: "drbd.io/drbd-reactor:v1.2.0"
    monitoringBindAddress: ""
    kernelModuleInjectionImage: "drbd.io/drbd9-rhel7:v9.1.14"
    kernelModuleInjectionMode: ShippedModules
    kernelModuleInjectionAdditionalSourceDirectory: "" (8)
    kernelModuleInjectionResources: {} (3)
    kernelModuleInjectionExtraVolumeMounts: []
    mountDrbdResourceDirectoriesFromHost: "" (10)
    additionalEnv: [] (5)
    sidecars: []
    extraVolumes: []
    customLabels: {}
    customAnnotations: {}
haController:
  enabled: false
  image: drbd.io/linstor-k8s-ha-controller:v0.3.0
  affinity: {} (4)
  tolerations: [] (4)
  resources: {} (3)
  replicas: 1 (2)
  customLabels: {}
customAnnotations: {}| 1 | Sets the pull policy for all images. |
| 2 | Controls the number of replicas for each component. |
| 3 | Set container resource requests and limits. See the Kubernetes docs.
Most containers need a minimal amount of resources, except for:
|
| 4 | Affinity and toleration determine where pods are scheduled on the cluster. See the
Kubernetes docs on affinity and
toleration. This might be especially important for the operator.satelliteSet and csi.node*
values. To schedule a pod using a LINSTOR persistent volume, the node requires a running
LINSTOR satellite and LINSTOR CSI pod. |
| 5 | Sets additional environments variables to pass to the LINSTOR controller and satellites.
Uses the same format as the
env value of a container |
| 6 | Sets additional properties on the LINSTOR controller. Expects a simple mapping of <property-key>: <value>. |
| 7 | kubelet expects every CSI plugin to mount volumes under a specific subdirectory of its own state directory. By default, this state directory is /var/lib/kubelet. Some Kubernetes distributions use a different directory:
|
| 8 | Directory on the host that is required for building kernel modules. Only needed if using the Compile injection method. Defaults to /usr/src, which is where the actual kernel sources are stored on most distributions. Use "none" to not mount any additional directories. |
| 9 | Set the number of worker threads used by the CSI driver. Higher values put more load on the LINSTOR controller, which might lead to instability when creating many volumes at once. |
| 10 | If set to true, the satellite containers will have the following files and directories mounted from the host operating system:
|
5.4.10. High-availability deployment in Operator v1
To create a high-availability deployment of all components within a LINSTOR Operator v1 deployment, consult the upstream guide The default values are chosen so that scaling the components to multiple replicas ensures that the replicas are placed on different nodes. This ensures that a single node failures will not interrupt the service.
| If you have deployed LINBIT SDS in Kubernetes by using the LINSTOR Operator v2, high availability is built into the deployment by default. |
Fast workload failover using the high availability controller
When node failures occur, Kubernetes is very conservative in rescheduling stateful workloads. This means it can take more than 15 minutes for Pods to be moved from unreachable nodes. With the information available to DRBD and LINSTOR, this process can be sped up significantly.
The LINSTOR High Availability Controller (HA Controller) speeds up the failover process for stateful workloads using LINSTOR for storage. It monitors and manages any Pod that is attached to at least one DRBD resource.
For the HA Controller to work properly, you need quorum, that is at least three replicas (or two replicas + one diskless tiebreaker). If using lower replica counts, attached Pods will be ignored and are not eligible for faster failover.
The HA Controller is packaged as a Helm chart, and can be deployed using:
$ helm repo update
$ helm install linstor-ha-controller linstor/linstor-ha-controller
If you are using the HA Controller in your cluster you can set additional parameters in all StorageClasses. These parameters ensure that the volume is not accidentally remounted as read-only, leading to degraded Pods.
parameters:
  property.linstor.csi.linbit.com/DrbdOptions/auto-quorum: suspend-io
  property.linstor.csi.linbit.com/DrbdOptions/Resource/on-no-data-accessible: suspend-io
  property.linstor.csi.linbit.com/DrbdOptions/Resource/on-suspended-primary-outdated: force-secondary
  property.linstor.csi.linbit.com/DrbdOptions/Net/rr-conflict: retry-connect
To exempt a Pod from management by the HA Controller, add the following annotation to the Pod:
$ kubectl annotate pod <podname> drbd.linbit.com/ignore-fail-over=""
5.4.11. Backing up the etcd database
To create a backup of the etcd database (in LINSTOR Operator v1 deployments) and store it on your control host, enter the following commands:
kubectl exec linstor-op-etcd-0 -- etcdctl snapshot save /tmp/save.db
kubectl cp linstor-op-etcd-0:/tmp/save.db save.db
These commands will create a file save.db on the machine you are running kubectl from.
5.5. Deploying with an external LINSTOR controller
The Operator can configure the satellites and CSI plugin to use an existing LINSTOR setup. This can be useful in cases where the storage infrastructure is separate from the Kubernetes cluster. Volumes can be provisioned in diskless mode on the Kubernetes nodes while the storage nodes will provide the backing disk storage.
5.5.1. Operator v2 deployment with an external LINSTOR controller
The instructions in this section describe how you can connect an Operator v2 LINBIT SDS deployment to an existing LINBIST SDS cluster that you manage outside Kubernetes.
To follow the steps in this section you should be familiar with editing LinstorCluster resources.
Configuring the LinstorCluster resource
To use an externally managed LINSTOR cluster, specify the URL of the LINSTOR controller in the LinstorCluster resource in a YAML configuration and apply it to your deployment. In the following example, the LINSTOR controller is reachable at http://linstor-controller.example.com:3370.
apiVersion: piraeus.io/v1
kind: LinstorCluster
metadata:
  name: linstorcluster
spec:
  externalController:
    url: http://linstor-controller.example.com:3370
| You can also specify an IP address rather than a hostname and domain for the controller. |
Configuring host networking for LINSTOR satellites
Normally the pod network is not reachable from outside the Kubernetes cluster. In this case the external LINSTOR controller would not be able to communicate with the satellites in the Kubernetes cluster. For this reason, you need to configure your satellites to use host networking.
To use host networking, deploy a LinstorSatelliteConfiguration resource by applying the following YAML configuration to your deployment:
apiVersion: piraeus.io/v1
kind: LinstorSatelliteConfiguration
metadata:
  name: host-network
spec:
  podTemplate:
    spec:
      hostNetwork: true
Verifying an external LINSTOR controller configuration
You can verify that you have correctly configured your Kubernetes deployment to use an external LINSTOR controller by verifying the following:
-
The
Availablecondition on theLinstorClusterresource reports the expected URL for the external LINSTOR controller:$ kubectl get LinstorCluster -ojsonpath='{.items[].status.conditions[?(@.type=="Available")].message}{"\n"}' Controller 1.20.3 (API: 1.16.0, Git: 8d19a891df018f6e3d40538d809904f024bfe361) reachable at 'http://linstor-controller.example.com:3370' -
The
linstor-csi-controllerdeployment uses the expected URL:$ kubectl get -n linbit-sds deployment linstor-csi-controller \ -ojsonpath='{.spec.template.spec.containers[?(@.name=="linstor-csi")].env[?(@.name=="LS_CONTROLLERS")].value}{"\n"}' http://linstor-controller.example.com:3370 -
The
linstor-csi-nodedeployment uses the expected URL:$ kubectl get -n linbit-sds daemonset linstor-csi-node \ -ojsonpath='{.spec.template.spec.containers[?(@.name=="linstor-csi")].env[?(@.name=="LS_CONTROLLERS")].value}{"\n"}' http://linstor-controller.example.com:3370 -
The Kubernetes nodes are registered as satellite nodes on the LINSTOR controller:
$ kubectl get nodes -owide
NAME               STATUS   ROLES           AGE   VERSION   INTERNAL-IP      [...]
k8s-1-26-10.test   Ready    control-plane   22m   v1.26.3   192.168.122.10   [...]
[...]
After getting the node names from the output of the above command, verify that the node names are also LINSTOR satellites by entering a LINSTOR
node listcommand on your LINSTOR controller node.$ linstor node list ╭─────────────────────────────────────────────────────────────────────╮ ┊ Node ┊ NodeType ┊ Addresses ┊ State ┊ ╞═════════════════════════════════════════════════════════════════════╡ ┊ k8s-1-26-10.test ┊ SATELLITE ┊ 192.168.122.10:3366 (PLAIN) ┊ Online ┊ [...]
5.5.2. Operator v1 deployment with an external LINSTOR controller
To skip the creation of a LINSTOR controller deployment and configure the other components to use your existing LINSTOR
controller, use the following options when running helm install:
-
operator.controller.enabled=falseThis disables creation of theLinstorControllerresource -
operator.etcd.enabled=falseSince no LINSTOR controller will run on Kubernetes, no database is required. -
controllerEndpoint=<url-of-linstor-controller>The HTTP endpoint of the existing LINSTOR controller. For example:http://linstor.storage.cluster:3370/
After all pods are ready, you should see the Kubernetes cluster nodes as satellites in your LINSTOR setup.
| Your Kubernetes nodes must be reachable using their IP by the controller and storage nodes. |
Create a storage class referencing an existing storage pool on your storage nodes.
apiVersion: storage.k8s.io/v1
kind: StorageClass
metadata:
  name: linstor-on-k8s
provisioner: linstor.csi.linbit.com
parameters:
  autoPlace: "3"
  storagePool: existing-storage-pool
  resourceGroup: linstor-on-k8s
You can provision new volumes by creating PVCs using your storage class. The volumes will first be placed only on nodes with the given storage pool, that is, your storage infrastructure. Once you want to use the volume in a pod, LINSTOR CSI will create a diskless resource on the Kubernetes node and attach over the network to the diskful resource.
5.6. Interacting with LINSTOR in Kubernetes
The controller pod includes a LINSTOR Client, making it easy to interact directly with LINSTOR. For example:
kubectl exec deploy/linstor-controller -- linstor storage-pool list
5.6.1. Simplifying LINSTOR client command entry
To simplify entering LINSTOR client commands within a Kubernetes deployment, you can use the
kubectl-linstor utility. This utility is available from the upstream Piraeus datastore
project. To download it, enter the following commands on your Kubernetes control plane node:
# KL_VERS=0.3.0 (1)
# KL_ARCH=linux_amd64 (2)
# curl -L -O \
https://github.com/piraeusdatastore/kubectl-linstor/releases/download/v$KL_VERS/kubectl-linstor_v"$KL_VERS"_$KL_ARCH.tar.gz
| 1 | Set the shell variable KL_VERS to the latest release version of the kubectl-linstor
utility, as shown on the
kubectl-linstor releases page. |
| 2 | Set the shell variable KL_ARCH to the architecture appropriate to your deployment and
supported by the utility’s available releases. |
If your deployment uses the LINSTOR Operator v2, you must use version 0.2.0 or higher
of the kubectl-linstor utility.
|
It is possible that the tar archive asset name could change over time. If you have issues downloading the asset by using the commands shown above, verify the naming convention of the asset that you want on the kubectl-linstor releases page or else manually download the asset
that you want from the releases page.
|
To install the utility, first extract it and then move the extracted executable file to a
directory in your $PATH, for example, /usr/bin. Then you can use kubectl-linstor to get
access to the complete LINSTOR CLI.
$ kubectl linstor node list
╭────────────────────────────────────────────────────────────────────────────────────╮
┊ Node                           ┊ NodeType   ┊ Addresses                   ┊ State  ┊
╞════════════════════════════════════════════════════════════════════════════════════╡
┊ kube-node-01.test              ┊ SATELLITE  ┊ 10.43.224.26:3366 (PLAIN)   ┊ Online ┊
┊ kube-node-02.test              ┊ SATELLITE  ┊ 10.43.224.27:3366 (PLAIN)   ┊ Online ┊
┊ kube-node-03.test              ┊ SATELLITE  ┊ 10.43.224.28:3366 (PLAIN)   ┊ Online ┊
╰────────────────────────────────────────────────────────────────────────────────────╯
It also expands references to PVCs to the matching LINSTOR resource.
$ kubectl linstor resource list -r pvc:my-namespace/demo-pvc-1 --all
pvc:my-namespace/demo-pvc-1 -> pvc-2f982fb4-bc05-4ee5-b15b-688b696c8526
╭─────────────────────────────────────────────────────────────────────────────────────────────╮
┊ ResourceName ┊ Node              ┊ Port ┊ Usage  ┊ Conns ┊    State   ┊ CreatedOn           ┊
╞═════════════════════════════════════════════════════════════════════════════════════════════╡
┊ pvc-[...]    ┊ kube-node-01.test ┊ 7000 ┊ Unused ┊ Ok    ┊   UpToDate ┊ 2021-02-05 09:16:09 ┊
┊ pvc-[...]    ┊ kube-node-02.test ┊ 7000 ┊ Unused ┊ Ok    ┊ TieBreaker ┊ 2021-02-05 09:16:08 ┊
┊ pvc-[...]    ┊ kube-node-03.test ┊ 7000 ┊ InUse  ┊ Ok    ┊   UpToDate ┊ 2021-02-05 09:16:09 ┊
╰─────────────────────────────────────────────────────────────────────────────────────────────╯
It also expands references of the form pod:[<namespace>/]<podname> into a list resources in use by the pod.
This should only be necessary for investigating problems and accessing advanced functionality. Regular operation such as creating volumes should be achieved through the Kubernetes integration.
5.7. Getting started with LINBIT SDS storage in Kubernetes
Once all linstor-csi Pods are up and running, you can provision volumes using the usual Kubernetes workflows.
Configuring the behavior and properties of LINSTOR volumes deployed through Kubernetes is accomplished using Kubernetes StorageClass objects.
The resourceGroup parameter is mandatory. Because Kubernetes StorageClass objects have a one-to-one correspondence with LINSTOR resource groups, you usually want the resourceGroup parameter to be unique and the same as the storage class name.
|
Here below is the simplest practical StorageClass that can be used to deploy volumes:
apiVersion: storage.k8s.io/v1
kind: StorageClass
metadata:
  # The name used to identify this StorageClass.
  name: linstor-basic-storage-class
  # The name used to match this StorageClass with a provisioner.
  # linstor.csi.linbit.com is the name that the LINSTOR CSI plugin uses to identify itself
provisioner: linstor.csi.linbit.com
volumeBindingMode: WaitForFirstConsumer
parameters:
  # LINSTOR will provision volumes from the drbdpool storage pool configured
  # On the satellite nodes in the LINSTOR cluster specified in the plugin's deployment
  storagePool: "lvm-thin"
  resourceGroup: "linstor-basic-storage-class"
  # Setting a fstype is required for "fsGroup" permissions to work correctly.
  # Currently supported: xfs/ext4
  csi.storage.k8s.io/fstype: xfs
The storagePool value, lvm-thin in the example YAML configuration file above, must match an available LINSTOR StoragePool. You can list storage pool information using the linstor storage-pool list command, executed within the running linstor-op-cs-controller pod, or by using the kubectl linstor storage-pool list command if you have installed the kubectl-linstor utility.
|
You can create the storage class with the following command:
kubectl create -f linstor-basic-sc.yaml
Now that your storage class is created, you can now create a persistent volume claim (PVC) which can be used to provision volumes known both to Kubernetes and LINSTOR:
kind: PersistentVolumeClaim
apiVersion: v1
metadata:
  name: my-first-linstor-volume
spec:
  storageClassName: linstor-basic-storage-class
  accessModes:
    - ReadWriteOnce
  resources:
    requests:
      storage: 500Mi
You can create the PersistentVolumeClaim with the following command:
kubectl create -f my-first-linstor-volume-pvc.yaml
This will create a PersistentVolumeClaim, but no volume will be created just yet.
The storage class we used specified volumeBindingMode: WaitForFirstConsumer, which
means that the volume is only created once a workload starts using it. This ensures
that the volume is placed on the same node as the workload.
For our example, we create a simple Pod, which mounts or volume by referencing the PersistentVolumeClaim. .my-first-linstor-volume-pod.yaml
apiVersion: v1
kind: Pod
metadata:
  name: fedora
  namespace: default
spec:
  containers:
  - name: fedora
    image: fedora
    command: [/bin/bash]
    args: ["-c", "while true; do sleep 10; done"]
    volumeMounts:
    - name: my-first-linstor-volume
      mountPath: /data
    ports:
    - containerPort: 80
  volumes:
  - name: my-first-linstor-volume
    persistentVolumeClaim:
      claimName: "my-first-linstor-volume"
You can create the Pod with the following command:
kubectl create -f my-first-linstor-volume-pod.yaml
Running kubectl describe pod fedora can be used to confirm that Pod
scheduling and volume attachment succeeded. Examining the PersistentVolumeClaim,
we can see that it is now bound to a volume.
To remove a volume, verify that no pod is using it and then delete the
PersistentVolumeClaim using the kubectl command. For example, to remove the volume that we
just made, run the following two commands, noting that the Pod must be
unscheduled before the PersistentVolumeClaim will be removed:
kubectl delete pod fedora # unschedule the pod.

kubectl get pod -w # wait for pod to be unscheduled

kubectl delete pvc my-first-linstor-volume # remove the PersistentVolumeClaim, the PersistentVolume, and the LINSTOR Volume.
5.7.1. Available parameters in a storage class
The following storage class contains currently available parameters to configure the provisioned storage.
The values for parameter keys shown in this storage class configuration are examples only.
There might be other values that you can use for these keys, besides what this configuration shows.
For example, you might set the linstor.csi.linbit.com/mountOpts key to "noatime,nodiratime" for better performance and less “wear and tear” on physical devices, at the expense of losing some monitoring and tracking abilities.
linstor.csi.linbit.com/ is an optional, but recommended prefix for LINSTOR CSI specific parameters.
Parameter keys are case insensitive but shown in lower camel case for convention.
|
The mountOpts parameter key can hold either general mount options or else file system (ext4 or XFS) specific options.
|
apiVersion: storage.k8s.io/v1
kind: StorageClass
metadata:
  name: full-example
provisioner: linstor.csi.linbit.com
parameters:
  # CSI related parameters
  csi.storage.k8s.io/fstype: xfs # or ext4
  # LINSTOR parameters
  linstor.csi.linbit.com/autoPlace: "2"
  linstor.csi.linbit.com/placementCount: "2"
  linstor.csi.linbit.com/resourceGroup: "full-example"
  linstor.csi.linbit.com/storagePool: "my-storage-pool"
  linstor.csi.linbit.com/disklessStoragePool: "DfltDisklessStorPool"
  linstor.csi.linbit.com/layerList: "drbd storage"
  linstor.csi.linbit.com/placementPolicy: "AutoPlaceTopology"
  linstor.csi.linbit.com/allowRemoteVolumeAccess: "true"
  linstor.csi.linbit.com/encryption: "true"
  linstor.csi.linbit.com/nodeList: "diskful-a diskful-b"
  linstor.csi.linbit.com/clientList: "diskless-a diskless-b"
  linstor.csi.linbit.com/replicasOnSame: "zone=a"
  linstor.csi.linbit.com/replicasOnDifferent: "rack"
  linstor.csi.linbit.com/disklessOnRemaining: "false"
  linstor.csi.linbit.com/doNotPlaceWithRegex: "tainted.*"
  linstor.csi.linbit.com/fsOpts: "-K" # or other `mkfs` options, refer to `man mkfs`
  linstor.csi.linbit.com/mountOpts: "noatime" # or other `mount` or file system specific options
  linstor.csi.linbit.com/postMountXfsOpts: "extsize 2m"
  linstor.csi.linbit.com/xReplicasOnDifferent: |
    topology.kubernetes.io/region: 2
    topology.kubernetes.io/zone: 1
  # Linstor properties
  property.linstor.csi.linbit.com/*: <x>
  # DRBD parameters
  DrbdOptions/*: <x>
The YAML map for the xReplicasOnDifferent parameter key is shown for illustrative purposes but clashes with the replicasOnSame and replicasOnDifferent keys and values.
As such, this is not a usable configuration.
|
5.7.2. Setting DRBD options for storage resources in Kubernetes
As shown in the Available parameters in a storage class section, you can set DRBD options within a
storage class configuration. Because of the one-to-one correspondence between a StorageClass
Kubernetes object and its named LINSTOR resource group (resourceGroup parameter), setting DRBD
options within a storage class configuration is similar to setting DRBD options on the LINSTOR
resource group.
There are some differences. If you set DRBD options within a storage class configuration, these
options will only affect new volumes that are created from the storage class. The options will
not affect existing volumes. Furthermore, because you cannot just update the storage class, you
will have to delete it and create it again if you add DRBD options to the storage class’s
configuration. If you set DRBD options on the LINSTOR resource group object (linstor
resource-group set-property <rg-name> DrbdOptions/<option-name>), changes will affect future
and existing volumes belonging to the resource group.
| If you set DRBD options on a LINSTOR resource group that also corresponds to a Kubernetes storage class, the next time a volume is created, the CSI driver will revert changes to DRBD options that are only in the resource group, unless you also configure the DRBD options in the storage class. |
Because of the potential pitfalls here, it is simpler to set DRBD options on the LINSTOR controller object. DRBD options set on the controller will apply to all resources groups, resources, and volumes, unless you have also set the same options on any of those LINSTOR objects. Refer to the LINSTOR object hierarchy section for more details about LINSTOR object hierarchy.
You can list the properties, including DRBD options, that you can set on the LINSTOR controller object by entering the following command:
# kubectl exec -n linbit-sds deployment/linstor-controller -- \
linstor controller set-property --help
Setting DRBD options on the LINSTOR controller in Kubernetes
To set DRBD options on the LINSTOR controller in a Kubernetes deployment, edit the
LinstorCluster
configuration. For example, to set transport encryption for all DRBD traffic:
apiVersion: piraeus.io/v1
kind: LinstorCluster
metadata:
  name: linstorcluster
spec:
  properties:
    # This one will be set on the controller, verify with: linstor controller list-properties
    # Enable TLS for all resources by default
    - name: "DrbdOptions/Net/tls"
      value: "yes"
After editing the LinstorCluster configuration, apply it to your deployment by entering
kubectl apply -f <configuration-file>.
Setting DRBD options on a LINSTOR node connection in Kubernetes
You can set DRBD options on LINSTOR node connections in Kubernetes, by editing the Kubernetes
LinstorNodeConnection
configuration. Instructions are similar for editing and applying a LinstorCluster
configuration, described in the previous section.
DRBD options set at the node connection level will take precedence over DRBD options set at the controller level and satellite node levels.
The following is an example node connection configuration that will do two things:
-
Select pairs of nodes (a node connection by definition connects two nodes) that are in different geographical regions, for example, two data centers.
-
Set a DRBD option to make DRBD use protocol A (asynchronous replication) on the node level connection between nodes that match the selection criterion.
apiVersion: piraeus.io/v1
kind: LinstorNodeConnection
metadata:
  name: cross-region
spec:
  selector:
    # Select pairs of nodes (A, B) where A is in a different region than node B.
    - matchLabels:
        - key: topology.kubernetes.io/region
          op: NotSame
  properties:
    # This property will be set on the node connection, verify with:
    # linstor node-connection list-properties <node1> <node2>
    # Configure DRBD protocol A between regions for reduced latency
    - name: DrbdOptions/Net/protocol
      value: A
Refer to
documentation
within the upstream Piraeus project for more details about the node connection selector
specification.
|
Setting DRBD options on LINSTOR satellite nodes in Kubernetes
You can set DRBD options on LINSTOR satellite nodes in Kubernetes, by editing the Kubernetes
LinstorSatelliteConfiguration] configuration. Instructions are similar for editing and
applying a LinstorCluster or LinstorNodeConnection configuration, described in the previous
sections.
DRBD options set at the satellite node level will take precedence over DRBD options set at the controller level.
To set a DRBD option that would prevent LINSTOR from automatically evicting a node, you could
use the following configuration file, provided that you apply an under-maintenance label to
the node that you want to disable the automatic eviction feature for. This might be useful
during a system maintenance window on a node.
apiVersion: piraeus.io/v1
kind: LinstorSatelliteConfiguration
metadata:
  name: nodes-under-maintenance
spec:
  nodeSelector:
    under-maintenance: "yes"
  properties:
    - name: DrbdOptions/AutoEvictAllowEviction
      value: "false"
Setting LINSTOR properties on LINSTOR storage pools in Kubernetes
Additionally, you can specify LINSTOR properties (not DRBD options) on LINSTOR storage pools that might exist on LINSTOR satellite nodes, as shown in the example configuration that follows.
The example configuration would apply to all LINSTOR satellite nodes in your Kubernetes deployment. However, it is possible to select only certain nodes within a configuration, similar to the configuration example in Setting DRBD options on LINSTOR satellite nodes in Kubernetes. Refer to documentation in the upstream Piraeus project for details.
apiVersion: piraeus.io/v1
kind: LinstorSatelliteConfiguration
spec:
  storagePools:
    - name: pool1
      lvmThinPool: {}
      properties:
        # This one will be set on the storage pool, verify with:
        # linstor storage-pool list-properties <node> <pool>
        # Set the oversubscription ratio on the storage pool to 1, i.e. no oversubscription.
        - name: MaxOversubscriptionRatio
          value: "1"
5.7.3. csi.storage.k8s.io/fstype
The csi.storage.k8s.io/fstype parameter sets the file system type to create for volumeMode: FileSystem PVCs. Currently supported are:
-
ext4(default) -
xfs
5.7.4. autoPlace
autoPlace is an integer that determines the amount of replicas a volume of
this StorageClass will have. For example, autoPlace: "3" will produce
volumes with three-way replication. If neither autoPlace nor nodeList are
set, volumes will be automatically placed on one node.
If you use this option, you must not use nodeList.
|
| You have to use quotes, otherwise Kubernetes will complain about a malformed StorageClass. |
| This option (and all options which affect auto-placement behavior) modifies the number of LINSTOR nodes on which the underlying storage for volumes will be provisioned and is orthogonal to which kubelets those volumes will be accessible from. |
5.7.5. placementCount
placementCount is an alias for autoPlace
5.7.6. resourceGroup
The LINSTOR Resource Group (RG) to associate with this StorageClass. If not set, a new RG will be created for each new PVC.
5.7.7. storagePool
storagePool is the name of the LINSTOR storage pool that
will be used to provide storage to the newly-created volumes.
Only nodes configured with this same storage pool with be considered
for auto-placement. Likewise, for StorageClasses using
nodeList all nodes specified in that list must have this
storage pool configured on them.
|
5.7.8. disklessStoragePool
disklessStoragePool is an optional parameter that only affects LINSTOR volumes
that are assigned as “diskless” to kubelets, that is, as clients. If you have a custom
diskless storage pool defined in LINSTOR, you will specify that here.
5.7.9. layerList
A comma-separated list of layers to use for the created volumes. The available layers and their order are described
towards the end of this section. Defaults to drbd,storage
5.7.10. placementPolicy
This key selects the volume scheduler.
AutoPlaceTopology is the default volume scheduler.
This scheduler uses topology information from Kubernetes together with user provided constraints (see replicasOnSame and replicasOnDifferent).
| While other volume schedulers might exist, they are experimental and unsupported and for this reason are not documented. |
5.7.11. allowRemoteVolumeAccess
Control on which nodes a volume is accessible. The value for this option can take two different forms:
-
A simple
"true"or"false"allows access from all nodes, or only those nodes with diskful resources. -
Advanced rules, which allow more granular rules on which nodes can access the volume.
The current implementation can grant access to the volume for nodes that share the same labels. For example, if you want to allow access from all nodes in the same region and zone as a diskful resource, you could use:
parameters: linstor.csi.linbit.com/allowRemoteVolumeAccess: | - fromSame: - topology.kubernetes.io/region - topology.kubernetes.io/zoneYou can specify multiple rules. The rules are additive, a node only need to match one rule to be assignable.
5.7.12. encryption
encryption is an optional parameter that determines whether to encrypt
volumes. LINSTOR must be configured for encryption
for this to work properly.
5.7.13. nodeList
nodeList is a list of nodes for volumes to be assigned to. This will assign
the volume to each node and it will be replicated among all of them. This
can also be used to select a single node by hostname, but it’s more flexible to use
replicasOnSame to select a single node.
If you use this option, you must not use autoPlace.
|
| This option determines on which LINSTOR nodes the underlying storage for volumes will be provisioned and is orthogonal from which kubelets these volumes will be accessible. |
5.7.14. clientList
clientList is a list of nodes for diskless volumes to be assigned to. Use in conjunction with nodeList.
5.7.15. replicasOnSame
replicasOnSame is a list of key or key=value items used as auto-placement selection
labels when autoPlace is used to determine where to
provision storage. These labels correspond to LINSTOR node properties.
| The operator periodically synchronizes all labels from Kubernetes Nodes, so you can use them as keys for scheduling constraints. |
Let’s explore this behavior with examples assuming a LINSTOR cluster such that node-a is configured with the
following auxiliary property zone=z1 and role=backups, while node-b is configured with
only zone=z1.
If we configure a StorageClass with autoPlace: "1" and replicasOnSame: "zone=z1 role=backups",
then all volumes created from that StorageClass will be provisioned on node-a,
since that is the only node with all of the correct key=value pairs in the LINSTOR
cluster. This is the most flexible way to select a single node for provisioning.
This guide assumes LINSTOR CSI version 0.10.0 or newer. All properties referenced in replicasOnSame
and replicasOnDifferent are interpreted as auxiliary properties. If you are using an older version of LINSTOR CSI, you
need to add the Aux/ prefix to all property names. So replicasOnSame: "zone=z1" would be replicasOnSame: "Aux/zone=z1"
Using Aux/ manually will continue to work on newer LINSTOR CSI versions.
|
If we configure a StorageClass with autoPlace: "1" and replicasOnSame: "zone=z1",
then volumes will be provisioned on either node-a or node-b as they both have
the zone=z1 aux prop.
If we configure a StorageClass with autoPlace: "2" and replicasOnSame: "zone=z1 role=backups",
then provisioning will fail, as there are not two or more nodes that have
the appropriate auxiliary properties.
If we configure a StorageClass with autoPlace: "2" and replicasOnSame: "zone=z1",
then volumes will be provisioned on both node-a and node-b as they both have
the zone=z1 aux prop.
You can also use a property key without providing a value to ensure all replicas are placed on nodes with the same property value,
with caring about the particular value. Assuming there are 4 nodes, node-a1 and node-a2 are configured with zone=a. node-b1 and node-b2
are configured with zone=b. Using autoPlace: "2" and replicasOnSame: "zone" will place on either node-a1 and node-a2 OR on node-b1 and node-b2.
5.7.16. replicasOnDifferent
replicasOnDifferent takes a list of properties to consider, same as replicasOnSame.
There are two modes of using replicasOnDifferent:
-
Preventing volume placement on specific nodes:
If a value is given for the property, the nodes which have that property-value pair assigned will be considered last.
Example:
replicasOnDifferent: "no-csi-volumes=true"will place no volume on any node with propertyno-csi-volumes=trueunless there are not enough other nodes to fulfill theautoPlacesetting. -
Distribute volumes across nodes with different values for the same key:
If no property value is given, LINSTOR will place the volumes across nodes with different values for that property if possible.
Example: Assuming there are 4 nodes,
node-a1andnode-a2are configured withzone=a.node-b1andnode-b2are configured withzone=b. Using a StorageClass withautoPlace: "2"andreplicasOnDifferent: "zone", LINSTOR will create one replica on eithernode-a1ornode-a2and one replica on eithernode-b1ornode-b2.
5.7.17. disklessOnRemaining
Create a diskless resource on all nodes that were not assigned a diskful resource.
5.7.18. doNotPlaceWithRegex
Do not place the resource on a node which has a resource with a name matching the regular expression.
5.7.19. fsOpts
fsOpts is an optional parameter that passes options to the volume’s
file system at creation time.
| These values are specific to your chosen file system. |
5.7.20. mountOpts
mountOpts is an optional parameter that passes options to the volume’s
file system at mount time.
5.7.21. postMountXfsOpts
Extra arguments to pass to xfs_io, which gets called before right before first use of the volume.
5.7.22. property.linstor.csi.linbit.com/*
Parameters starting with property.linstor.csi.linbit.com/ are translated to LINSTOR properties that are set on the
Resource Group associated with the StorageClass.
For example, to set DrbdOptions/auto-quorum to disabled, use:
property.linstor.csi.linbit.com/DrbdOptions/auto-quorum: disabled
The full list of options is available here
5.7.23. DrbdOptions/*: <x>
This option is deprecated, use the more general property.linstor.csi.linbit.com/* form.
|
Advanced DRBD options to pass to LINSTOR. For example, to change the replication protocol, use
DrbdOptions/Net/protocol: "A".
5.8. Snapshots
Snapshots create a copy of the volume content at a particular point in time. This copy remains untouched when you make modifications to the volume content. This, for example, enables you to create backups of your data before performing modifications or deletions on your data.
Because a backup is useless unless you have a way to restore it, this section describes how to create a snapshot, and how to restore it, for example, in the case of accidental deletion of your data.
5.8.1. Working with snapshots
Before you can add snapshot support within a LINBIT SDS deployment, you need to meet the following environment prerequisites:
-
Your cluster has a storage pool supporting snapshots. LINSTOR supports snapshots for
LVM_THIN,ZFSandZFS_THINpools. Snapshots are also supported onFILE_THINpools backed by a file system withreflinkssupport, such as XFS or Btrfs. -
You have a
StorageClass,PersistentVolumeClaim, andDeploymentthat uses a storage pool that supports snapshots. -
Your cluster has the necessary CRDs for snapshotting in Kubernetes. To verify your cluster has these deployed, you can enter the following command:
$ kubectl api-resources --api-group=snapshot.storage.k8s.io -oname
Output should be similar to the following:
volumesnapshotclasses.snapshot.storage.k8s.io volumesnapshotcontents.snapshot.storage.k8s.io volumesnapshots.snapshot.storage.k8s.io
If output from the command is empty, you can deploy the necessary CRDs by entering the following command:
$ kubectl apply -k https://github.com/kubernetes-csi/external-snapshotter//client/config/crd
-
Your cluster has a CSI snapshotter (
snapshot-controller) deployed. To verify that a CSI snapshotter is already deployed, enter the following command:$ kubectl get pods -A | grep snapshot-controller
If you are using a Kubernetes flavor other than vanilla, you might need to change the regular expression that you use with the grepcommand, in case the snapshot controller is named differently in your Kubernetes flavor.Output should be similar to the following:
kube-system snapshot-controller-[...] 1/1 Running 7 (22m ago) 7d20h kube-system snapshot-controller-[...] 1/1 Running 7 (22m ago) 7d20h
Because the
snapshot-controlleris deployed as a replica set, output will show multiplesnapshot-controllerpods. If output from the command is empty, you can deploy a snapshot controller by entering the following command:$ kubectl apply -k https://github.com/kubernetes-csi/external-snapshotter//deploy/kubernetes/snapshot-controller
Creating a snapshot
To create a volume snapshot, you first need to create a volume snapshot class (VolumeSnapshotClass). This volume snapshot class will specify the linstor.csi.linbit.com provisioner, and sets the clean-up policy for the snapshots to Delete. This means that deleting the Kubernetes resources will also delete the snapshots in LINSTOR.
You can create a volume snapshot class by entering the following command:
$ kubectl apply -f - <<EOF apiVersion: snapshot.storage.k8s.io/v1 kind: VolumeSnapshotClass metadata: name: linbit-sds-snapshots driver: linstor.csi.linbit.com deletionPolicy: Delete EOF
To create a snapshot, you create a VolumeSnapshot resource. The VolumeSnapshot resource needs to reference a snapshot-compatible PersistentVolumeClaim resource, and the VolumeSnapshotClass that you just created. For example, you could create a snapshot (named data-volume-snapshot-1) of a PVC named data-volume by entering the following command:
$ kubectl apply -f - <<EOF
apiVersion: snapshot.storage.k8s.io/v1
kind: VolumeSnapshot
metadata:
name: data-volume-snapshot-1
spec:
volumeSnapshotClassName: linbit-sds-snapshots
source:
persistentVolumeClaimName: data-volume
EOF
Verifying snapshot creation
You can verify the creation of a snapshot by entering the following commands:
$ kubectl wait volumesnapshot --for=jsonpath='{.status.readyToUse}'=true data-volume-snapshot-1
volumesnapshot.snapshot.storage.k8s.io/data-volume-snapshot-1 condition met
$ kubectl get volumesnapshot data-volume-snapshot-1
Output should show a table of information about the volume snapshot resource, similar to the following:
NAME READYTOUSE SOURCEPVC SOURCESNAPSHOTCONTENT RESTORESIZE SNAPSHOTCLASS data-volume-snapshot-1 true data-volume 1Gi linbit-sds-snapshots
You can further verify the snapshot in LINSTOR, by entering the following command:
$ kubectl -n linbit-sds exec deploy/linstor-controller -- linstor snapshot list
Output should show a table similar to the following:
╭─────────────────────────────────────────────────────────────────────────────────────────╮ ┊ ResourceName ┊ SnapshotName ┊ NodeNames ┊ Volumes ┊ CreatedOn ┊ State ┊ ╞═════════════════════════════════════════════════════════════════════════════════════════╡ ┊ pvc-[...] ┊ snapshot-[...] ┊ kube-0 ┊ 0: 1 GiB ┊ 2023-02-13 15:36:18 ┊ Successful ┊ ╰─────────────────────────────────────────────────────────────────────────────────────────╯
Restoring a snapshot
To restore a snapshot, you will need to create a new PVC to recover the volume snapshot to. You will replace the existing PVC, named data-volume in this example, with a new version based on the snapshot.
First, stop the deployment that uses the data-volume PVC. In this example, the deployment is named volume-logger.
$ kubectl scale deploy/volume-logger --replicas=0 deployment.apps "volume-logger" deleted $ kubectl rollout status deploy/volume-logger deployment "volume-logger" successfully rolled out
Next, remove the PVC. You still have the snapshot resource, so this is a safe operation.
$ kubectl delete pvc/data-volume persistentvolumeclaim "data-volume" deleted
Next, create a new PVC by referencing a previously created snapshot. This will create a volume which uses the data from the referenced snapshot.
kubectl apply -f - <<EOF
apiVersion: v1
kind: PersistentVolumeClaim
metadata:
name: data-volume
spec:
storageClassName: linbit-sds-storage
resources:
requests:
storage: 1Gi
dataSource:
apiGroup: snapshot.storage.k8s.io
kind: VolumeSnapshot
name: data-volume-snapshot-1
accessModes:
- ReadWriteOnce
EOF
Because you named the new volume, data-volume, the same as the previous volume, you can just scale up the Deployment again, and the new pod will start using the restored volume.
$ kubectl scale deploy/volume-logger --replicas=1 deployment.apps/volume-logger scaled
5.8.2. Storing snapshots on S3 storage
LINSTOR can store snapshots on S3 compatible storage for disaster recovery. This is integrated in Kubernetes using a special VolumeSnapshotClass:
---
kind: VolumeSnapshotClass
apiVersion: snapshot.storage.k8s.io/v1
metadata:
name: linstor-csi-snapshot-class-s3
driver: linstor.csi.linbit.com
deletionPolicy: Retain
parameters:
snap.linstor.csi.linbit.com/type: S3
snap.linstor.csi.linbit.com/remote-name: backup-remote
snap.linstor.csi.linbit.com/allow-incremental: "false"
snap.linstor.csi.linbit.com/s3-bucket: snapshot-bucket
snap.linstor.csi.linbit.com/s3-endpoint: s3.us-west-1.amazonaws.com
snap.linstor.csi.linbit.com/s3-signing-region: us-west-1
snap.linstor.csi.linbit.com/s3-use-path-style: "false"
# Refer here to the secret that holds access and secret key for the S3 endpoint.
# See below for an example.
csi.storage.k8s.io/snapshotter-secret-name: linstor-csi-s3-access
csi.storage.k8s.io/snapshotter-secret-namespace: storage
---
kind: Secret
apiVersion: v1
metadata:
name: linstor-csi-s3-access
namespace: storage
immutable: true
type: linstor.csi.linbit.com/s3-credentials.v1
stringData:
access-key: access-key
secret-key: secret-keyRefer to the instructions in the Shipping snapshots section for the exact meaning of the
snap.linstor.csi.linbit.com/ parameters. The credentials used to log in are stored in a separate secret, as show in
the example above.
Referencing the above storage class when creating snapshots causes the snapshots to be automatically uploaded to the configured S3 storage.
Restoring from remote snapshots
Restoring from remote snapshots is an important step in disaster recovery. A snapshot needs to be registered with Kubernetes before it can be used to restore.
If the snapshot that should be restored is part of a backup to S3, the LINSTOR “remote” needs to be configured first.
linstor remote create s3 backup-remote s3.us-west-1.amazonaws.com \ snapshot-bucket us-west-1 access-key secret-key linstor backup list backup-remote
The snapshot you want to register needs to be one of the listed snapshots.
To register the snapshot with Kubernetes, you need to create two resources, one VolumeSnapshotContent referencing the ID of the snapshot and one VolumeSnapshot, referencing the content.
---
apiVersion: snapshot.storage.k8s.io/v1
kind: VolumeSnapshot
metadata:
name: example-backup-from-s3
namespace: project
spec:
source:
volumeSnapshotContentName: restored-snap-content-from-s3
volumeSnapshotClassName: linstor-csi-snapshot-class-s3
---
apiVersion: snapshot.storage.k8s.io/v1
kind: VolumeSnapshotContent
metadata:
name: restored-snap-content-from-s3
spec:
deletionPolicy: Delete
driver: linstor.csi.linbit.com
source:
snapshotHandle: snapshot-id
volumeSnapshotClassName: linstor-csi-snapshot-class-s3
volumeSnapshotRef:
apiVersion: snapshot.storage.k8s.io/v1
kind: VolumeSnapshot
name: example-backup-from-s3
namespace: projectOnce applied, the VolumeSnapshot should be shown as ready, at which point you can reference it as a dataSource in a
PVC.
5.9. Volume accessibility and locality
LINSTOR volumes are typically accessible both locally and over the network. The CSI driver will ensure that the volume is accessible on whatever node was selected for the consumer. The driver also provides options to ensure volume locality (the consumer is placed on the same node as the backing data) and restrict accessibility (only a subset of nodes can access the volume over the network).
Volume locality is achieved by setting volumeBindingMode: WaitForFirstConsumer in the storage class. This tell
Kubernetes and the CSI driver to wait until the first consumer (Pod) referencing the PVC is scheduled. The CSI driver
then provisions the volume with backing data on the same node as the consumer. In case a node without appropriate
storage pool was selected, a replacement node in the set of accessible nodes is chosen (see below).
Volume accessibility is controlled by the
allowRemoteVolumeAccess parameter. Whenever the CSI plugin needs to
place a volume, this parameter is consulted to get the set of “accessible” nodes. This means they can share volumes
placed on them through the network. This information is also propagated to Kubernetes using label selectors on the PV.
5.9.1. Volume Accessibility and Locality Examples
The following example show common scenarios where you want to optimize volume accessibility and locality. It also includes examples of how to spread volume replicas across zones in a cluster.
Single-zone homogeneous clusters
The cluster only spans a single zone, so latency between nodes is low. The cluster is homogeneous, that is, all nodes are configured similarly. All nodes have their own local storage pool.
apiVersion: storage.k8s.io/v1
kind: StorageClass
metadata:
name: linstor-storage
provisioner: linstor.csi.linbit.com
volumeBindingMode: WaitForFirstConsumer (1)
parameters:
linstor.csi.linbit.com/storagePool: linstor-pool (2)
linstor.csi.linbit.com/placementCount: "2" (3)
linstor.csi.linbit.com/allowRemoteVolumeAccess: "true" (4)| 1 | Enable late volume binding. This places one replica on the same node as the first consuming pod, if possible. |
| 2 | Set the storage pool(s) to use. |
| 3 | Ensure that the data is replicated, so that at least 2 nodes store the data. |
| 4 | Allow using the volume even on nodes without replica. Since all nodes are connected equally, performance impact should be manageable. |
Multi-zonal homogeneous clusters
As before, in our homogeneous cluster all nodes are configured similarly with their own local storage pool. The cluster spans now multiple zones, with increased latency across nodes in different zones. To ensure low latency, we want to restrict access to the volume with a local replica to only those zones that do have a replica. At the same time, we want to spread our data across multiple zones.
apiVersion: storage.k8s.io/v1
kind: StorageClass
metadata:
name: linstor-storage
provisioner: linstor.csi.linbit.com
volumeBindingMode: WaitForFirstConsumer (1)
parameters:
linstor.csi.linbit.com/storagePool: linstor-pool (2)
linstor.csi.linbit.com/placementCount: "2" (3)
linstor.csi.linbit.com/allowRemoteVolumeAccess: | (4)
- fromSame:
- topology.kubernetes.io/zone
linstor.csi.linbit.com/replicasOnDifferent: topology.kubernetes.io/zone (5)| 1 | Enable late volume binding. This places one replica on the same node as the first consuming pod, if possible. |
| 2 | Set the storage pool(s) to use. |
| 3 | Ensure that the data is replicated, so that at least 2 nodes store the data. |
| 4 | Allow using the volume on nodes in the same zone as a replica, under the assumption that zone internal networking is fast and low latency. |
| 5 | Spread the replicas across different zones. |
Multi-region clusters
If your cluster spans multiple regions, you do not want to incur the latency penalty to replicate your data across regions. To accomplish this, you can configure your storage class to just replicate data in the same zone.
apiVersion: storage.k8s.io/v1
kind: StorageClass
metadata:
name: linstor-storage
provisioner: linstor.csi.linbit.com
volumeBindingMode: WaitForFirstConsumer (1)
parameters:
linstor.csi.linbit.com/storagePool: linstor-pool (2)
linstor.csi.linbit.com/placementCount: "2" (3)
linstor.csi.linbit.com/allowRemoteVolumeAccess: | (4)
- fromSame:
- topology.kubernetes.io/zone
linstor.csi.linbit.com/replicasOnSame: topology.kubernetes.io/region (5)| 1 | Enable late volume binding. This places one replica on the same node as the first consuming pod, if possible. |
| 2 | Set the storage pool(s) to use. |
| 3 | Ensure that the data is replicated, so that at least 2 nodes store the data. |
| 4 | Allow using the volume on nodes in the same zone as a replica, under the assumption that zone internal networking is fast and low latency. |
| 5 | Restrict replicas to only a single region. |
Cluster with external storage
Our cluster now only consists of compute nodes without local storage. Any volume access has to occur through remote volume access.
apiVersion: storage.k8s.io/v1
kind: StorageClass
metadata:
name: linstor-storage
provisioner: linstor.csi.linbit.com
parameters:
linstor.csi.linbit.com/storagePool: linstor-pool (1)
linstor.csi.linbit.com/placementCount: "1" (2)
linstor.csi.linbit.com/allowRemoteVolumeAccess: "true" (3)| 1 | Set the storage pool(s) to use. |
| 2 | Assuming we only have one storage host, we can only place a single volume without additional replicas. |
| 3 | Our worker nodes need to be allowed to connect to the external storage host. |
5.10. ReadWriteMany volume access
Since LINSTOR Operator version 2.10.0, you can create ReadWriteMany (RWX) PVCs directly by using the LINSTOR CSI driver. This feature enables multiple pods to mount and write to the same LINSTOR-backed persistent volume simultaneously.
Under the hood, the RWX volume access mode uses NFS and DRBD Reactor. Because NFS is used, I/O performance will be less than it would be otherwise.
| Because the LINSTOR RWX volume access mode uses DRBD Reactor, using a LINSTOR cluster with three or more nodes to qualify for DRBD quorum is recommended. DRBD Reactor uses the DRBD quorum feature for managing highly available services. |
5.10.1. Creating a PVC with RWX access
To create an RWX PVC from a LINSTOR-backed Kubernetes storage class, specify the storage class name and the ReadWriteMany access mode in the PVC object spec, for example:
kind: PersistentVolumeClaim apiVersion: v1 metadata: name: demo-rwx-pvc-0 spec: storageClassName: linstor-csi-lvm-thin-r3 accessModes: - ReadWriteMany [...]
The storageClassName specified in this YAML configuration should be one that specifies an autoPlace parameter value greater than or equal to 2, in a LINSTOR cluster with three or more nodes.
|
5.10.2. Considerations for RWX volumes in Kubernetes
Besides the already mentioned recommendations to use a LINSTOR cluster that qualifies for DRBD quorum and a storage class with a minimum auto placement value of 2, there are other considerations for using RWX volumes in Kubernetes. These considerations relate to LINSTOR storage class parameters.
You can specify fsOpts (mkfs) options with a LINSTOR storage class that you intend to use with RWX volumes.
fsOpts options that you might specify are applied to the file system that the LINSTOR Operator will export as an NFS share.
You specify the file system type by using the the fstype parameter within the storage class configuration.
Do not use mountOpts with the LINSTOR storage class you provision an RWX PVC from.
This is because the LINSTOR Operator will mount the NFS export on each Kubelet that needs access using ideal (opinionated) mount options that should not change.
|
Using RWX volume access in clusters of fewer than three nodes
While using a LINSTOR cluster that qualifies for using the DRBD quorum feature is strongly recommended, it is possible to deploy RWX volume access in clusters of fewer than three nodes.
In this case, you need to manually set the DRBD quorum option value to majority in the backing storage class configuration.
[...] parameters: DrbdOptions/Resource/quorum: majority [...]
Setting the parameter value to majority in a 2-node cluster means that both nodes will need to be connected over the network for the HA RWX volume to be up and running in the cluster.
If you do not set this, the value defaults to off in clusters with fewer than three nodes.
If the setting was its default value of off in a 2-node cluster, for example, either node could be promoted at any time which would lead to split-brain scenarios, manual interventions, and downtime.
| Although you can configure RWX volumes in clusters of fewer than three nodes, using LINSTOR in a cluster that qualifies for DRBD quorum (3-node minimum) is always preferred and recommended. |
5.11. LINSTOR affinity controller
Volume Accessibility is controlled by the node affinity of the PersistentVolume (PV). This affinity is static, that is once defined it cannot be changed.
This can be an issue if you want to use a strict affinity: Your PV is pinned to specific nodes, but you might want to remove or add nodes. While LINSTOR can move the volume (for example: this happens automatically if you remove a node in Kubernetes), the PV affinity is not updated to reflect this.
This is where the LINSTOR Affinity Controller comes in: it watches PVs and compares their affinity with the volumes’ states in LINSTOR. If they go out of sync, the PV is replaced with an updated version.
The LINSTOR Affinity Controller is packaged in a Helm chart. If you install it in the same namespace as the Operator, simply run:
$ helm repo update $ helm install linstor-affinity-controller linstor/linstor-affinity-controller
Additional options for the chart are available at the upstream project.
5.12. Volume locality optimization
To ensure that pods are scheduled on nodes with local replicas of data, to reduce latency for read operations, you can take the following steps:
-
Use a StorageClass with
volumeBindingMode: WaitForFirstConsumer. -
Set
allowRemoteVolumeAccess: "false"in the StorageClass parameters.
Optionally, you can also deploy the [LINSTOR Affinity Controller](https://artifacthub.io/packages/helm/piraeus-charts/linstor-affinity-controller).
5.13. Configuring the DRBD module loader in Operator v2 deployments
To follow the steps in this section, you should be familiar with editing
LinstorSatelliteConfiguration
resources.
|
The DRBD module loader is the component responsible for making the DRBD kernel module available, in addition to loading other useful kernel modules for LINBIT SDS in Kubernetes. This section describes how you can configure various aspects of the DRBD kernel module loader, within a LINSTOR Operator v2 deployment.
Besides the DRBD kernel module, these modules are also loaded if available:
| Module | Purpose |
|---|---|
|
dependency for DRBD |
|
LINSTOR NVME layer |
|
LINSTOR when using loop devices as backing disks |
|
LINSTOR writecache layer |
|
LINSTOR cache layer |
|
LINSTOR thin-provisioned storage |
|
LINSTOR Snapshots |
|
LINSTOR encrypted volumes |
5.13.1. Disabling the DRBD module loader
In some circumstances it might be necessary to disable the DRBD module loader entirely. For example, if you are using an immutable operating system, and DRBD and other modules are loaded as part of the host configuration.
To disable the DRBD module loader completely, apply the following YAML configuration to your deployment:
apiVersion: piraeus.io/v1
kind: LinstorSatelliteConfiguration
metadata:
name: no-loader
spec:
podTemplate:
spec:
initContainers:
- name: drbd-module-loader
$patch: delete5.13.2. Selecting a different DRBD module loader version
By default, the Operator will try to find a DRBD module loader that matches the host operating system. The Operator determines the host distribution by inspecting the .status.nodeInfo.osImage field of the Kubernetes Node resource. A user-defined image can be used if the automatic mapping does not succeed or if you have different module loading requirements.
The following YAML configuration overrides the chosen DRBD module loader image with a user-defined image example.com/drbd-loader:v9:
apiVersion: piraeus.io/v1
kind: LinstorSatelliteConfiguration
metadata:
name: custom-drbd-module-loader-image
spec:
podTemplate:
spec:
initContainers:
- name: drbd-module-loader
image: example.com/drbd-loader:v9drbd.io, available to LINBIT customers only, maintains the following module loader container images:
| Image | Distribution |
|---|---|
|
Amazon Linux 2 |
|
Ubuntu 18.04 |
|
Ubuntu 20.04 |
|
Ubuntu 22.04 |
|
Red Hat Enterprise Linux 7 |
|
Red Hat Enterprise Linux 8 |
|
Red Hat Enterprise Linux 9 |
If you need to create a module loader image for your own distribution, you can refer to the container source files which are available in the upstream Piraeus project.
5.13.3. Changing how the module loader loads the DRBD kernel module
By default, the DRBD module loader will try to build the kernel module from source. The module loader can also be configured to load the module from a DEB or RPM package included in the image, or skip loading DRBD entirely.
To change the behavior of the DRBD module loader, set the LB_HOW environment variable to an appropriate value shown in the following table:
LB_HOW |
Module Loader Behavior |
|---|---|
|
The default value. Builds the DRBD module from source and tries to load all optional modules from the host. |
|
Searches for |
|
Only tries to load the optional modules. No DRBD module will be loaded. |
After setting the LB_HOW environment variable, apply the following YAML configuration to your deployment. Based on the name within the metadata section, the example below would be used with an LB_HOW environment variable that was set to deps_only.
apiVersion: piraeus.io/v1
kind: LinstorSatelliteConfiguration
metadata:
name: no-drbd-module-loader
spec:
podTemplate:
spec:
initContainers:
- name: drbd-module-loader
env:
- name: LB_HOW
value: deps_only5.14. Using the host network for DRBD replication in Operator v2 deployments
Instructions in this section will describe how you can use the host network for DRBD replication traffic.
By default, DRBD will use the container network to replicate volume data. This ensures replication works on a wide range of clusters without further configuration. It also enables use of NetworkPolicy to block unauthorized access to DRBD traffic. Since the network interface of the pod is tied to the lifecycle of the pod, it also means DRBD will temporarily disrupt replication when the LINSTOR satellite pod is restarted.
In contrast, using the host network for DRBD replication will cause replication to work independently of the LINSTOR satellite pod. The host network might also offer better performance than the container network. As a downside, you will have to manually ensure connectivity between nodes on the relevant ports.
To follow the steps in this section, you should be familiar with editing
LinstorSatelliteConfiguration
resources.
|
5.14.1. Configuring DRBD replication to use the host network
Switching from the default container network to the host network for DRBD replication is possible at any time. Existing DRBD resources will then be reconfigured to use the host network interface.
To configure the host network for the LINSTOR satellite, apply the following YAML configuration to your deployment:
apiVersion: piraeus.io/v1
kind: LinstorSatelliteConfiguration
metadata:
name: host-network
spec:
podTemplate:
spec:
hostNetwork: trueAfter the satellite pods are recreated, they will use the host network. Any existing DRBD resources are reconfigured to use a new IP address on the host network rather than an IP address on the container network.
5.14.2. Configuring DRBD replication to use the container network
Switching back from host network to container network involves manually resetting the configured peer addresses used by DRBD. You can do this by rebooting every node, or by manually resetting the addresses by using the drbdadm CLI command on each node. Each method is described below.
Rebooting nodes to switch DRBD replication from the host to the container network
First, you need to remove the LinstorSatelliteConfiguration that set hostNetwork: true. You can do this by entering the following kubectl command:
$ kubectl delete linstorsatelliteconfigurations.piraeus.io host-network linstorsatelliteconfiguration.piraeus.io "host-network" deleted
Next, reboot each cluster node, either serially, one by one, or else all at once. In general, replication will not work between rebooted nodes and non-rebooted nodes. The non-rebooted nodes will continue to use the host network addresses, which are generally not reachable from the container network.
After all nodes have restarted, all resources will be configured to use the container network, and all DRBD connections should be connected again.
Using the DRBD administration tool to switch DRBD replication from the host to the container network
| During this procedure, ensure that no new volumes or snapshots are created, otherwise the migration to the container network might not be applied to all resources. |
First, you need to temporarily stop all DRBD replication and suspend all DRBD volume I/O operations by using the drbdadm suspend-io all command. Enter the command once on each LINSTOR satellite pod.
$ kubectl exec ds/linstor-satellite.node1.example.com -- drbdadm suspend-io all $ kubectl exec ds/linstor-satellite.node2.example.com -- drbdadm suspend-io all $ kubectl exec ds/linstor-satellite.node3.example.com -- drbdadm suspend-io all
Next, disconnect all DRBD connections on all nodes.
$ kubectl exec ds/linstor-satellite.node1.example.com -- drbdadm disconnect --force all $ kubectl exec ds/linstor-satellite.node2.example.com -- drbdadm disconnect --force all $ kubectl exec ds/linstor-satellite.node3.example.com -- drbdadm disconnect --force all
Next, you can safely reset all DRBD connection paths. This frees the connection on each node to be moved to the container network.
$ kubectl exec ds/linstor-satellite.node1.example.com -- drbdadm del-path all $ kubectl exec ds/linstor-satellite.node2.example.com -- drbdadm del-path all $ kubectl exec ds/linstor-satellite.node3.example.com -- drbdadm del-path all
Finally, remove the LinstorSatelliteConfiguration resource configuration that set hostNetwork: true. This will result in the creation of new LINSTOR satellite pods that use the container network.
$ kubectl delete linstorsatelliteconfigurations.piraeus.io host-network linstorsatelliteconfiguration.piraeus.io "host-network" deleted
After the pods are recreated and the LINSTOR satellites are Online, the DRBD resource will be reconfigured and resume I/O operations.
5.15. Evacuating a node in Kubernetes
If you want to evacuate a LINSTOR node of its resources, so that they are placed onto other nodes within your cluster, the process is detailed in Evacuating a node. However, before evacuating a LINSTOR node in Kubernetes, you need to take an additional action.
First, prevent new Kubernetes workloads from being scheduled to the node and then move the node’s workload to another node. You can do this by entering the following commands:
# kubectl cordon <node_name> # kubectl drain --ignore-daemonsets <node_name>
After verifying that your cluster is running as expected, you can continue to follow the steps in Evacuating a node.
If you are planning on evacuating more than one node, enter the following command on all the nodes that you will be evacuating:
# linstor node set-property n1.k8s-mwa.at.linbit.com AutoplaceTarget false
This ensures that LINSTOR will not place resources from a node that you are evacuating onto another node that you plan on evacuating.
5.16. Deleting a LINSTOR node in Kubernetes
Before you can delete a LINSTOR storage node from a Kubernetes cluster, the node must have no deployed LINSTOR resources or Kubernetes workloads. To remove resources and workloads from a node, you can follow the instructions in the Evacuating a node in Kubernetes section.
Alternatively, let the LINSTOR Operator handle the node evacuation for you. To do this, you need to take a few preparatory steps.
First, use kubectl to apply a label, marked-for-deletion in the following example, to the
node that you want to delete from your Kubernetes cluster.
# kubectl label nodes <node-name> marked-for-deletion=
You must add an equals sign (=) to the end of your label name.
|
Next, configure the linstorcluster Kubernetes resource so that it does not deploy LINSTOR
resources to any node with the label that you have applied. To do this, edit the resource and
replace the contents with the lines shown in the following example, including the … line.
Change the key to match the label that you previously applied to your node.
# kubectl edit linstorclusters linstorcluster
...
spec:
nodeAffinity:
nodeSelectorTerms:
- matchExpressions:
- key: marked-for-deletion
operator: DoesNotExist
After taking these steps, the LINSTOR Operator will automatically delete the corresponding
LinstorSatellite resource. That will stop the LINSTOR satellite service on that node, but only
after LINSTOR runs a node evacuate operation and there are no more resources on the node.
Enter the following command to wait for the Operator to finish evacuating the node:
# kubectl wait linstorsatellite/<node> --for=condition=EvacuationCompleted
This can take some time. You can also use kubectl describe linstorsatellite/<node> to get a status update on the evacuation process.
After the Operator finishes evacuating the node, you can delete the node by entering the following command:
# kubectl delete node <node-name>
5.17. Monitoring with Prometheus
A LINSTOR deployment in Kubernetes offers the possibility of integrating with the Prometheus monitoring stack. You can use Prometheus to monitor LINSTOR and related components in Kubernetes. This monitoring solution is configurable to suit your purposes and includes features such as a Grafana dashboard for Prometheus scraped metrics, and the ability to set up alert rules and get alerts for events.
The Prometheus monitoring integration with LINSTOR configures:
-
Metrics scraping for the LINSTOR and DRBD state.
-
Alerts based on the cluster state
-
A Grafana dashboard
To configure monitoring for your LINSTOR in Kubernetes deployment, you should be familiar with:
5.17.1. Configuring monitoring with Prometheus in Operator v2 deployments
This section describes configuring monitoring with Prometheus for LINSTOR Operator v2 deployments in Kubernetes. If you need to configure monitoring with Prometheus for a LINSTOR Operator v1 deployment, refer to the instructions in the Monitoring with Prometheus in Operator v1 deployments section.
Deploying the Prometheus Operator for LINSTOR Operator v2 deployments
| If you already have a working Prometheus Operator deployment, skip the steps in this section. |
To deploy the Prometheus monitoring integration in Kubernetes, you need to deploy the Prometheus Operator. A simple way to do this is to use the Helm chart provided by the Prometheus Community.
First, add the Helm chart repository to your local Helm configuration, by entering the following command:
# helm repo add prometheus-community https://prometheus-community.github.io/helm-charts
Then, deploy the
kube-prometheus-stack
chart. This chart will set up Prometheus, Alertmanager, and Grafana for your cluster. Configure
it to search for monitoring and alerting rules in all namespaces:
# helm install \ --create-namespace -n monitoring prometheus prometheus-community/kube-prometheus-stack \ --set prometheus.prometheusSpec.serviceMonitorSelectorNilUsesHelmValues=false \ --set prometheus.prometheusSpec.podMonitorSelectorNilUsesHelmValues=false \ --set prometheus.prometheusSpec.ruleSelectorNilUsesHelmValues=false
By default, the deployment will only monitor resources in the kube-system and its own
namespace. LINSTOR is usually deployed in a different namespace, linbit-sds, so you need to
configure Prometheus to watch this namespace. In the example above, this is achieved by setting
the various *NilUsesHelmValues parameters to false.
|
Deploying Prometheus monitoring and alerting rules for LINSTOR
After creating a Prometheus Operator deployment and configuring it to watch all namespaces,
apply the monitoring and alerting resources for LINSTOR. You can do this by either using the
kustomize or helm utilities.
Using Kustomize to deploy Prometheus monitoring and alerting rules
To deploy Prometheus monitoring and alerting rules for LINSTOR by using the kustomize utility,
you can apply a LINBIT GitHub-hosted kustomization configuration, by entering the following command:
# kubectl apply -k \ "https://github.com/linbit/linstor-operator-builder//config/monitoring?ref=v2"
|
If you have configured SSL/TLS for your LINSTOR deployment in Kubernetes, you will need to apply a different version of the monitoring configuration. You can do this by entering the following command: kubectl apply -k \ "https://github.com/linbit/linstor-operator-builder//config/monitoring-with-api-tls?ref=v2" |
Output from applying the monitoring configuration to your deployment should show the following:
configmap/linbit-sds-dashboard created podmonitor.monitoring.coreos.com/linstor-satellite created prometheusrule.monitoring.coreos.com/linbit-sds created servicemonitor.monitoring.coreos.com/linstor-controller created
Using Helm to deploy Prometheus monitoring and alerting rules
If you are using Helm, you can deploy Prometheus monitoring for your LINSTOR in Kubernetes
deployment by enabling monitoring in the linbit-sds chart. The following command will install a new LINSTOR in Kubernetes deployment with Prometheus monitoring, or upgrade an existing Helm-installed deployment and enable Prometheus monitoring:
# helm repo update linstor && \ helm upgrade --install linbit-sds linstor/linbit-sds \ --set monitoring.enabled=true
Unlike the kustomize deployment method, you can use the same helm upgrade --install command for
a regular and an SSL/TLS-enabled LINSTOR deployment. The Helm deployment configures the correct
endpoint automatically.
|
Output from the command above should show that the linbit-sds chart was successfully deployed.
Verifying a monitoring deployment
You can verify that the monitoring configuration is working in your deployment by checking the local Prometheus, Alertmanager, and Grafana web consoles.
Verifying the Prometheus web console deployment
First, get access to the Prometheus web console from your local browser by forwarding the Prometheus web console service to local port 9090:
# kubectl port-forward -n monitoring services/prometheus-kube-prometheus-prometheus 9090:9090
If you need to access the Prometheus instance from a system other than localhost, you
might need to add the --address 0.0.0.0 argument to the previous command.
|
Next, in a web browser, open http://localhost:9090/graph and display the linstor_info and
drbd_version metrics, for example, by entering each metric into the search field, and clicking
the Execute button.
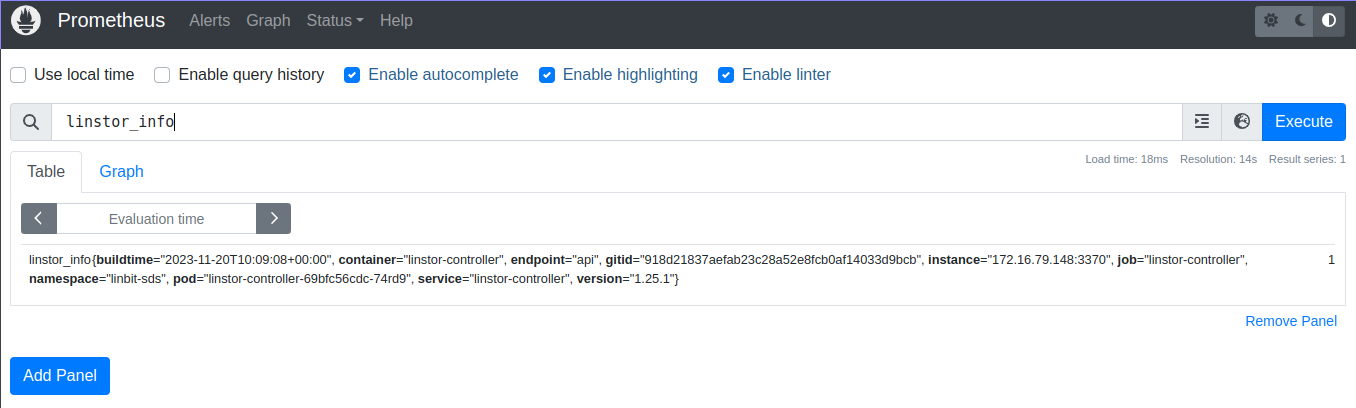
linstor_info Prometheus metric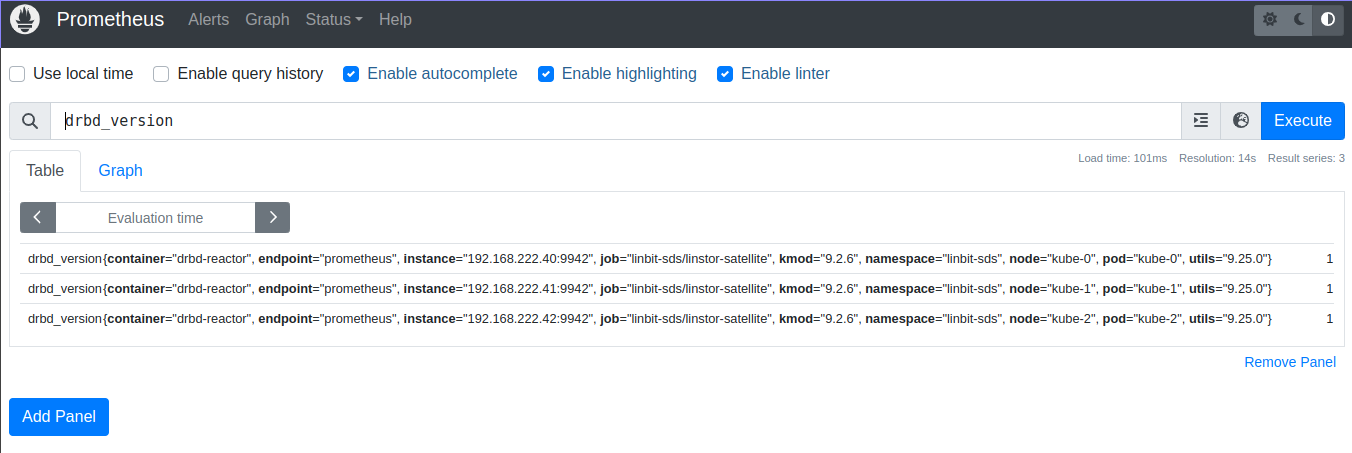
drbd_version Prometheus metricVerifying the Prometheus Alertmanager web console deployment
To view the Alertmanager console, forward the Prometheus Alertmanager service to local port 9093, by entering the following command:
# kubectl port-forward -n monitoring services/prometheus-kube-prometheus-alertmanager 9093:9093
If you need to access the Prometheus Alertmanager instance from a system other than
localhost, you might need to add the --address 0.0.0.0 argument to the previous command.
|
Next, in a web browser, open http://localhost:9093. The Alertmanager console should show an
itemized list of alert groups for your deployment, including an alert group for the linbit-sds
namespace.
You can verify that an alert will fire and be shown in your Alertmanager console by running a
command that will cause an event applicable to an alert that you want to test. For example, you
can disconnect a DRBD resource. This will cause a drbdResourceSuspended alert. To test this,
assuming that you have a LINSTOR satellite pod named kube-0 that is running in the
linbit-sds namespace and that the satellite is in a secondary role for a DRBD resource named
my-res, enter the following command:
# kubectl exec -it -n linbit-sds kube-0 -- drbdadm disconnect --force my-res
Use caution with the types of events that you use to test alerts, especially on a
production system. The above drbdadm disconnect command should be safe if you run it on a
satellite node pod that is in a secondary role for the resource you disconnect. You can verify
the resource role state that the satellite node pod is in by using a drbdadm status
<resource-name> command.
|
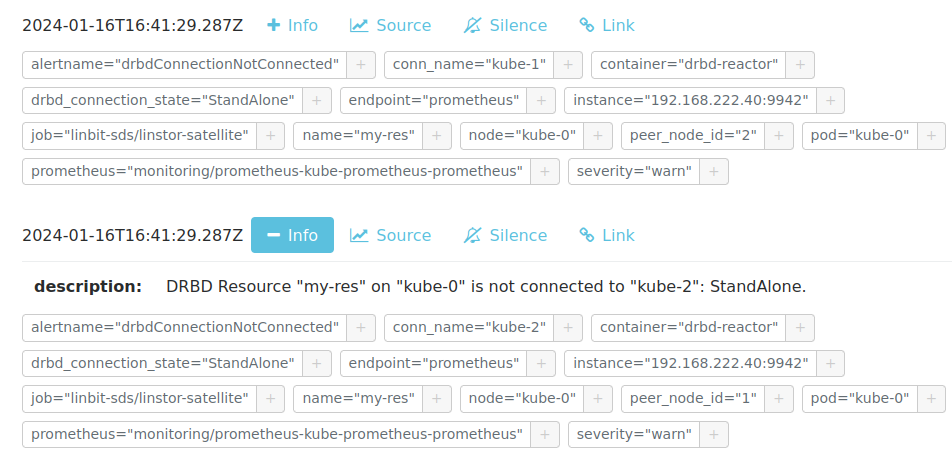
my-res DRBD resource in a disconnected stateAfter verifying that the Prometheus Alertmanager web console shows new alerts that relate to the
event you caused, you should revert your deployment to its previous state. To do this for the
previous drbdadm disconnect example, enter the following command:
# kubectl exec -it -n linbit-sds kube-0 -- drbdadm connect my-res
You can verify that the kube-0 satellite node pod is again connected to the my-res DRBD
resource by entering a drbdadm status command:
# kubectl exec -it -n linbit-sds kube-0 -- drbdadm status my-res
Output from the command should show that the resource is in an up-to-date state on all diskful and connected nodes.
my-res role:Secondary
disk:UpToDate
kube-1 role:Secondary
peer-disk:Diskless
kube-2 role:Secondary
peer-disk:UpToDate
Verifying the Grafana web console and LINBIT SDS dashboard deployment
To view the Grafana console and LINBIT SDS dashboard, first forward the Grafana service to local port 3000, by entering the following command:
# kubectl port-forward -n monitoring services/prometheus-grafana 3000:http-web
If you need to access the Grafana instance from a system other than the localhost, you
might need to add the --address 0.0.0.0 argument to the previous command.
|
Next, in a web browser, open http://localhost:3000 and log in. If you are using the example
deployment from above, enter username admin and password prom-operator to log in to the
Grafana instance. After logging in, change your password
(http://192.168.121.20:3000/profile/password) to something other than the default password.
Select “LINBIT SDS” from the available dashboards (http://localhost:3000/dashboards) to show
an overview of the health status of your LINSTOR deployment, including various metrics and
statistics.
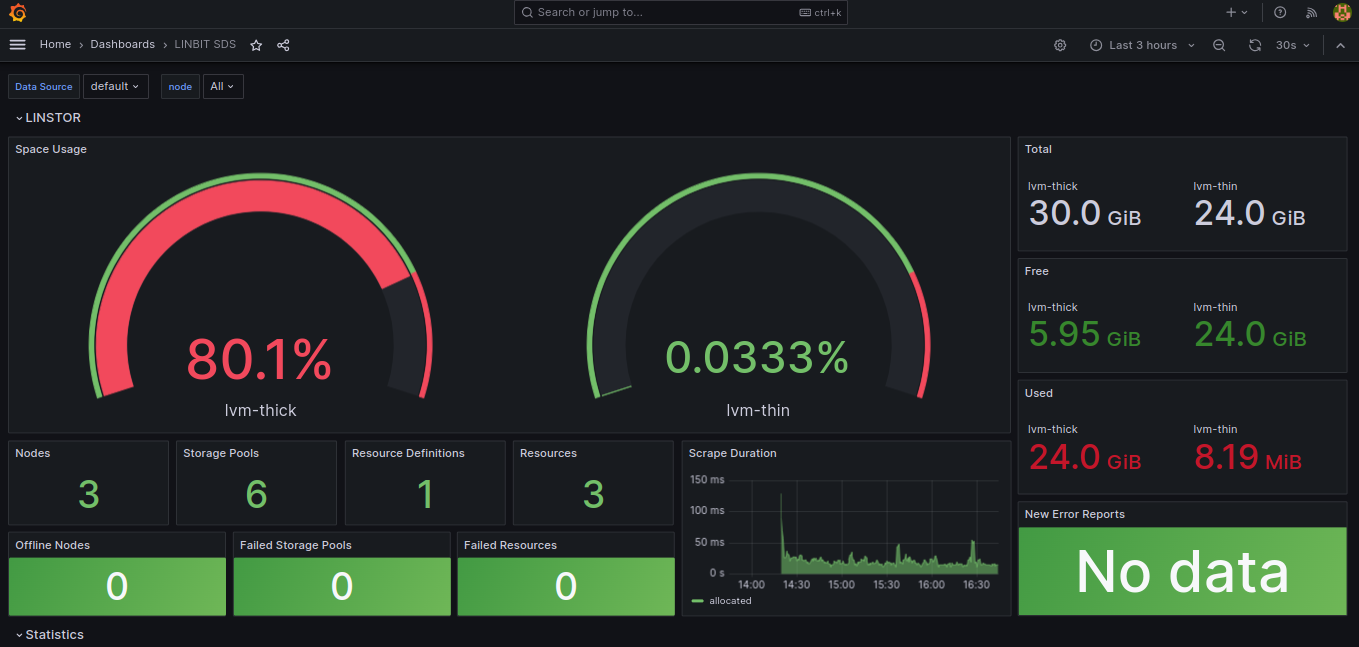
5.17.2. Monitoring with Prometheus in Operator v1 deployments
In Operator v1 deployments, the operator will set up monitoring containers along the existing components and make them available as a Service.
If you use the Prometheus Operator, the LINSTOR Operator will also set up the ServiceMonitor
instances. The metrics will automatically be collected by the Prometheus instance associated to the operator, assuming
watching the Piraeus namespace is enabled.
To disable exporting of metrics, set operator.satelliteSet.monitoringImage to an empty value.
LINSTOR controller monitoring in Operator v1 deployments
The LINSTOR controller exports cluster-wide metrics. Metrics are exported on the existing controller service, using the
path /metrics.
DRBD resource monitoring in Operator v1 deployments
All satellites are bundled with a secondary container that uses drbd-reactor
to export metrics directly from DRBD. The metrics are available on port 9942, for convenience a headless service named
<linstorsatelliteset-name>-monitoring is provided.
If you want to disable the monitoring container, set monitoringImage to "" in your LinstorSatelliteSet resource.
5.18. Upgrading a LINSTOR deployment on Kubernetes
A LINSTOR deployment in Kubernetes can be upgraded to a new release. It is also possible to upgrade an existing LINSTOR Operator v1 deployment in Kubernetes to an Operator v2 deployment.
| During the upgrade process, attaching, detaching or provisioning of volumes will be paused. Existing volumes and volumes already in use by a pod will continue to work. |
5.18.1. Upgrading LINSTOR Operator v2
If you deployed LINSTOR using Operator v2, you can upgrade LINBIT SDS by deploying the newer version of LINSTOR Operator.
| During the upgrade process, the LINSTOR satellite pods will restart. This will stop replication of DRBD devices, freezing any writes on volumes, until the satellite pods are online again. |
How you upgrade LINBIT SDS depends on your original deployment method.
Upgrading LINSTOR Operator v2 by using Kustomize
If you deployed LINBIT SDS by using kustomize, upgrade to a new LINSTOR Operator version by changing the resource link in your
kustomization.yaml file.
apiVersion: kustomize.config.k8s.io/v1beta1
kind: Kustomization
namespace: linbit-sds
resources:
- https://charts.linstor.io/static/v2.10.0.yaml (1)
generatorOptions:
disableNameSuffixHash: true
secretGenerator:
- name: drbdio-pull-secret
type: kubernetes.io/dockerconfigjson
literals:
- .dockerconfigjson={"auths":{"drbd.io":{"username":"MY_LINBIT_USER","password":"MY_LINBIT_PASSWORD"}}} (2)| 1 | Replace with the latest release manifest from charts.linstor.io. |
| 2 | Replace MY_LINBIT_USER and MY_LINBIT_PASSWORD with your my.linbit.com credentials. |
Then, apply the kustomization.yaml file, by using the following kubectl command, and wait
for the upgrade to complete:
$ kubectl apply -k . namespace/linbit-sds applied [...] $ kubectl -n linbit-sds wait pod --for=condition=Ready --all pod/linstor-operator-controller-manager-6d9847d857-zc985 condition met [...]
Upgrading LINSTOR Operator v2 by using Helm
If you used Helm, to deploy LINBIT SDS, upgrade to a new Operator version by upgrading the linstor-operator Helm chart.
$ helm repo update [...] Update Complete. ⎈Happy Helming!⎈ $ helm install linstor-operator linstor/linstor-operator --wait Release "linstor-operator" has been upgraded. Happy Helming! [...]
5.18.2. Upgrading LINSTOR Operator v1
Before upgrading to a new release, you should ensure you have an up-to-date backup of the LINSTOR database. If you are using the etcd database packaged in the LINSTOR Chart, see here.
Upgrades using the LINSTOR etcd deployment require etcd to use persistent storage.
Only follow these steps if etcd was deployed using etcd.persistentVolume.enabled=true
|
Upgrades will update to new versions of the following components:
-
LINSTOR Operator deployment
-
LINSTOR Controller
-
LINSTOR Satellite
-
LINSTOR CSI Driver
-
etcd
-
Stork
Some versions require special steps, refer to instructions here. The main command to upgrade to a new LINSTOR Operator version is:
helm repo update helm upgrade linstor-op linstor/linstor
If you used any customizations on the initial install, pass the same options to helm upgrade.
The options currently in use can be retrieved from Helm.
# Retrieve the currently set options
$ helm get values linstor-op
USER-SUPPLIED VALUES:
USER-SUPPLIED VALUES: null
drbdRepoCred: drbdiocred
operator:
satelliteSet:
kernelModuleInjectionImage: drbd.io/drbd9-rhel8:v9.0.28
storagePools:
lvmThinPools:
- devicePaths:
- /dev/vdb
name: thinpool
thinVolume: thinpool
volumeGroup: ""
# Save current options
$ helm get values linstor-op > orig.yaml
# modify values here as needed. for example selecting a newer DRBD image
$ vim orig.yaml
# Start the upgrade
$ helm upgrade linstor-op linstor/linstor -f orig.yaml
This triggers the rollout of new pods. After a short wait, all pods should be running and ready. Check that no errors are listed in the status section of LinstorControllers, LinstorSatelliteSets and LinstorCSIDrivers.
5.18.3. Upgrading LINSTOR Operator v1 to LINSTOR Operator v2
To upgrade an existing LINBIT SDS deployment in Kubernetes from a LINSTOR Operator v1 deployment to an Operator v2 deployment, you can follow the migration instructions at charts.linstor.io.
It is possible to do this upgrade without affecting existing storage volumes that are attached to your LINSTOR satellite pods. However, during the migration to an Operator v2 deployment, you will not be able to create new volumes, nor attach or detach existing volumes, until you roll out your new deployment.
5.18.4. Upgrading a LINSTOR cluster with Kubernetes back end
The LINSTOR Operator will create a backup of the database before upgrading. This makes it possible to roll back to a known state should something go wrong during the upgrade.
There are situations in which the Operator can’t create the backup automatically. This might be because:
-
The base version of the chart or operator is too old. Automatic backups are available starting with version 1.8.0 If upgrading from a version before 1.8.0, follow the manual steps in the next section.
-
The backup is too large to fit into a Kubernetes secret. In this case an error is reported in the status field of the
LinstorControllerresources. Follow the instructions by copying the created backup to a safe location and creating the necessary secret.kubectl cp <linstor-operator-pod>:/run/linstor-backups/linstor-backup-<some-hash>.tar.gz <destination-path> kubectl create secret linstor-backup-<same-hash>
Creating a backup of the LINSTOR database
Follow these instructions if you need to manually create a backup of the LINSTOR Kubernetes database.
-
Stop the current controller:
$ kubectl patch linstorcontroller linstor-op-cs '{"spec":{"replicas": 0}}' $ kubectl rollout status --watch deployment/linstor-op-cs-controller -
The following command will create a file
crds.yaml, which stores the current state of all LINSTOR Custom Resource Definitions:$ kubectl get crds | grep -o ".*.internal.linstor.linbit.com" | \ xargs kubectl get crds -oyaml > crds.yaml
-
In addition to the definitions, the actual resources must be backed up as well:
$ kubectl get crds | grep -o ".*.internal.linstor.linbit.com" | \ xargs -i{} sh -c "kubectl get {} -oyaml > {}.yaml" -
If upgrading the chart, use
--set IHaveBackedUpAllMyLinstorResources=trueto acknowledge you have executed the above steps.
Restoring from a LINSTOR database backup
Follow these instructions if you need to recover from an failure during a LINSTOR upgrade.
-
Fetch the backup (skip if the backup is already available on your local machine):
$ # List the available backups $ kubectl get secret '-ocustom-columns=NAME:.metadata.name,FROM:metadata.annotations.linstor\.linbit\.com/backup-previous-version,CREATED-AT:.metadata.creationTimestamp' $ kubectl get secret linstor-backup-<backup-specific-hash> '-ogo-template=go-template={{index .data ".binaryData.backup.tar.gz" | base64decode}}' > linstor-backup.tar.gz -
Unpack the backup
$ tar xvf linstor-backup.tar.gz crds.yaml ....
-
Stop the current controller:
$ kubectl patch linstorcontroller linstor-op-cs "{"spec":{"replicas": 0}}" $ kubectl rollout status --watch deployment/piraeus-op-cs-controller -
Delete existing resources
$ kubectl get crds | grep -o ".*.internal.linstor.linbit.com" | xargs --no-run-if-empty kubectl delete crds
-
Apply the old LINSTOR CRDs
$ kubectl apply -f crds.yaml
-
Apply the old LINSTOR resource state
$ kubectl apply -f *.internal.linstor.linbit.com.yaml
-
Re-apply the helm chart using the old LINSTOR version
$ helm upgrade linstor-op charts/piraeus --set operator.controller.controllerImage=... --set operator.satelliteSet.satelliteImage=...
5.18.5. Upgrading instructions for specific versions
Some versions require special steps, see below.
Upgrading to v2.10
Generally, no additional steps are necessary to upgrade to v2.10.
If you installed the LINSTOR Affinity Controller separately by using Helm, it is no longer required. The Operator now deploys the LINSTOR Affinity Controller as part of LINBIT SDS.
Upgrading to v2.9
Generally, no additional steps are necessary to upgrade to v2.9.
The default behavior when deleting the LinstorSatellite resource has been changed with this version. The Operator no longer causes the node to be evacuated by default. Instead, the LINSTOR Satellite is left unchanged. To restore the old behavior, create the following resource:
apiVersion: piraeus.io/v1
kind: LinstorSatelliteConfiguration
metadata:
name: satellite-deletion-policy
spec:
deletionPolicy: EvacuateThe default behavior of starting LINBIT SDS components also on control plane nodes has been changed. LINBIT SDS will no
longer run on nodes tainted by the node-role.kubernetes.io/control-plane:NoSchedule or
node-role.kubernetes.io/master:NoSchedule taints by default. To restore the old behaviour, make the following change
to the LinstorCluster resource:
apiVersion: piraeus.io/v1
kind: LinstorCluster
metadata:
name: linstorcluster
spec:
tolerations:
- key: node-role.kubernetes.io/control-plane
effect: NoSchedule
operator: Exists
- key: node-role.kubernetes.io/worker
effect: NoSchedule
operator: ExistsUpgrading to v2.7
Generally, no additional steps are necessary.
LINSTOR Satellites now try to automatically detect the LVM configuration on the host. Any patch targeting the Satellites
/etc/lvm/lvm.conf file might need to be adapted.
Upgrading to v2.4
No additional steps are necessary.
LINSTOR Satellites are now managed via DaemonSet resources. Any patch targeting a satellite
Pod resources is automatically converted to the equivalent DaemonSet resource patch. In the Pod
list, you will see these Pods using a new linstor-satellite prefix.
Upgrading to v2.3
Version v2.3 removed the NetworkPolicy resource from default deployment. To clean up existing
NetworkPolicy resources, run the following command:
$ kubectl delete networkpolicy -n linbit-sds satellite
Upgrading to v2.2
Version v2.2 removed the dependency on cert-manager for the initial deployment. To clean up
existing Certificate resource, run the following command:
$ kubectl delete certificate -n linbit-sds linstor-operator-serving-cert
Upgrading to 1.10
Version 1.10 introduces an option to share DRBD configuration between host and container. If you need this option, you have to update the CRDs. Because Helm does not upgrade CRDs on chart upgrade, instead enter the following commands:
$ helm repo update $ helm pull linstor/linstor --untar $ kubectl replace -f linstor/crds/ customresourcedefinition.apiextensions.k8s.io/linstorcontrollers.linstor.linbit.com replaced customresourcedefinition.apiextensions.k8s.io/linstorcsidrivers.linstor.linbit.com replaced customresourcedefinition.apiextensions.k8s.io/linstorsatellitesets.linstor.linbit.com replaced
Upgrading to 1.9
Version 1.9 disables the LINSTOR HA Controller deployment by default. The deployment has moved out of the LINSTOR Operator chart. If you want to keep using the old version, enable it again using this Helm command:
helm upgrade linstor-op linstor/linstor ... --set haController.enabled=true
If you are upgrading to v1.9 from v1.6 or earlier, you need to either:
-
Create a master passphrase, before you upgrade:
$ kubectl create secret generic linstor-pass --from-literal=MASTER_PASSPHRASE=<password>
-
Or, upgrade to v1.7 first, and Helm will create a master passphrase for you automatically. You can view this passphrase later, by entering:
$ kubectl get secret linstor-op-passphrase \ -ogo-template='{{ .data.MASTER_PASSPHRASE | base64decode }}'
Upgrading to v1.8
| This upgrade requires a complete rebuild of the K8s database, so upgrades might take longer than normal. |
Version 1.8 introduces new options to centrally set the log level and number of worker threads for the CSI driver. If you need these options, you have to update the CRDs. As Helm does not upgrade CRDs on chart upgrade, instead enter the following commands:
$ helm repo update $ helm pull linstor/linstor --untar $ kubectl replace -f linstor/crds/ customresourcedefinition.apiextensions.k8s.io/linstorcontrollers.linstor.linbit.com replaced customresourcedefinition.apiextensions.k8s.io/linstorcsidrivers.linstor.linbit.com replaced customresourcedefinition.apiextensions.k8s.io/linstorsatellitesets.linstor.linbit.com replaced
In addition, 1.8 reworks the way SSL/TLS setups work. Refer to the Securing Operator v1 deployment section and work through these steps again.
If you are upgrading to v1.8 from v1.6 or earlier, you need to either:
-
Create a master passphrase, before you upgrade:
$ kubectl create secret generic linstor-pass --from-literal=MASTER_PASSPHRASE=<password>
-
Or, upgrade to v1.7 first, and Helm will create a master passphrase for you automatically. You can view this passphrase later, by entering:
$ kubectl get secret linstor-op-passphrase \ -ogo-template='{{ .data.MASTER_PASSPHRASE | base64decode }}'
Upgrading to v1.6
This versions introduces a new option to support Kubernetes distributions which use different
state directories than the default of /var/lib/kubelet. A notable example is microk8s, which
uses /var/snap/microk8s/common/var/lib/kubelet. To support this, a small addition to the
LinstorCSIDriver CRD was necessary. As Helm does not upgrade CRDs on chart upgrade, instead
enter the following commands:
$ helm repo update $ helm pull linstor/linstor --untar $ kubectl replace -f linstor/crds/ customresourcedefinition.apiextensions.k8s.io/linstorcontrollers.linstor.linbit.com replaced customresourcedefinition.apiextensions.k8s.io/linstorcsidrivers.linstor.linbit.com replaced customresourcedefinition.apiextensions.k8s.io/linstorsatellitesets.linstor.linbit.com replaced
If you do not apply the new CRDs, you will get errors such as the following:
Error: UPGRADE FAILED: error validating "": error validating data: ValidationError(LinstorCSIDriver.spec): unknown field "kubeletPath" in com.linbit.linstor.v1.LinstorCSIDriver.spec
If you previously used the included snapshot-controller to process VolumeSnapshot resources,
you should replace it with the new charts provided by the Piraeus project. The
section on snapshots has been updated to include
instructions on how you can add the snapshot-controller to your cluster.
Upgrading to v1.5
This version introduces a monitoring component for DRBD resources.
This requires a new image and a replacement of the existing LinstorSatelliteSet CRD. Helm does
not upgrade the CRDs on a chart upgrade, instead enter the following commands:
$ helm repo update $ helm pull linstor/linstor --untar $ kubectl replace -f linstor/crds/ customresourcedefinition.apiextensions.k8s.io/linstorcontrollers.linstor.linbit.com replaced customresourcedefinition.apiextensions.k8s.io/linstorcsidrivers.linstor.linbit.com replaced customresourcedefinition.apiextensions.k8s.io/linstorsatellitesets.linstor.linbit.com replaced
If you do not plan to use the provided monitoring you still need to apply the above steps, otherwise you will get an error such as the following:
Error: UPGRADE FAILED: error validating "": error validating data: ValidationError(LinstorSatelliteSet.spec): unknown field "monitoringImage" in com.linbit.linstor.v1.LinstorSatelliteSet.spec
Some Helm versions fail to set the monitoring image even after replacing the CRDs. In that
case, the in-cluster LinstorSatelliteSet will show an empty monitoringImage value. Edit the
resource using kubectl edit linstorsatellitesets and set the value to
drbd.io/drbd-reactor:v0.3.0 to enable monitoring.
|
Upgrading to v1.4
This version introduces a new default version for the etcd image, so take extra care that etcd is using persistent storage. Upgrading the etcd image without persistent storage will corrupt the cluster.
If you are upgrading an existing cluster without making use of new Helm options, no additional steps are necessary.
If you plan to use the newly introduced additionalProperties and additionalEnv settings, you
have to replace the installed CustomResourceDefinitions with newer versions. Helm does not
upgrade the CRDs on a chart upgrade
$ helm pull linstor/linstor --untar $ kubectl replace -f linstor/crds/ customresourcedefinition.apiextensions.k8s.io/linstorcontrollers.linstor.linbit.com replaced customresourcedefinition.apiextensions.k8s.io/linstorcsidrivers.linstor.linbit.com replaced customresourcedefinition.apiextensions.k8s.io/linstorsatellitesets.linstor.linbit.com replaced
Upgrading to v1.2
LINSTOR Operator v1.2 is supported on Kubernetes 1.17+. If you are using an older Kubernetes distribution, you might need to change the default settings, for example [the CSI provisioner](https://kubernetes-csi.github.io/docs/external-provisioner.html).
There is a known issue when updating the CSI components: the pods will not be updated to the
newest image and the errors section of the LinstorCSIDrivers resource shows an error updating
the DaemonSet. In this case, manually delete deployment/linstor-op-csi-controller and
daemonset/linstor-op-csi-node. They will be re-created by the Operator.
6. LINSTOR volumes in OpenShift
This chapter describes the usage of LINBIT SDS in OpenShift as managed by the LINSTOR® Operator and with volumes provisioned using the LINSTOR CSI plugin.
OpenShift is the official Red Hat developed and supported distribution of Kubernetes. The value of OpenShift is the strong integration of otherwise optional components, such as network ingress and monitoring, all tied together with a Web UI to manage it all. LINSTOR Operator integrates with these components where possible.
6.1. Deploying LINBIT SDS on OpenShift
Deploying LINBIT SDS on OpenShift is similar to deploying LINBIT SDS on other Kubernetes clusters. As prerequisites, you need:
-
Access to your OpenShift cluster through the
ocutility. -
Your LINBIT® Customer Portal credentials for accessing
drbd.io.
| The LINBIT container image repository (https://drbd.io) is only available to LINBIT customers or through LINBIT customer trial accounts. Contact LINBIT for information on pricing or to begin a trial. Alternatively, you can use the LINSTOR SDS upstream project, named Piraeus, without being a LINBIT customer. |
First, create a new OpenShift project for LINBIT SDS which will also create a namespace for LINBIT SDS deployment:
$ oc new-project linbit-sds Now using project "linbit-sds" on server ...
Next, create a file named kustomization.yaml to customize some of the deployment’s default
values:
apiVersion: kustomize.config.k8s.io/v1beta1
kind: Kustomization
namespace: linbit-sds
resources:
- https://charts.linstor.io/static/v2.1.1.yaml
generatorOptions:
disableNameSuffixHash: true
secretGenerator:
- name: drbdio-pull-secret
type: kubernetes.io/dockerconfigjson
literals:
- .dockerconfigjson={"auths":{"drbd.io":{"username":"MY_LINBIT_USER","password":"MY_LINBIT_PASSWORD"}}} (1)| 1 | Replace MY_LINBIT_USER and MY_LINBIT_PASSWORD with your LINBIT customer portal
credentials. |
| The YAML configuration manifest above is current at the time of writing. Refer to https://charts.linstor.io for the most up-to-date version or previous versions if needed. |
You can make additional modifications to the kustomization.yaml file based on your
preferences and needs. Possible options are discussed in the
Kubernetes advanced deployment section.
Finally, deploy LINBIT SDS by applying the customized configuration, and wait until all pods are
ready, by entering the following commands in the same directory as your kustomization.yaml:
$ oc apply -k . && \ oc wait --for=condition=ready pod --all -n linbit-sds --timeout=5m && \ oc get pods -n linbit-sds
Output should eventually show that a LINSTOR controller pod is up and running.
NAME READY STATUS RESTARTS AGE linstor-operator-controller-manager-59586c7bb5-qlfwb 1/1 Running 0 11s
After deploying the LINSTOR controller pod, enter the following command to complete the deployment of your LINBIT SDS in OpenShift cluster:
# oc apply -f - <<EOF
apiVersion: piraeus.io/v1
kind: LinstorCluster
metadata:
name: linstorcluster
spec: {}
EOF
# oc wait pod --for=condition=Ready -n linbit-sds --timeout=5m --all
Output should eventually show that your LINBIT SDS cluster pods are up and running.
NAME READY STATUS RESTARTS AGE ha-controller-6fl6b 1/1 Running 0 60s ha-controller-c955w 1/1 Running 0 60s ha-controller-v4mdr 1/1 Running 0 60s kube-0 2/2 Running 0 56s (1) kube-1 2/2 Running 0 56s (1) kube-2 2/2 Running 0 55s (1) linstor-controller-779bffbc59-6jjzd 1/1 Running 0 61s linstor-csi-controller-8cd45658f-6f9t6 7/7 Running 0 61s linstor-csi-node-blgk8 3/3 Running 0 61s linstor-csi-node-mn8p6 3/3 Running 0 61s linstor-csi-node-pncpz 3/3 Running 0 61s linstor-operator-controller-manager-59586c7bb5-qlfwb 1/1 Running 0 4m2s
| 1 | These pods are the LINSTOR satellite node pods. The pod name reflects each node’s hostname. |
6.1.2. Configuring LINBIT GUI access
The LINSTOR container images come with the LINBIT GUI preinstalled. To expose it on your cluster, configure an OpenShift Route resource:
$ oc create route edge --service linstor-controller $ oc get route NAME HOST/PORT PATH SERVICES PORT TERMINATION WILDCARD linstor-controller linstor-controller-linbit-sds.apps.example.com linstor-controller api edge None
The GUI is now accessible at https://linstor-controller-linbit-sds.apps.oc.example.com/ui/
| This might enable external access to LINBIT GUI and LINSTOR API. Ensure that only authorized users can access it, for example, by requiring client side TLS certificates on the route. |
6.1.3. Configuring cluster monitoring
OpenShift includes a fully configured monitoring stack. While most of the monitoring stack is only intended for OpenStack infrastructure, basic monitoring for LINBIT SDS is possible.
First, ensure that monitoring of user-defined projects is enabled in OpenShift by following the steps in Red Hat documentation.
Once monitoring for user-defined projects is enabled, the LINSTOR Operator
automatically detects the presence of OpenShift’s Prometheus-based monitoring
stack and configures the ServiceMonitor resources. The Prometheus instance
will scrape metrics for DRBD® and LINSTOR from all Cluster nodes.
6.2. Interacting with LINBIT SDS in OpenShift
The LINSTOR Controller pod includes a LINSTOR Client, making it easy to access LINSTOR’s interactive mode. For instance:
$ oc exec -it deployment/linstor-controller -- linstor interactive LINSTOR ==> ...
This should only be necessary for investigating problems and accessing advanced functionality. Regular operation such as creating volumes should be achieved through the Kubernetes integration.
7. LINSTOR volumes in Nomad
This chapter describes using LINSTOR® and DRBD® to provision volumes in Nomad.
7.1. Introduction to Nomad
Nomad is a simple and flexible workload orchestrator to deploy and manage containers and non-containerized applications across on-premises and cloud environments.
Nomad supports provisioning storage volumes using plug-ins conforming to the Container Storage Interface (CSI).
LINBIT® distributes a CSI plugin in the form of container images from drbd.io. The plugin can be
configured to work with a LINSTOR cluster that is deployed along or inside a Nomad cluster.
| The LINBIT container image repository (https://drbd.io) is only available to LINBIT customers or through LINBIT customer trial accounts. Contact LINBIT for information on pricing or to begin a trial. Alternatively, you may use LINSTOR SDS’ upstream project named Piraeus, without being a LINBIT customer. |
7.2. Deploying LINSTOR on Nomad
This section describes how you can deploy and configure a new LINSTOR cluster in Nomad.
| If you want to install LINSTOR directly on your nodes, check out the guide on installing LINSTOR. You can skip this section and jump directly to deploying the CSI driver. |
7.2.1. Preparing Nomad
To run LINSTOR, every Nomad agent needs to be configured to:
-
Support the docker driver and allow executing privileged containers
To allow running privileged containers, add the following snippet to your Nomad agent configuration and restart Nomad
Listing 15. /etc/nomad.d/docker-privileged.hclplugin "docker" { config { allow_privileged = true } } -
Support for container networking. If you don’t have the Container Network Interface plug-ins installed, you will only be able to use
mode = "host"in your job networks. For most production setups, we recommend installing the default plug-ins:Head to the plug-in release page, select the release archive appropriate for your distribution and unpack them in
/opt/cni/bin. You might need to create the directory before unpacking. -
Provide a host volume, allowing a container access to the hosts
/devdirectoryTo create a host volume, add the following snippet to your Nomad agent configuration and restart Nomad.
Listing 16. /etc/nomad.d/host-volume-dev.hclclient { host_volume "dev" { path = "/dev" } }
7.2.2. Creating a LINSTOR controller job
The LINSTOR Controller is deployed as a service with no replicas. At any point in time, there can only be one LINSTOR Controller running in a cluster. It is possible to restart the controller on a new node, provided it still has access to the database. See Creating a highly available LINSTOR cluster for more information.
The following example will create a Nomad job starting a single LINSTOR Controller in data center dc1 and connect
to an external database.
linstor-controller.hcljob "linstor-controller" {
datacenters = ["dc1"] (1)
type = "service"
group "linstor-controller" {
network {
mode = "bridge"
# port "linstor-api" { (2)
# static = 3370
# to = 3370
# }
}
service { (3)
name = "linstor-api"
port = "3370"
connect {
sidecar_service {}
}
check {
expose = true
type = "http"
name = "api-health"
path = "/health"
interval = "30s"
timeout = "5s"
}
}
task "linstor-controller" {
driver = "docker"
config {
image = "drbd.io/linstor-controller:v1.13.0" (4)
auth { (5)
username = "example"
password = "example"
server_address = "drbd.io"
}
mount {
type = "bind"
source = "local"
target = "/etc/linstor"
}
}
# template { (6)
# destination = "local/linstor.toml"
# data = <<EOH
# [db]
# user = "example"
# password = "example"
# connection_url = "jdbc:postgresql://postgres.internal.example.com/linstor"
# EOH
# }
resources {
cpu = 500 # 500 MHz
memory = 700 # 700MB
}
}
}
}| 1 | Replace dc1 with your own data center name |
||
| 2 | This exposes the LINSTOR API on the host on port 3370.
|
||
| 3 | The service block is used to expose the LINSTOR API to other jobs through the service mesh.
|
||
| 4 | This sets the LINSTOR Controller image to run. The latest images are available from
drbd.io.
|
||
| 5 | Sets the authentication to use when pulling the image. If pulling from drbd.io, you need
to use your LINBIT customer login here. Read more about pulling from a private repo
here. |
||
| 6 | This template can be used to set arbitrary configuration options for LINSTOR. This example configures an external database for LINSTOR. You can find a more detailed explanation of LINSTOR’s database options here and more on Nomad templates here. |
Apply the job by running:
$ nomad job run linstor-controller.hcl
==> Monitoring evaluation "7d8911a7"
Evaluation triggered by job "linstor-controller"
==> Monitoring evaluation "7d8911a7"
Evaluation within deployment: "436f4b2d"
Allocation "0b564c73" created: node "07754224", group "controller"
Evaluation status changed: "pending" -> "complete"
==> Evaluation "7d8911a7" finished with status "complete"Using a host volume for the LINSTOR database
If you want to try LINSTOR without setting up an external database, you can make use of LINSTOR’s built-in file system based database. To make the database persistent, you need to ensure it is placed on a host volume.
| Using a host volume means that only a single node is able to run the LINSTOR Controller. If the node is unavailable, the LINSTOR Cluster will also be unavailable. For alternatives, use an external (highly available) database or deploy the LINSTOR cluster directly on the hosts. |
To create a host volume for the LINSTOR database, first create the directory on the host with the expected permissions
$ mkdir -p /var/lib/linstor
$ chown -R 1000:0 /var/lib/linstorThen add the following snippet to your Nomad agent configuration and restart Nomad
/etc/nomad.d/host-volume-linstor-db.hclclient {
host_volume "linstor-db" {
path = "/var/lib/linstor"
}
}Then, add the following snippets to the linstor-controller.hcl example from above and adapt the connection_url
option from the configuration template.
job > groupvolume "linstor-db" {
type = "host"
source = "linstor-db"
}job > group > taskvolume_mount {
volume = "linstor-db"
destination = "/var/lib/linstor"
}
template {
destination = "local/linstor.toml"
data = <<EOH
[db]
user = "linstor"
password = "linstor"
connection_url = "jdbc:h2:/var/lib/linstor/linstordb"
EOH
}7.2.3. Creating a LINSTOR satellite job
In Nomad, the LINSTOR satellites are deployed as a system job that runs in a privileged container. In addition to the satellites, the job will also load the DRBD module along with other kernel modules used by LINSTOR.
The following example will create a Nomad job starting a LINSTOR satellite on every node in data center dc1.
linstor-satellite.hcljob "linstor-satellite" {
datacenters = ["dc1"] (1)
type = "system"
group "satellite" {
network {
mode = "host"
}
volume "dev" { (2)
type = "host"
source = "dev"
}
task "linstor-satellite" {
driver = "docker"
config {
image = "drbd.io/linstor-satellite:v1.13.0" (3)
auth { (4)
username = "example"
password = "example"
server_address = "drbd.io"
}
privileged = true (5)
network_mode = "host" (6)
}
volume_mount { (2)
volume = "dev"
destination = "/dev"
}
resources {
cpu = 500 # 500 MHz
memory = 500 # 500MB
}
}
task "drbd-loader" {
driver = "docker"
lifecycle {
hook = "prestart" (7)
}
config {
image = "drbd.io/drbd9-rhel8:v9.0.29" (8)
privileged = true (5)
auth { (4)
username = "example"
password = "example"
server_address = "drbd.io"
}
}
env {
LB_HOW = "shipped_modules" (9)
}
volume_mount { (10)
volume = "kernel-src"
destination = "/usr/src"
}
volume_mount { (10)
volume = "modules"
destination = "/lib/modules"
}
}
volume "modules" { (10)
type = "host"
source = "modules"
read_only = true
}
volume "kernel-src" { (10)
type = "host"
source = "kernel-src"
read_only = true
}
}
}| 1 | Replace dc1 with your own data center name. |
||
| 2 | The dev host volume is the volume created in Preparing Nomad, which allows the
satellite to manage the hosts block devices. |
||
| 3 | This sets the LINSTOR Satellite image to run. The latest images are available from
drbd.io. The satellite image version has to match the version of the controller
image.
|
||
| 4 | Sets the authentication to use when pulling the image. If pulling from drbd.io, you need
to use your LINBIT customer login here. Read more about pulling from a private repo
here. |
||
| 5 | To configure storage devices, DRBD and load kernel modules, the containers need to be running in privileged mode. | ||
| 6 | The satellite needs to communicate with DRBD, which requires access to the netlink interface running in the hosts network. | ||
| 7 | The drbd-loader task will be executed once at the start of the satellite and load DRBD and
other useful kernel modules. |
||
| 8 | The drbd-loader is specific to the distribution you are using. Available options are:
|
||
| 9 | The drbd-loader container can be configured using environment variables. LB_HOW tells the
container how to insert the DRBD kernel module. Available options are:
|
||
| 10 | In order for the drbd-loader container to build DRBD or load existing modules, it needs
access to a hosts /usr/src and /lib/modules respectively.
This requires setting up additional host volumes on every node. The following snippet needs to be added to every Nomad agent configuration, then Nomad needs to be restarted. Listing 22.
/etc/nomad.d/drbd-loader-volumes.hcl |
Apply the job by running:
$ nomad job run linstor-satellite.hcl
==> Monitoring evaluation "0c07469d"
Evaluation triggered by job "linstor-satellite"
==> Monitoring evaluation "0c07469d"
Evaluation status changed: "pending" -> "complete"
==> Evaluation "0c07469d" finished with status "complete"7.2.4. Configuring LINSTOR in Nomad
Once the linstor-controller and linstor-satellite jobs are running, you can start configuring the cluster using
the linstor command line tool.
This can done:
-
directly by
nomad exec-ing into thelinstor-controllercontainer. -
using the
drbd.io/linstor-clientcontainer on the host running thelinstor-controller:docker run -it --rm --net=host drbd.io/linstor-client node create
-
by installing the
linstor-clientpackage on the host running thelinstor-controller.
In all cases, you need to add the satellites to your cluster and
create some storage pools. For example, to add the node nomad-01.example.com and configure
a LVM Thin storage pool, you would run:
$ linstor node create nomad-01.example.com
$ linstor storage-pool create lvmthin nomad-01.example.com thinpool linstor_vg/thinpool|
When using LINSTOR together with LVM and DRBD, set the global_filter = [ "r|^/dev/drbd|", "r|^/dev/mapper/[lL]instor|" ] This setting tells LVM to reject DRBD and other devices created or set up by LINSTOR from operations such as scanning or opening attempts. In some cases, not setting this filter might lead to increased CPU load or stuck LVM operations. |
The CSI driver requires your satellites to be named after their hostname. To be precise, the satellite name
needs to match Nomads attr.unique.hostname attribute on the node.
|
7.3. Deploying the LINSTOR CSI driver in Nomad
The CSI driver is deployed as a system job, meaning it runs on every node in the cluster.
The following example will create a Nomad job starting a LINSTOR CSI Driver on every node in data center dc1.
linstor-csi.hcljob "linstor-csi" {
datacenters = ["dc1"] (1)
type = "system"
group "csi" {
network {
mode = "bridge"
}
service {
connect {
sidecar_service { (2)
proxy {
upstreams {
destination_name = "linstor-api"
local_bind_port = 8080
}
}
}
}
}
task "csi-plugin" {
driver = "docker"
config {
image = "drbd.io/linstor-csi:v0.13.1" (3)
auth { (4)
username = "example"
password = "example"
server_address = "drbd.io"
}
args = [
"--csi-endpoint=unix://csi/csi.sock",
"--node=${attr.unique.hostname}", (5)
"--linstor-endpoint=http://${NOMAD_UPSTREAM_ADDR_linstor_api}", (6)
"--log-level=info"
]
privileged = true (7)
}
csi_plugin { (8)
id = "linstor.csi.linbit.com"
type = "monolith"
mount_dir = "/csi"
}
resources {
cpu = 100 # 100 MHz
memory = 200 # 200MB
}
}
}
}| 1 | Replace dc1 with your own data center name |
||
| 2 | The sidecar_service stanza enables use of the service mesh generated by using
Consul Connect. If you have not configured this feature in Nomad, or you are
using an external LINSTOR Controller, you can skip this configuration. |
||
| 3 | This sets the LINSTOR CSI Driver image to run. The latest images are available from drbd.io.
|
||
| 4 | Sets the authentication to use when pulling the image. If pulling from drbd.io, you need
to use your LINBIT customer login here. Read more about pulling from a private repo
here. |
||
| 5 | This argument sets the node name used by the CSI driver to identify itself in the LINSTOR API. By default, this is set to the node’s hostname. | ||
| 6 | This argument sets the LINSTOR API endpoint. If you are not using the consul service mesh (see Nr. 2 above), this needs to be set to the Controllers API endpoint. The endpoint needs to be reachable from every node this is deployed on. | ||
| 7 | The CSI driver needs to execute mount commands, requiring privileged containers. | ||
| 8 | The csi_plugin stanza informs Nomad that this task is a CSI plug-in. The Nomad agent will
forward requests for volumes to one of the jobs containers. |
Apply the job by running:
$ nomad job run linstor-csi.hcl
==> Monitoring evaluation "0119f19c"
Evaluation triggered by job "linstor-csi"
==> Monitoring evaluation "0119f19c"
Evaluation status changed: "pending" -> "complete"
==> Evaluation "0119f19c" finished with status "complete"7.4. Using LINSTOR volumes in Nomad
Volumes in Nomad are created using a volume-specification.
As an example, the following specification requests a 1GiB volume with 2 replicas from the LINSTOR storage pool thinpool.
id = "vol1" (1)
name = "vol1" (2)
type = "csi"
plugin_id = "linstor.csi.linbit.com"
capacity_min = "1GiB"
capacity_max = "1GiB"
capability {
access_mode = "single-node-writer" (3)
attachment_mode = "file-system" (4)
}
mount_options {
fs_type = "ext4" (5)
}
parameters { (6)
"resourceGroup" = "default-resource",
"storagePool" = "thinpool",
"autoPlace" = "2"
}| 1 | The id is used to reference this volume in Nomad. Used in the volume.source field of a
job specification. |
| 2 | The name is used when creating the volume in the back end (that is, LINSTOR). Ideally this
matches the id and is a valid LINSTOR resource name. If the name would not be valid, LINSTOR
CSI will generate a random compatible name. |
| 3 | What kind of access the volume should support. LINSTOR CSI supports:
|
| 4 | Can be file-system or block-device. |
| 5 | Specify the file system to use. LINSTOR CSI supports ext4 and xfs. |
| 6 | Additional parameters to pass to LINSTOR CSI. The example above requests the resource be
part of the default-resource resource group and should deploy 2
replicas.
For a complete list of available parameters, you can check out the guide on Kubernetes storage classes. Kubernetes, like Nomad, makes use of the CSI plug-in. |
To create the volume, run the following command:
$ nomad volume create vol1.hcl
Created external volume vol1 with ID vol1You can verify that the new volume exists by entering the following command:
$ nomad volume status
Output will show:
Container Storage Interface ID Name Plugin ID Schedulable Access Mode vol1 vol1 linstor.csi.linbit.com true <none>
You can also verify that a new LINSTOR resource was created when you created the Nomad volume, by entering a linstor resource list command.
Output will show something similar to the following:
╭──────────────────────────────────────────────────────────────────────────────────────────────╮
┊ ResourceName ┊ Node ┊ Port ┊ Usage ┊ Conns ┊ State ┊ CreatedOn ┊
╞══════════════════════════════════════════════════════════════════════════════════════════════╡
┊ vol1 ┊ nomad-01.example.com ┊ 7000 ┊ Unused ┊ Ok ┊ UpToDate ┊ 2021-06-15 14:56:32 ┊
┊ vol1 ┊ nomad-02.example.com ┊ 7000 ┊ Unused ┊ Ok ┊ UpToDate ┊ 2021-06-15 14:56:32 ┊
╰──────────────────────────────────────────────────────────────────────────────────────────────╯7.4.1. Using volumes in jobs
To use the volume in a job, add the volume and volume_mount stanzas to the job specification:
job "example" {
...
group "example" {
volume "example-vol" {
type = "csi"
source = "vol1"
attachment_mode = "file-system"
access_mode = "single-node-writer"
}
task "mount-example" {
volume_mount {
volume = "example-vol"
destination = "/data"
}
...
}
}
}7.4.2. Creating snapshots of volumes
LINSTOR can create snapshots of existing volumes, provided the underlying storage pool driver supports snapshots.
The following command creates a snapshot named snap1 of the volume vol1.
$ nomad volume snapshot create vol1 snap1
Snapshot ID Volume ID Size Create Time Ready?
snap1 vol1 1.0 GiB None true
$ linstor s l
╭────────────────────────────────────────────────────────────────────────────────────────────────────────────────────────╮
┊ ResourceName ┊ SnapshotName ┊ NodeNames ┊ Volumes ┊ CreatedOn ┊ State ┊
╞════════════════════════════════════════════════════════════════════════════════════════════════════════════════════════╡
┊ vol1 ┊ snap1 ┊ nomad-01.example.com, nomad-02.example.com ┊ 0: 1 GiB ┊ 2021-06-15 15:04:10 ┊ Successful ┊
╰────────────────────────────────────────────────────────────────────────────────────────────────────────────────────────╯You can use a snapshot to pre-populate an existing volume with data from the snapshot
$ cat vol2.hcl
id = "vol2"
name = "vol2"
snapshot_id = "snap1"
type = "csi"
plugin_id = "linstor.csi.linbit.com"
...
$ nomad volume create vol2.hcl
Created external volume vol2 with ID vol28. LINSTOR volumes in Proxmox VE
This chapter describes integrating LINSTOR® and DRBD® in Proxmox Virtual Environment (VE) by using the LINSTOR Proxmox Plugin. The sections in this chapter describe how to install, configure, and upgrade the LINSTOR Proxmox plugin.
8.1. Introduction to Proxmox VE
Proxmox VE is an easy to use, complete server virtualization environment with KVM, Linux Containers, and high availability (HA).
linstor-proxmox is a storage plugin for Proxmox that interfaces with LINSTOR, allowing you to
replicate virtual disk images and container volumes across several Proxmox VE nodes in your cluster,
all backed by DRBD. By integrating LINSTOR with Proxmox, you can live migrate active VMs within
seconds, with no downtime and without needing a centralized SAN. LINSTOR also unlocks other shared
storage functionality in Proxmox, allowing you to use features such as
high availability.
8.2. Installing the LINSTOR Proxmox plugin
This section describes how to install the LINSTOR Proxmox plugin. If you have already installed the plugin and you need to upgrade it to a newer version, refer to the Upgrading the LINSTOR Proxmox plugin section.
8.2.1. Installing the Proxmox VE kernel headers
To use LINSTOR in Proxmox, you will need to install the DRBD kernel module. The DRBD 9 kernel module
is installed as a kernel module source package (drbd-dkms). Therefore, you will have to install
the Proxmox VE kernel headers package, proxmox-default-headers, before you install the DRBD kernel
module from the LINBIT® repositories. Following that order ensures that the kernel module will
build properly for your kernel.
If you do not plan to install the latest Proxmox kernel, you have to install kernel headers that
match your current running kernel (for example, proxmox-headers-$(uname -r)). If you missed this
step and you installed different kernel headers already, you can still rebuild the drbd-dkms
package against your current kernel by entering the apt install --reinstall drbd-dkms command.
You will need to configure the Proxmox pve-enterprise or pve-no-subscription
repository in your APT sources list, /etc/apt/sources.list, and then enter apt update, before
you can install the proxmox-headers-$(uname -r) package. Refer to
the Proxmox wiki for
instructions.
|
8.2.2. Configuring LINBIT customer repositories for Proxmox
If you are a LINBIT customer, or you have an evaluation account, you can enable the LINBIT
drbd-9 repository on your nodes and then update your repositories by using an apt update
command.
| Refer to the Using a Script to Manage LINBIT Cluster Nodes for instructions on registering a node with LINBIT and enabling LINBIT repositories. |
8.2.3. Configuring LINBIT public repositories for Proxmox
If you are familiar with the Proxmox VE No-Subscription Repository, LINBIT also provides a publicly available repository for use with Proxmox VE. This repository not only contains the LINSTOR Proxmox plugin, but the entire LINBIT SDS stack, including DRBD, LINSTOR, and all user-space utilities.
| Although this can be a great option for homelabs, testing, and non-production use, LINBIT does not maintain these packages to the same rigorous standards as the customer repositories. For production deployments, using the official LINBIT customer repositories is recommended. |
You can add the LINBIT public repository by entering the commands below:
# wget -O /tmp/linbit-keyring.deb \ https://packages.linbit.com/public/linbit-keyring.deb # dpkg -i /tmp/linbit-keyring.deb # source /etc/os-release && PVERS=$(( VERSION_ID - 4 )) # echo "deb [signed-by=/etc/apt/trusted.gpg.d/linbit-keyring.gpg] \ https://packages.linbit.com/public/ proxmox-$PVERS drbd-9" > /etc/apt/sources.list.d/linbit.list # apt update
| The Proxmox version is the Debian (Proxmox base OS) version minus 4. |
8.2.4. Installing the LINSTOR Proxmox plugin and related utilities from packages
After configuring an appropriate LINBIT package repository, you can install the LINSTOR Proxmox plugin and other necessary components (DRBD kernel module and utilities), by entering the following command:
# apt -y install drbd-dkms drbd-utils linstor-proxmox
8.3. Configuring LINSTOR
The rest of this guide assumes that you have a LINSTOR cluster configured as described in
Initializing your cluster. Start the linstor-controller service on one node, and the
linstor-satellite service on all nodes.
The preferred way to use the plugin, starting from version 4.1.0, is through LINSTOR resource groups and a single volume group within every resource group. LINSTOR resource groups are described in Using resource groups to deploy LINSTOR provisioned volumes. All the required LINSTOR configuration, for example, data replica count, has to be set on the resource group.
|
When using LINSTOR together with LVM and DRBD, set the global_filter = [ "r|^/dev/drbd|", "r|^/dev/mapper/[lL]instor|" ] This setting tells LVM to reject DRBD and other devices created or set up by LINSTOR from operations such as scanning or opening attempts. In some cases, not setting this filter might lead to increased CPU load or stuck LVM operations. |
8.4. Configuring the Proxmox plugin
The final step is to provide a configuration for Proxmox itself. You can do this by adding an
entry in the /etc/pve/storage.cfg file, with content similar to the following:
drbd: drbdstorage resourcegroup defaultpool content images,rootdir controller 10.11.12.13
| Storage entries within the Proxmox storage configuration file must be separated by an empty new line. |
The drbd entry is fixed. You are not allowed to modify it because it tells Proxmox to use DRBD
as the storage back end. You can change the value for the drbd entry, here drbdstorage, as
you want. It is used as a friendly name that will be shown in the PVE web GUI to locate the DRBD
storage.
The content entry is also fixed, so do not change it. You can configure data redundancy by
specifying a placement
count for the backing LINSTOR resource group. This way, you can specify how many replicas of
the data will be stored in the cluster. The recommendation is to set the place count option to
two or three depending on your setup. By virtue of the DRBD diskless attachment feature, the
data is accessible from all nodes, even if some of them do not have local copies of the data.
For example, in a 5-node cluster, all nodes will be able to access three copies of the data, no
matter where they are stored in the cluster.
The controller parameter must be set to the IP of the node that runs the LINSTOR controller
service. Only one node in a cluster can run the LINSTOR controller service at any given time. If
that node fails, you will need to start the LINSTOR controller service on another node and
change the controller parameter value to the new node’s IP address. It is also possible to
make the LINSTOR controller itself highly available. By making the LINSTOR
controller highly available in your cluster, you have the option to specify either multiple IP
addresses for the controller parameter, or else specify a virtual IP address for the LINSTOR
controller.
The resourcegroup parameter specifies the name of the LINSTOR resource group that you want to
associate with the DRBD-backed storage in Proxmox.
8.4.1. Configuring more than one LINSTOR resource group for use in Proxmox
A configuration using different resource groups associated with different storage pools could look similar to this:
drbd: drbdstorage resourcegroup defaultpool content images,rootdir controller 10.11.12.13 drbd: fastdrbd resourcegroup ssd content images,rootdir controller 10.11.12.13 drbd: slowdrbd resourcegroup backup content images,rootdir controller 10.11.12.13
After making this configuration, you will be able to create VMs by using the Proxmox web GUI, by selecting “drbdstorage“, or any other of the defined pools, “fastdrbd” or “slowdrbd“, as storage locations for your VM disk images.
Starting from version 5 of the plugin, you can set the option preferlocal to yes or no.
By default, the option is set to yes.
With the preferlocal yes option set, the plugin tries to create a diskful assignment on the node that issued the storage
create command. The default option setting ensures that the VM gets local storage if possible.
If you set the option to no, LINSTOR might place the storage on nodes ‘B’ and ‘C’, while the VM is
initially started on node ‘A’. This would still work as node ‘A’ then would get a diskless
assignment.
However, in most cases, having local, fast storage is preferred which is the reason for the default yes setting.
| DRBD supports only the raw disk format at the moment. |
At this point you can try to live migrate the VM. Because all data is accessible on all nodes, even on diskless nodes, it will take just a few seconds. The overall process might take a bit longer if the VM is under load and if there is a significant amount of RAM being dirtied all the time. But in any case, the downtime should be minimal and you will experience no operational interruption at all.
| Option | Meaning |
|---|---|
|
The IP of the LINSTOR controller (‘,’ separated list allowed) |
|
The name of a LINSTOR resource group which defines the deployment of new VMs. As described above |
|
Prefer to create local storage (yes/no). As described above |
|
Time in seconds status information is cached, 0 means no extra cache. Relevant on huge clusters with hundreds of resources. This has to be set on all |
|
Set this temporarily to |
|
Path to the client certificate |
|
Path to the client private key |
|
Path to the CA certificate |
8.5. Configuring a highly available LINSTOR controller in Proxmox
Making LINSTOR highly available is a matter of making the LINSTOR controller highly available. Doing this is described in Creating a highly available LINSTOR cluster. This is an optional configuration that can make your LINSTOR integration with Proxmox more fault-tolerant.
After completing the steps in the linked section, the last and crucial step is to configure the
Proxmox plugin to be able to connect to different LINSTOR controllers. The plugin will use the
first controller it receives an answer from. You configure different LINSTOR controllers in
Proxmox by adding a comma-separated list of controller node IP addresses in the controller
section of the plugin, for example:
drbd: drbdstorage resourcegroup defaultpool content images,rootdir controller 10.11.12.13,10.11.12.14,10.11.12.15
An alternative is to configure a virtual IP (VIP) address for the LINSTOR controller by using an
OCF resource agent, ocf:heartbeat:IPaddr2, added to the DRBD Reactor promoter plugin’s
services start list. If you do this, you could then specify the VIP address for the controller
parameter value.
8.6. Storage for cloud-init images
cloud-init VM images are only a few MB in size and Proxmox can generate them on-demand. This is possible because the settings saved in cloud-init images are stored cluster wide in Proxmox itself. This allows Proxmox to use local storage (for example, LVM) for such images. If a VM is started on a node where the cloud-init image does not exist, it is generated from the stored settings.
While you can store cloud-init images on DRBD storage, there is no gain in doing that. Storing cloud-init images on local storage is enough.
8.7. Virtual machine image naming in Proxmox with LINSTOR
Starting with version 8 of the LINSTOR Proxmox plugin, VM disk images have names such as
pm-12cf742a_101 within PVE, and pm-12cf742a within LINSTOR and DRBD. This is a static prefix
(pm-), 8 characters of a UUID, and on PVE level the VMID separated by an underscore (_101).
In older versions of the plugin, VM disk images had names such as vm-101-disk-1. If you
upgrade the plugin to version 8 or later, if you clone a VM that uses the older naming scheme,
the cloned disk image will have the version 8 naming scheme.
8.8. Migrating storage to DRBD in Proxmox with LINSTOR
Sometimes, you might want to migrate existing Proxmox data to DRBD-backed storage. This section details the steps that you need to take to do this, for example, when migrating existing LVM or ZFS-backed Proxmox data. If your Proxmox data is already on DRBD-backed storage, these steps are unnecessary, for example, to do a live migration of a VM from one DRBD-backed storage to another DRBD-backed storage.
| These instructions require version 8 or later of the LINSTOR Proxmox plugin. |
If you want to migrate data, such as VM disk images, while your Proxmox VMs are online, you can
temporarily set exactsize yes in your /etc/pve/storage.cfg storage configuration file for
a particular DRBD storage, and then migrate disks from the non-DRBD-backed storage to the
DRBD-backed storage. After you are done, remove the exactsize option from the storage.cfg
configuration file. The LINSTOR property that the exactsize option enabled to temporarily
allow online migration will be deleted when the disk is activated again (but not if the disk is
currently active). If you want to delete the property for all active disks after migration, or
you want to be extra sure, you can run a command such as the following:
# linstor -m --output-version v1 rd l | \
jq '.[][].name' | \
xargs -I {} linstor rd sp {} DrbdOptions/ExactSize False
8.9. Upgrading the LINSTOR Proxmox plugin
This section describes changes to be aware of or actions that you might need to do when
upgrading an existing installation of the linstor-proxmox plugin.
If you need to do a fresh installation, skip this section and continue with Installing the LINSTOR Proxmox plugin.
8.9.1. Upgrading to plugin version 8.x
Upgrading to this plugin version requires LINSTOR 1.27.0 or greater.
This version of the LINSTOR Proxmox plugin introduced a new naming scheme for VM images created on LINSTOR and DRBD backed storage. Existing VMs from earlier plugin versions will still work with version 8 of the plugin. The naming scheme change requires no user intervention, besides the user getting accustomed to the new naming scheme.
You can find more details about the naming scheme in Virtual machine image naming in Proxmox with LINSTOR.
Until version 8 of the plugin, it was only possible to migrate data such as VM disk images from external storage such LVM to LINSTOR and DRBD backed storage if the data was migrated offline. Starting with version 8 of the plugin, you can migrate data online. For more details, refer to Migrating storage to DRBD in Proxmox with LINSTOR.
8.9.2. Upgrading to plugin version 7.x
Version 7 of the plugin uses a LINSTOR controller API that is available from LINSTOR version 1.21.1 onward. Make sure that your LINSTOR setup (controller and satellites) use at least that version.
8.9.3. Upgrading plugin version from 4.x to 5.x
Version 5 of the plugin drops compatibility with the legacy configuration options storagepool
and redundancy. Version 5 requires a resourcegroup option, and obviously a LINSTOR
resource group. The old options should be removed from the configuration.
Configuring LINSTOR is described in Section Configuring LINSTOR, a typical example
follows. The following example assumes that the storagepool was set to mypool, and
redundancy to 3.
# linstor resource-group create --storage-pool=mypool --place-count=3 drbdMypoolThree # linstor volume-group create drbdMypoolThree
Next, edit the Proxmox storage configuration file, /etc/pve/storage.cfg.
Add an entry for LINSTOR managed (and DRBD replicated) storage, changing configuration values to match your environment.
drbd: drbdstorage resourcegroup drbdMypoolThree content images,rootdir controller 10.11.12.13
| Storage entries within the Proxmox storage configuration file must be separated by empty new lines. |
8.9.4. Upgrading plugin version from 5.x to 6.x
Version 6.0.0 of the plugin drops all code related to the redundancy setting. This is handled
by LINSTOR resource groups (resourcegroup setting) for a very long time. No change should be
required.
The controllervm setting, which was intended for executing a LINSTOR controller in a VM manged
by LINSTOR is gone. Using drbd-reactor to realize a highly available LINSTOR controller is
what we suggest.
The settings statuscache and preferlocal are now enabled by default.
8.9.5. Upgrading PVE from version 5.x to 6.x
With version 6, PVE added additional parameters to some functions and rightfully reset their “APIAGE”. This means that old plugins, while they might actually be usable because they do not use any of these changed functions, do not work anymore. Upgrade to plugin version 5.2.1 at least.
9. LINSTOR volumes in OpenNebula
This chapter describes DRBD® in OpenNebula using the LINSTOR® storage driver add-on.
Detailed installation and configuration instructions and be found in the README.md file of the driver’s source.
9.1. Introduction to OpenNebula
OpenNebula is a flexible and open source cloud management platform which allows its functionality to be extended using add-ons.
The LINSTOR add-on allows the deployment of virtual machines with highly available images backed by DRBD and attached across the network through DRBD’s own transport protocol.
9.2. Installing the OpenNebula add-on
To install the LINSTOR storage add-on for OpenNebula, you need both a working OpenNebula cluster and a working LINSTOR cluster.
With access to the LINBIT® customer repositories you can install the linstor-opennebula package with:
# apt install linstor-opennebula
or
# yum install linstor-opennebula
Without access to LINBIT’s prepared packages you need to fall back to instructions on the OpenNebula LINSTOR Add-on GitHub page.
A DRBD cluster with LINSTOR can be installed and configured by following the instructions in this guide, see Initializing your cluster.
The OpenNebula and DRBD clusters can be somewhat independent of one another with the following exception: OpenNebula’s front end and host nodes must be included in both clusters.
Host nodes do not need a local LINSTOR storage pool, as virtual machine images are attached to them across the network [5].
9.3. Deployment options
It is recommended to use LINSTOR resource groups to configure resource deployment as you want it, refer to Creating resource groups. Previous auto-place and deployment nodes modes are deprecated.
9.4. Configuring the OpenNebula add-on
Configuring the OpenNebula LINSTOR add-on involves:
-
Adding the OpenNebula LINSTOR driver to your OpenNebula configuration
-
Configuring cluster nodes
-
Configuring correct permissions for the
oneadminuser -
Creating a LINSTOR OpenNebula image datastore
-
Creating LINSTOR resource groups from which to deploy storage resources
-
Configuring optional LINSTOR plugin attributes
-
Configuring LINSTOR as an OpenNebula system datastore
9.5. Adding the driver to OpenNebula
Modify the following sections of /etc/one/oned.conf
Add linstor to the list of drivers in the TM_MAD and DATASTORE_MAD
sections:
TM_MAD = [
EXECUTABLE = "one_tm",
ARGUMENTS = "-t 15 -d dummy,lvm,shared,fs_lvm,qcow2,ssh,vmfs,ceph,linstor"
]
DATASTORE_MAD = [
EXECUTABLE = "one_datastore",
ARGUMENTS = "-t 15 -d dummy,fs,lvm,ceph,dev,iscsi_libvirt,vcenter,linstor -s shared,ssh,ceph,fs_lvm,qcow2,linstor"
]
Specify linstor twice in the DATASTORE_MAD arguments setting.
|
Add new TM_MAD_CONF and DS_MAD_CONF sections:
TM_MAD_CONF = [
NAME = "linstor", LN_TARGET = "NONE", CLONE_TARGET = "SELF", SHARED = "yes", ALLOW_ORPHANS="yes",
TM_MAD_SYSTEM = "ssh,shared", LN_TARGET_SSH = "NONE", CLONE_TARGET_SSH = "SELF", DISK_TYPE_SSH = "BLOCK",
LN_TARGET_SHARED = "NONE", CLONE_TARGET_SHARED = "SELF", DISK_TYPE_SHARED = "BLOCK"
]
DS_MAD_CONF = [
NAME = "linstor", REQUIRED_ATTRS = "BRIDGE_LIST", PERSISTENT_ONLY = "NO",
MARKETPLACE_ACTIONS = "export"
]
After making these changes, restart the OpenNebula service.
9.5.1. Configuring the nodes
The front-end node issues commands to the storage and host nodes through LINSTOR.
Storage nodes hold disk images of VMs locally.
Host nodes are responsible for running instantiated VMs and typically have the storage for the images they need attached across the network through LINSTOR diskless mode.
All nodes must have DRBD 9 and LINSTOR installed. The installation process is detailed in the DRBD 9 and LINSTOR user guides.
It is possible to have front-end and host nodes act as storage nodes in addition to their primary role provided that they the meet all the requirements for both roles.
Configuring the front end node
Verify that the control node(s) that you hope to communicate with are
reachable from the front-end node. linstor node list for locally running
LINSTOR controllers and linstor --controllers "<IP:PORT>" node list for
remotely running LINSTOR controllers are ways you can to test this.
Configuring host nodes
Host nodes must have LINSTOR satellite processes running on them and be members
of the same LINSTOR cluster as the front-end and storage nodes, and can optionally
have storage locally. If the oneadmin user is able to connect via SSH between
hosts without using a password, then live migration is possible, even with the SSH system datastore.
Configuring storage nodes
Only the front-end and host nodes require OpenNebula to be installed, but the
oneadmin user must be able to passwordlessly access storage nodes. Refer to
the OpenNebula installation guide for your distribution on how to manually
configure the oneadmin user account.
The storage nodes must use storage pools created with a driver that’s capable of making snapshots, such as the thin LVM plugin.
|
When using LINSTOR together with LVM and DRBD, set the global_filter = [ "r|^/dev/drbd|", "r|^/dev/mapper/[lL]instor|" ] This setting tells LVM to reject DRBD and other devices created or set up by LINSTOR from operations such as scanning or opening attempts. In some cases, not setting this filter might lead to increased CPU load or stuck LVM operations. |
Given two physical devices (/dev/sdX and /dev/sdY), the following example shows how you
would prepare thin-provisioned storage, by using LVM commands, to back a LINSTOR storage pool or
pools. The example uses generic names for the volume group and thin pool.
pvcreate /dev/sdX /dev/sdY vgcreate drbdpool /dev/sdX /dev/sdY lvcreate -l 95%VG --poolmetadatasize 8g -T /dev/drbdpool/drbdthinpool
Set the thin-provisioned logical volume’s metadata space to a reasonable size
because if it becomes full it can be difficult to resize. For this reason, you might also want
to configure monitoring or automatic extension of your LVM thin-provisioned logical volumes.
Refer to the “Size of pool metadata LV” section in man lvmthin for more details.
|
Next, you would create a LINSTOR storage pool or pools using the /dev/drbdpool/drbdthinpool
device as the backing storage.
9.5.2. Permissions for the administrative account
The oneadmin, “Cloud Administrator”, user account must have passwordless sudo access to the mkfs command on
the storage nodes
oneadmin ALL=(root) NOPASSWD: /sbin/mkfs
Groups
Be sure to consider the groups that you need to add the oneadmin user to so that
the oneadmin user can access the devices and programs needed to access storage and
instantiate VMs. For this add-on, the oneadmin user must belong to the disk
group on all nodes to access the DRBD devices where images are held.
usermod -a -G disk oneadmin
9.5.3. Creating a new LINSTOR datastore
Create a datastore configuration file named ds.conf and use the onedatastore
tool to create a new datastore based on that configuration. There are two
mutually exclusive deployment options: LINSTOR_AUTO_PLACE and
LINSTOR_DEPLOYMENT_NODES. If both are configured, LINSTOR_AUTO_PLACE is ignored.
For both of these options, BRIDGE_LIST must be a space
separated list of all storage nodes in the LINSTOR cluster.
9.5.4. Creating resource groups
Since version 1.0.0 LINSTOR supports resource groups. A resource group is a centralized point for settings that all resources linked to that resource group share.
Create a resource group and volume group for your datastore, it is mandatory to specify a storage-pool
within the resource group, otherwise monitoring space for OpenNebula will not work.
Here we create one with 2 node redundancy and use a created opennebula-storagepool:
linstor resource-group create OneRscGrp --place-count 2 --storage-pool opennebula-storagepool linstor volume-group create OneRscGrp
Now add a OpenNebula datastore using the LINSTOR plugin:
cat >ds.conf <<EOI NAME = linstor_datastore DS_MAD = linstor TM_MAD = linstor TYPE = IMAGE_DS DISK_TYPE = BLOCK LINSTOR_RESOURCE_GROUP = "OneRscGrp" COMPATIBLE_SYS_DS = 0 BRIDGE_LIST = "alice bob charlie" #node names EOI onedatastore create ds.conf
9.5.5. Plugin attributes
9.5.6. Deprecated attributes
The following attributes are deprecated and were removed in version 2.0.
LINSTOR_CLONE_MODE
LINSTOR now automatically decides which clone mode it should use.
LINSTOR supports two different clone modes: snapshot and copy. These modes are set through the LINSTOR_CLONE_MODE attribute.
The default mode is snapshot. It uses a LINSTOR snapshot and restores a new resource from this snapshot, which is then a clone of the image. This mode is usually faster than using the copy mode as snapshots are cheap copies.
The second mode is copy. It creates a new resource with the same size as the original and copies the data with dd to the new resource. This mode will be slower than snapshot, but is more robust as it doesn’t rely on any snapshot mechanism. It is also used if you are cloning an image into a different LINSTOR datastore.
LINSTOR_STORAGE_POOL
LINSTOR_STORAGE_POOL attribute is used to select the LINSTOR storage pool your datastore
should use. If resource groups are used this attribute isn’t needed as the storage pool
can be select by the auto select filter options.
If LINSTOR_AUTO_PLACE or LINSTOR_DEPLOYMENT_NODES is used and LINSTOR_STORAGE_POOL
is not set, it will fallback to the DfltStorPool in LINSTOR.
9.5.7. Configuring LINSTOR as a system datastore
LINSTOR driver can also be used as a system datastore, configuration is pretty similar to normal datastores, with a few changes:
cat >system_ds.conf <<EOI NAME = linstor_system_datastore TM_MAD = linstor TYPE = SYSTEM_DS DISK_TYPE = BLOCK LINSTOR_RESOURCE_GROUP = "OneSysRscGrp" BRIDGE_LIST = "alice bob charlie" # node names EOI onedatastore create system_ds.conf
Also add the new system datastore ID to the COMPATIBLE_SYS_DS to your image datastores (comma-separated), otherwise the scheduler will ignore them.
If you want live migration with volatile disks you need to enable the --unsafe option for KVM, see:
opennebula-doc
9.6. Live migration
Live migration is supported even with the use of the SSH system datastore, as well as the NFS shared system datastore.
9.7. Free space reporting
Free space is calculated differently depending on whether resources are deployed automatically or on a per node basis.
For datastores which place per node, free space is reported based on the most restrictive storage pools from all nodes where resources are being deployed. For example, the capacity of the node with the smallest amount of total storage space is used to determine the total size of the datastore and the node with the least free space is used to determine the remaining space in the datastore.
For a datastore which uses automatic placement, size and remaining space are determined based on the aggregate storage pool used by the datastore as reported by LINSTOR.
10. LINSTOR volumes in OpenStack
This chapter describes using LINSTOR® to provision persistent, replicated, and high-performance block storage for OpenStack.
10.1. Introduction to OpenStack
OpenStack consists of a wide range of individual services; The service responsible for provisioning and managing block storage is called Cinder. Other OpenStack services such as the compute instance service Nova can request volumes from Cinder. Cinder will then make a volume accessible to the requesting service.
LINSTOR can integrate with Cinder using a volume driver. The volume driver translates calls to the Cinder API to LINSTOR commands. For example: requesting a volume from Cinder will create new resources in LINSTOR, Cinder Volume snapshots translate to snapshots in LINSTOR and so on.
10.2. Installing LINSTOR for OpenStack
An initial installation and configuration of DRBD® and LINSTOR must be completed before using the OpenStack driver.
-
A detailed installation guide can be found here.
-
Initialize your cluster.
-
Learn how to use the LINSTOR client.
-
Add all storage nodes to the LINSTOR cluster.
At this point you should be able to list your storage cluster nodes by using the LINSTOR client:
$ linstor node list
╭────────────────────────────────────────────────────────────────────────────╮
┊ Node ┊ NodeType ┊ Addresses ┊ State ┊
╞════════════════════════════════════════════════════════════════════════════╡
┊ cinder-01.openstack.test ┊ COMBINED ┊ 10.43.224.21:3366 (PLAIN) ┊ Online ┊
┊ cinder-02.openstack.test ┊ COMBINED ┊ 10.43.224.22:3366 (PLAIN) ┊ Online ┊
┊ storage-01.openstack.test ┊ SATELLITE ┊ 10.43.224.11:3366 (PLAIN) ┊ Online ┊
┊ storage-02.openstack.test ┊ SATELLITE ┊ 10.43.224.12:3366 (PLAIN) ┊ Online ┊
┊ storage-03.openstack.test ┊ SATELLITE ┊ 10.43.224.13:3366 (PLAIN) ┊ Online ┊
╰────────────────────────────────────────────────────────────────────────────╯You should configure one or more storage pools per node. This guide assumes the
storage pool is named cinderpool. LINSTOR should list the storage pool for each node, including the diskless storage
pool created by default.
$ linstor storage-pool list
╭─────────────────────────────────────────────────────────────────────────────────────────────────────────────────────────────────────╮
┊ StoragePool ┊ Node ┊ Driver ┊ PoolName ┊ FreeCapacity ┊ TotalCapacity ┊ CanSnapshots ┊ State ┊
╞═════════════════════════════════════════════════════════════════════════════════════════════════════════════════════════════════════╡
┊ DfltDisklessStorPool ┊ cinder-01.openstack.test ┊ DISKLESS ┊ ┊ ┊ ┊ False ┊ Ok ┊
┊ DfltDisklessStorPool ┊ cinder-02.openstack.test ┊ DISKLESS ┊ ┊ ┊ ┊ False ┊ Ok ┊
┊ DfltDisklessStorPool ┊ storage-01.openstack.test ┊ DISKLESS ┊ ┊ ┊ ┊ False ┊ Ok ┊
┊ DfltDisklessStorPool ┊ storage-02.openstack.test ┊ DISKLESS ┊ ┊ ┊ ┊ False ┊ Ok ┊
┊ DfltDisklessStorPool ┊ storage-03.openstack.test ┊ DISKLESS ┊ ┊ ┊ ┊ False ┊ Ok ┊
┊ cinderpool ┊ storage-01.openstack.test ┊ LVM_THIN ┊ ssds/cinderpool ┊ 100 GiB ┊ 100 GiB ┊ True ┊ Ok ┊
┊ cinderpool ┊ storage-02.openstack.test ┊ LVM_THIN ┊ ssds/cinderpool ┊ 100 GiB ┊ 100 GiB ┊ True ┊ Ok ┊
┊ cinderpool ┊ storage-03.openstack.test ┊ LVM_THIN ┊ ssds/cinderpool ┊ 100 GiB ┊ 100 GiB ┊ True ┊ Ok ┊
╰─────────────────────────────────────────────────────────────────────────────────────────────────────────────────────────────────────╯10.2.1. Upgrading the LINSTOR driver
If this is a fresh installation, skip this section and continue with Installing the LINSTOR driver.
Upgrading From 1.x to 2.x
Driver version 2 dropped some static configuration options in favour of managing these options at runtime using volume types.
Option in cinder.conf |
Status | Replace with |
|---|---|---|
|
removed |
Use the |
|
removed |
No replacement needed, the driver will create a diskless resource on the cinder host when required |
|
removed |
This setting had no effect. |
|
deprecated |
This setting is deprecated for removal in a future version. Use the |
|
deprecated |
Replaced by the more aptly named |
|
removed |
Creating nodes and storage pools was completely removed in Driver version 2. See Installing LINSTOR for OpenStack |
|
removed |
This setting served no purpose, it was removed without replacement. |
10.2.2. Installing the LINSTOR driver
Starting with OpenStack Stein, the LINSTOR driver is part of the Cinder project. While the driver can be used as is, it might be missing features or fixes available in newer version. Due to OpenStacks update policy for stable versions, most improvements to the driver will not get back-ported to older stable releases.
LINBIT® maintains a fork of the Cinder repository with all improvements to the LINSTOR driver backported to the supported stable versions. Currently, these are:
| OpenStack Release | Included Version | LINBIT Version | LINBIT Branch |
|---|---|---|---|
|
1.0.1 |
2.0.0 |
|
|
1.0.1 |
2.0.0 |
|
|
1.0.1 |
2.0.0 |
The exact steps to enable the LINSTOR Driver depend on your OpenStack distribution. In general, the python-linstor
package needs to be installed on all hosts running the Cinder volume service. The next section will cover the
installation process for common OpenStack distributions.
Installing on DevStack
DevStack is a great way to try out OpenStack in a lab environment. To use the most recent driver use the following DevStack configuration:
# This ensures the LINSTOR Driver has access to the 'python-linstor' package. # # This is needed even if using the included driver! USE_VENV=True ADDITIONAL_VENV_PACKAGES=python-linstor # This is required to select the LINBIT version of the driver CINDER_REPO=https://github.com/LINBIT/openstack-cinder.git # Replace linstor/stable/2025.1 with the reference matching your OpenStack release. CINDER_BRANCH=linstor/stable/2025.1 # Resizing of volumes using the DRBD transport requires updates to Nova and os-brick: NOVA_REPO=https://github.com/LINBIT/openstack-nova.git OS_BRICK_REPO=https://github.com/LINBIT/openstack-os-brick.git NOVA_BRANCH=linstor/stable/2025.1 OS_BRICK_BRANCH=linstor/stable/2025.1 LIBS_FROM_GIT=os-brick
Installing on Kolla
Kolla packages OpenStack components in containers. They can then be deployed, for example using Kolla Ansible You can take advantage of the available customisation options for kolla containers to set up the LINSTOR driver.
To ensure that the required python-linstor package is installed, use the following override file:
{% extends parent_template %}
# Cinder
{% set cinder_base_pip_packages_append = ['python-linstor'] %}
# Nova
# Replace linstor/stable/2025.1 with the reference matching your OpenStack release.
{% set openstack_base_pip_packages_append = ['git+https://github.com/LINBIT/openstack-os-brick.git@linstor/stable/2025.1'] %}
{% block openstack_base_override_upper_constraints %}
RUN {{ macros.upper_constraints_remove("os-brick") }}
{% endblock %}To install the LINBIT version of the driver, update your kolla-build.conf
[cinder-base] type = git location = https://github.com/LINBIT/openstack-cinder.git # Replace linstor/stable/2025.1 with the reference matching your OpenStack release. reference = linstor/stable/2025.1 [nova-base] type = git location = https://github.com/LINBIT/openstack-nova.git # Replace linstor/stable/2025.1 with the reference matching your OpenStack release. reference = linstor/stable/2025.1
To rebuild the Cinder containers, run:
# A private registry used to store the kolla container images
REGISTRY=deployment-registry.example.com
# The image namespace in the registry
NAMESPACE=kolla
# The tag to apply to all images. Use the release name for compatibility with kolla-ansible
TAG=2025.1
kolla-build -t source --template-override template-override.j2 cinder --registry $REGISTRY --namespace $NAMESPACE --tag $TAGKolla Ansible deployment
When deploying OpenStack using Kolla Ansible, you need to verify that:
-
the custom Cinder images, created in the section above, are used deployment of Cinder services is enabled.
# use "source" images
kolla_install_type: source
# use the same registry as for running kolla-build above
docker_registry: deployment-registry.example.com
# use the same namespace as for running kolla-build above
docker_namespace: kolla
# deploy cinder block storage service
enable_cinder: "yes"
# disable verification of cinder back ends, kolla-ansible only supports a small subset of available back ends for this
skip_cinder_backend_check: True
# add the LINSTOR back end to the enabled back ends. For back end configuration see below
cinder_enabled_backends:
- name: linstor-drbdYou can place the LINSTOR driver configuration in one of the override directories for kolla-ansible. For more details on the available configuration options, see the section below.
[linstor-drbd] volume_backend_name = linstor-drbd volume_driver = cinder.volume.drivers.linstordrv.LinstorDrbdDriver linstor_uris = linstor://cinder-01.openstack.test,linstor://cinder-02.openstack.test
OpenStack Ansible deployment
OpenStack Ansible provides Ansible playbooks to configure and deploy of OpenStack environments. It allows for fine-grained customization of the deployment, letting you set up the LINSTOR driver directly.
cinder_git_repo: https://github.com/LINBIT/openstack-cinder.git cinder_git_install_branch: linstor/stable/2025.1 cinder_user_pip_packages: - python-linstor nova_git_repo: https://github.com/LINBIT/openstack-nova.git nova_git_install_branch: linstor/stable/2025.1 nova_user_pip_packages: - git+https://github.com/LINBIT/openstack-os-brick.git@linstor/stable/2025.1 cinder_backends: (1) linstor-drbd: volume_backend_name: linstor-drbd volume_driver: cinder.volume.drivers.linstordrv.LinstorDrbdDriver linstor_uris: linstor://cinder-01.openstack.test,linstor://cinder-02.openstack.test
| 1 | A detailed description of the available back end parameters can be found in the section below. |
Generic Cinder deployment
For other forms of OpenStack deployments, this guide can only provide non-specific hints.
To update the LINSTOR driver version, find your Cinder installation. Some likely paths are:
/usr/lib/python*/dist-packages/cinder/ /usr/lib/python*/site-packages/cinder/
The LINSTOR driver consists of a single file called linstordrv.py, located in the Cinder directory:
$CINDER_PATH/volume/drivers/linstordrv.py
To update the driver, replace the file with one from the LINBIT repository
RELEASE=linstor/stable/2025.1 curl -fL "https://raw.githubusercontent.com/LINBIT/openstack-cinder/$RELEASE/cinder/volume/drivers/linstordrv.py" > $CINDER_PATH/volume/drivers/linstordrv.py
You might also need to remove the Python cache for the update to be registered:
rm -rf $CINDER_PATH/volume/drivers/__pycache__
10.3. Configuring a LINSTOR back end for Cinder
To use the LINSTOR driver, configure the Cinder volume service. This is done by editing the Cinder configuration file and then restarting the Cinder Volume service.
Most of the time, the Cinder configuration file is located at /etc/cinder/cinder.conf. Some deployment options allow
manipulating this file in advance. See the section above for specifics.
To configure a new volume back end using LINSTOR, add the following section to cinder.conf
[linstor-drbd] volume_backend_name = linstor-drbd (1) volume_driver = cinder.volume.drivers.linstordrv.LinstorDrbdDriver (2) linstor_uris = linstor://cinder-01.openstack.test,linstor://cinder-02.openstack.test (3) linstor_trusted_ca = /path/to/trusted/ca.cert (4) linstor_client_key = /path/to/client.key (5) linstor_client_cert = /path/to/client.cert (5) # Deprecated or removed in 2.0.0 linstor_default_storage_pool_name = cinderpool (6) linstor_autoplace_count = 2 (7) linstor_controller_diskless = true (8) # non-linstor-specific options ... (9)
| The parameters described here are based on the latest release provided by LINBIT. The driver included in OpenStack might not support all of these parameters. Consult the OpenStack driver documentation to learn more. |
| 1 | The name of the volume back end. Needs to be unique in the Cinder configuration. The whole
section should share the same name. This name is referenced again in cinder.conf in the
enabled_backends setting and when creating a new volume type. |
||
| 2 | The version of the LINSTOR driver to use. There are two options:
|
||
| 3 | The URL(s) of the LINSTOR Controller(s). Multiple Controllers can be specified to make use of LINSTOR high availability. If not set, defaults to linstor://localhost.
|
||
| 4 | If HTTPS is enabled the referenced certificate is used to verify the LINSTOR Controller authenticity. | ||
| 5 | If HTTPS is enabled the referenced key and certificate will be presented to the LINSTOR Controller for authentication. | ||
| 6 | Deprecated in 2.0.0, use volume types instead. The storage pools to use when placing resources. Applies to all diskful resources created. Defaults to DfltStorPool. |
||
| 7 | Removed in 2.0.0, use volume types instead. The number of replicas to create for the given volume. A value of 0 will create a replica on all nodes. Defaults to 0. |
||
| 8 | Removed in 2.0.0, volumes are created on-demand by the driver. If set to true, ensures that at least one (diskless) replica is deployed on the Cinder Controller host. This is useful for ISCSI transports. Defaults to true. |
||
| 9 | You can specify more generic Cinder options here, for example target_helper = tgtadm for the ISCSI connector. |
| You can also configure multiple LINSTOR back ends, choosing a different name and configuration options for each. |
After configuring the LINSTOR back end, it should also be enabled. Add it to the list of enabled back ends in cinder.conf,
and optionally set is as the default back end:
[DEFAULT] ... default_volume_type = linstor-drbd-volume enabled_backends = lvm,linstor-drbd ...
As a last step, if you changed the Cinder configuration or updated the driver itself, you need to restart the Cinder service(s). Please check the documentation for your OpenStack Distribution on how to restart services.
10.3.1. Choosing a transport protocol
The Transport Protocol in Cinder is how clients (for example nova-compute) access the actual volumes. With LINSTOR, you can choose between two different drivers that use different transports.
-
cinder.volume.drivers.linstordrv.LinstorDrbdDriver, which uses DRBD as transport -
cinder.volume.drivers.linstordrv.LinstorIscsiDriver, which uses ISCSI as transport
Using DRBD as the transport protocol
The LinstorDrbdDriver works by ensuring a replica of the volume is available locally on the node where
a client (that is, nova-compute) issued a request. This only works if all compute nodes are also running
LINSTOR Satellites that are part of the same LINSTOR cluster.
The advantages of this option are:
-
Once set up, the Cinder host is no longer involved in the data path. All read and write to the volume are handled by the local DRBD module, which will handle replication across its configured peers.
-
Since the Cinder host is not involved in the data path, any disruptions to the Cinder service do not affect volumes that are already attached.
Known limitations:
-
Not all hosts and hypervisors support using DRBD volumes. This restricts deployment to Linux hosts and
kvmhypervisors. -
Resizing of attached and in-use volumes does work with default nova packages. While the resize itself is successful, the compute service will not propagate it to the VM until after a restart.
LINBIT provides updated sources for the Nova compute service and os-brick dependency. Using the updated source enables resizing of attached volumes with the DRBD transport. -
Multi-attach (attaching the same volume on multiple VMs) is not supported.
-
Encrypted volumes only work if udev rules for DRBD devices are in place.
udevrules are either part of thedrbd-utilspackage or have their owndrbd-udevpackage.
Using iSCSI as the transport protocol
The default way to export Cinder volumes is through iSCSI. This has the advantage of maximum compatibility as iSCSI can be used with every hypervisor, be it VMWare, Xen, HyperV, or KVM.
The drawback is that all data has to be sent to a Cinder node, to be processed by an (userspace) iSCSI daemon; that means that the data needs to pass the kernel/userspace border, and these transitions will cost some performance.
Another drawback is the introduction of a single point of failure. If a Cinder node running the iSCSI daemon crashes, other nodes lose access to their volumes. There are ways to configure Cinder for automatic fail-over to mitigate this, but it requires considerable effort.
In driver versions before 2.0.0, the Cinder host needs access to a local replica of every volume. This can be
achieved by either setting linstor_controller_diskless=True or using linstor_autoplace_count=0. Newer driver
versions will create such a volume on-demand.
|
10.3.2. Verifying the status of LINSTOR back ends
To verify that all back ends are up and running, you can use the OpenStack command line client:
$ openstack volume service list
╭─────────────────────────────────────────────────────────────────────────────────────────────────────────────────╮
┊ Binary ┊ Host ┊ Zone ┊ Status ┊ State ┊ Updated At ┊
╞═════════════════════════════════════════════════════════════════════════════════════════════════════════════════╡
┊ cinder-scheduler ┊ cinder-01.openstack.test ┊ nova ┊ enabled ┊ up ┊ 2021-03-10T12:24:37.000000 ┊
┊ cinder-volume ┊ cinder-01.openstack.test@linstor-drbd ┊ nova ┊ enabled ┊ up ┊ 2021-03-10T12:24:34.000000 ┊
┊ cinder-volume ┊ cinder-01.openstack.test@linstor-iscsi ┊ nova ┊ enabled ┊ up ┊ 2021-03-10T12:24:35.000000 ┊
╰─────────────────────────────────────────────────────────────────────────────────────────────────────────────────╯If you have the Horizon GUI deployed, check Admin > System Information > Block Storage Service instead.
In the above example all configured services are enabled and up. If there are any issues, examine the logs of the Cinder Volume service.
10.4. Creating a new volume type for LINSTOR
Before creating volumes using Cinder, you have to create a volume type. This can be done using the command line:
# Create a volume using the default back end
$ openstack volume type create default
╭────────────────────────────────────────────────────╮
┊ Field ┊ Value ┊
╞════════════════════════════════════════════════════╡
┊ description ┊ None ┊
┊ id ┊ 58365ffb-959a-4d91-8821-5d72e5c39c26 ┊
┊ is_public ┊ True ┊
┊ name ┊ default ┊
╰────────────────────────────────────────────────────╯
# Create a volume using a specific back end
$ openstack volume type create --property volume_backend_name=linstor-drbd linstor-drbd-volume
╭────────────────────────────────────────────────────╮
┊ Field ┊ Value ┊
╞════════════════════════════════════════════════════╡
┊ description ┊ None ┊
┊ id ┊ 08562ea8-e90b-4f95-87c8-821ac64630a5 ┊
┊ is_public ┊ True ┊
┊ name ┊ linstor-drbd-volume ┊
┊ properties ┊ volume_backend_name='linstor-drbd' ┊
╰────────────────────────────────────────────────────╯Alternatively, you can create volume types using the Horizon GUI. Navigate to Admin > Volume > Volume Types and click
“Create Volume Type”. You can assign it a back end by adding the volume_backend_name as “Extra Specs” to it.
10.4.1. Advanced configuration of volume types
Each volume type can be customized by adding properties or “Extra Specs” as they are called in the Horizon GUI.
To add a property to a volume type on the command line use:
openstack volume type set linstor_drbd_b --property linstor:redundancy=5
Alternatively, you can set the property using the GUI by navigating tp Admin > Volume > Volume Types. In the Actions
column, open the dropdown menu and click the View Extra Specs button. This opens a dialog you can use to create, edit
and delete properties.
Available volume type properties
linstor:diskless_on_remaining-
Create diskless replicas on non-selected nodes after auto-placing.
linstor:do_not_place_with_regex-
Do not place the resource on a node which has a resource with a name matching the regular expression.
linstor:layer_list-
Comma-separated list of layers to apply for resources. If empty, defaults to DRBD,Storage.
linstor:provider_list-
Comma-separated list of providers to use. If empty, LINSTOR will automatically choose a suitable provider.
linstor:redundancy-
Number of replicas to create. Defaults to two.
linstor:replicas_on_different-
A comma-separated list of key or key=value items used as autoplacement selection labels when autoplace is used to determine where to provision storage.
linstor:replicas_on_same-
A comma-separated list of key or key=value items used as autoplacement selection labels when autoplace is used to determine where to provision storage.
linstor:storage_pool-
Comma-separated list of storage pools to use when auto-placing.
linstor:property:<key>-
If a <key> is prefixed by
linstor:property:, it is interpreted as a LINSTOR property. The property gets set on the Resource Group created for the volume type.OpenStack does not allow for
/in property names. If a LINSTOR property name contains a/replace it with a:.For example: To change the quorum policy,
DrbdOptions/auto-quorumneeds to be set. This can be done by setting thelinstor:property:DrbdOptions:auto-quorumproperty in OpenStack.
10.5. Using volumes
Once you have a volume type configured, you can start using it to provision new volumes.
For example, to create a simple 1Gb volume on the command line you can use:
openstack volume create --type linstor-drbd-volume --size 1 \
--availability-zone nova linstor-test-vol
openstack volume list
If you set default_volume_type = linstor-drbd-volume in your /etc/cinder/cinder.conf,
you may omit the --type linstor-drbd-volume from the openstack volume create … command above.
|
10.6. Troubleshooting
This section describes what to do in case you encounter problems with using LINSTOR volumes and snapshots.
10.6.1. Checking for error messages in the Horizon dashboard
Every volume and snapshot has a Messages tab in the Horizon dashboard. In case of errors, you can use the list of messages as a starting point for further investigation. Some common messages in case of errors:
create volume from backend storage:Driver failed to create the volume.
This message shows that there was an error creating a new volume. Check the Cinder Volume service logs for more details.
schedule allocate volume:Could not find any available weighted backend.
If this is the only error message, this means that the Cinder Scheduler could not find a volume back end suitable for creating the volume. This is most likely because:
-
The volume back end is offline. See Verifying the status of LINSTOR back ends.
-
The volume back end does not have enough free capacity to fulfil the request. Check the output of
cinder get-pools --detailandlinstor storage-pool listto verify that the requested capacity is available.
10.6.2. Checking the Cinder volume service
The LINSTOR driver is called as part of the Cinder Volume service.
| Distribution | Log location or command |
|---|---|
DevStack |
|
10.6.3. Checking the compute service logs
Some issues will not be logged in the Cinder Service but in the actual consumer of the volumes, most likely the compute service (Nova). As with the volume service, the exact host and location to check depends on your OpenStack distribution:
| Distribution | Log location or command |
|---|---|
DevStack |
|
11. LINSTOR volumes in Docker
This chapter describes LINSTOR® volumes in Docker as managed by the LINSTOR Docker Volume Plugin.
11.1. Introduction to Docker
Docker is a platform for developing, shipping, and running applications in the form of Linux containers. For stateful applications that require data persistence, Docker supports the use of persistent volumes and volume drivers.
The LINSTOR Docker Volume Plugin is a volume driver that provisions persistent volumes from a LINSTOR cluster for Docker containers.
11.2. Installing the LINSTOR plugin for Docker
To install the linstor-docker-volume plugin provided by LINBIT®, you will
need to have a working LINSTOR cluster. After that the plugin can be installed from the public docker hub.
# docker plugin install linbit/linstor-docker-volume --grant-all-permissions
The --grant-all-permissions flag will automatically grant all
permissions needed to successfully install the plugin. If you want to
manually accept these, omit the flag from the command above.
|
The implicit :latest tag is the latest amd64 version. We currently also build for arm64 with the
according tag. To installing the arm64 plugin, enter the following command:
# docker plugin install linbit/linstor-docker-volume:arm64 --grant-all-permissions
11.3. Configuring the LINSTOR plugin for Docker
As the plugin has to communicate to the LINSTOR Controller software using the LINSTOR Python library, we must tell the plugin where to find the LINSTOR controller node in its configuration file:
# cat /etc/linstor/docker-volume.conf [global] controllers = linstor://hostnameofcontroller
A more extensive example is this:
# cat /etc/linstor/docker-volume.conf [global] storagepool = thin-lvm fs = ext4 fsopts = -E discard size = 100MB replicas = 2
11.4. Using the LINSTOR plugin for Docker
The following are some examples of how you might use the LINSTOR Docker Volume plugin. In the following we expect a cluster consisting of three nodes (alpha, bravo, and charlie).
11.4.1. Typical Docker pattern
On node alpha:
$ docker volume create -d linbit/linstor-docker-volume \
--opt fs=xfs --opt size=200 lsvol
$ docker run -it --rm --name=cont \
-v lsvol:/data --volume-driver=linbit/linstor-docker-volume busybox sh
$ root@cont: echo "foo" > /data/test.txt
$ root@cont: exit
On node bravo:
$ docker run -it --rm --name=cont \
-v lsvol:/data --volume-driver=linbit/linstor-docker-volume busybox sh
$ root@cont: cat /data/test.txt
foo
$ root@cont: exit
$ docker volume rm lsvol
11.4.2. One diskful assignment by name, two nodes diskless
$ docker volume create -d linbit/linstor-docker-volume --opt nodes=bravo lsvol
11.4.3. One diskful assignment, no matter where, two nodes diskless
$ docker volume create -d linbit/linstor-docker-volume --opt replicas=1 lsvol
11.4.4. Two diskful assignments by name, and one diskless
$ docker volume create -d linbit/linstor-docker-volume --opt nodes=alpha,bravo lsvol
11.4.5. Two diskful assignments, no matter where, one node diskless
$ docker volume create -d linbit/linstor-docker-volume --opt replicas=2 lsvol
11.4.6. Using LINSTOR volumes with services from Docker Swarm manager node
$ docker service create \
--mount type=volume,src=lsvol,dst=/data,volume-driver=linbit/linstor-docker-volume \
--name swarmsrvc busybox sh -c "while true; do sleep 1000s; done"
Docker services do not accept the -v or --volume syntax, you
must use the --mount syntax. Docker run will accept either syntax.
|
12. LINSTOR Gateway for highly available NFS, iSCSI, or NVMe-oF storage
LINSTOR Gateway is open source software that you can use to create and manage highly available NVMe-oF targets, iSCSI targets, or NFS exports. LINSTOR Gateway does this by using both LINSTOR® and DRBD® Reactor behind the scenes.
This chapter focuses on how to install and use the software. For an explanatory overview of the software, its parts, its architecture, and how it works, reading the Understanding LINSTOR Gateway guide is essential.
12.1. LINSTOR Gateway requirements
Before you can use LINSTOR Gateway, you will need to have an initialized LINSTOR cluster, with DRBD Reactor, and NVMe-oF, NFS, iSCSI utilities installed and configured. DRBD Reactor requires a 3-node cluster at minimum, although only two of the three nodes need to be diskful. A third node can be diskless, to save on costs, and only needs to serve as a DRBD quorum witness. For this role, even hardware as basic as a low-power, single-board computer such as a Raspberry Pi might be enough. The following sections detail how to meet LINSTOR Gateway installation requirements. Refer to the DRBD User Guide for more information about the DRBD quorum feature.
12.1.1. Preparing a LINSTOR cluster for LINSTOR Gateway
You need to set up a LINSTOR cluster before you can use LINSTOR Gateway. For more information about installing LINSTOR and initializing a LINSTOR cluster, see the LINSTOR User Guide.
After installing and initializing a LINSTOR cluster, you need to create a LINSTOR storage pool, resource group, and volume group. These LINSTOR objects will back targets and exports that you create with LINSTOR Gateway. For more detail regarding LINSTOR storage pools, see the Storage pools section of the LINSTOR User Guide.
The rest of this section shows some example commands for setting up the LINSTOR Gateway prerequisites in a 3-node LINSTOR cluster.
|
When using LINSTOR together with LVM and DRBD, set the global_filter = [ "r|^/dev/drbd|", "r|^/dev/mapper/[lL]instor|" ] This setting tells LVM to reject DRBD and other devices created or set up by LINSTOR from operations such as scanning or opening attempts. In some cases, not setting this filter might lead to increased CPU load or stuck LVM operations. |
Create an LVM-backed storage pool on each node that uses the physical device /dev/sdb:
linstor physical-storage create-device-pool --pool-name lvpool LVM LINSTOR1 /dev/sdb \ --storage-pool lvmpool linstor physical-storage create-device-pool --pool-name lvpool LVM LINSTOR2 /dev/sdb \ --storage-pool lvmpool linstor physical-storage create-device-pool --pool-name lvpool LVM LINSTOR3 /dev/sdb \ --storage-pool lvmpool
Create LINSTOR resource groups and volume groups backed by the storage pool that you just created:
linstor resource-group create iscsi_group \ --storage-pool lvmpool \ --place-count 2 linstor resource-group create nfs_group \ --storage-pool lvmpool \ --place-count 3 linstor resource-group create nvme_group \ --storage-pool lvm \ --place-count 2
linstor volume-group create iscsi_group linstor volume-group create nfs_group linstor volume-group create nvmeof_group
LINSTOR Gateway requires that you change the LINSTOR satellite service configuration on each satellite node.
To do this, edit or create the /etc/linstor/linstor_satellite.toml configuration file and add the following content:
[files]
allowExtFiles = [
"/etc/systemd/system",
"/etc/systemd/system/linstor-satellite.service.d",
"/etc/drbd-reactor.d"
]
You might need to first create the /etc/linstor directory if it does not already exist on a node.
|
After saving the changes to the satellite configuration, restart the satellite service on all nodes to load the changes:
systemctl restart linstor-satellite
12.1.2. Using DRBD Reactor to create highly available LINSTOR Gateway resources
DRBD Reactor is an open source daemon that will orchestrate the iSCSI, NFS or NVMe-oF resources in the LINSTOR Gateway cluster. You must install DRBD Reactor and enable the DRBD Reactor service on all LINSTOR satellite nodes in the cluster.
For details about DRBD Reactor installation and configuration options, see the DRBD Reactor chapter in the DRBD® User Guide.
The instructions that follow for setting up DRBD Reactor for use with LINSTOR Gateway assume that you have installed DRBD Reactor by using a package manager.
Instructions might vary for an installation from the open source code found at the DRBD Reactor source code repository.
See the README file and other documentation in this repository for details.
Enabling and starting the DRBD Reactor service
After installing DRBD Reactor on all your cluster’s LINSTOR satellite nodes, start and enable the DRBD Reactor service on all nodes:
systemctl enable --now drbd-reactor
Configuring DRBD Reactor to automatically reload following configuration changes
Besides enabling and starting the DRBD Reactor service on all LINSTOR satellite nodes, you also need to configure DRBD Reactor to automatically reload when its configuration changes. To do this, enter the following commands on all DRBD Reactor nodes:
cp /usr/share/doc/drbd-reactor/examples/drbd-reactor-reload.{path,service} \
/etc/systemd/system/
systemctl enable --now drbd-reactor-reload.path
Installing the Open Cluster Framework resource agents
DRBD Reactor uses Open Cluster Framework (OCF) resource agents when integrated with LINSTOR Gateway.
You need to install these resource agents on all DRBD Reactor running nodes in the cluster.
To do this, use a package manager to install the resource-agents package (for both RPM and DEB based distributions).
12.1.3. Installing NVMe-oF, iSCSI, and NFS utilities
So that LINSTOR Gateway can configure its various targets and exports, you will need to install and configure various packages and utilities. The subsections that follow describe how to do this.
Installing NVMe-oF utilities
If you want to use LINSTOR Gateway to create and manage NVMe-oF targets, you will need to install the NVMe-of command line interface on all nodes.
On RPM based systems, install the nvmetcli package.
On DEB based systems, install the nvme-cli package.
Selecting and installing the iSCSI stack and dependencies
LINSTOR Gateway deployments typically use either the Linux-IO (LIO) or the Generic SCSI Target Subsystem for Linux (SCST) for an iSCSI implementation.
LIO is the iSCSI implementation that the Linux kernel community chose as the SCSI target subsystem that is included in the mainline Linux kernel.
SCST is a mature iSCSI implementation that is used in many iSCSI appliances, including the LINBIT®-developed VSAN solution since version 0.17.0.
While using one of either LIO or SCST is recommended with LINSTOR Gateway, you can also use the iSCSI Enterprise Target (IET) or SCSI Target Framework (STGT) iSCSI target implementations.
Installing LIO for LINSTOR Gateway
LIO is the SCSI target that has been included with the Linux kernel since 2.6.38, which makes the installation of its utilities and dependencies relatively simple.
TargetCLI is an interactive shell used to manage the LIO target.
LINSTOR Gateway requires TargetCLI for some operations when using the LIO iSCSI implementation.
You can install TargetCLI by using a package manager to install the targetcli package on RPM-based systems, or the targetcli-fb package on DEB-based systems.
To verify that you have satisfied the LIO iSCSI implementation requirements for using LINSTOR Gateway to create a highly available iSCSI target, after installing LINSTOR Gateway, enter this command:
linstor-gateway check-health --iscsi-backends lio-t
Output from the command should indicate LIO iSCSI requirements are met.
[...] [✓] iSCSI [...]
Installing SCST for LINSTOR Gateway
The SCST project consists of a kernel space core, device handlers, target drivers, and the scstadmin user space utility for managing its core parts.
All of which can be built from source, by following the instructions found on the project’s source code repository.
By following the installation instructions, you will install all the necessary parts for using SCST with LINSTOR Gateway.
| To install SCST for LINSTOR Gateway, enter and run all the commands that follow on all nodes. The instructions that follow are for installations on Red Hat Enterprise Linux (RHEL). You will need to adjust the commands to install and configure SCST on DEB-based systems. |
ELRepo, the RPM repository for Enterprise Linux packages that are not included in the standard RHEL distribution’s repositories, is needed for installing DKMS. You also need to install development tools and other dependencies for building SCST RPM packages.
dnf install -y https://dl.fedoraproject.org/pub/epel/epel-release-latest-9.noarch.rpm dnf groupinstall -y "Development Tools" dnf install -y kernel-devel perl perl-Data-Dumper perl-ExtUtils-MakeMaker rpm-build dkms git
After installing build dependencies, you can build and install the SCST packages:
git clone https://github.com/SCST-project/scst cd scst/ make rpm-dkms cd ~/ dnf install -y /usr/src/packages/RPMS/x86_64/scst*
Finally, enter the following commands to create the necessary configuration for loading the SCST kernel module, and then create a systemd unit file for an iscs-scst service.
echo -n "" > /etc/modules-load.d/scst.conf for m in iscsi-scst scst scst_vdisk; do echo $m >> /etc/modules-load.d/scst.conf modprobe $m done cat << EOF > /etc/systemd/system/iscsi-scst.service [Unit] Description=iSCSI SCST Target Daemon Documentation=man:iscsi-scstd(8) After=network.target Before=scst.service Conflicts=shutdown.target [Service] EnvironmentFile=-/etc/sysconfig/scst PIDFile=/var/run/iscsi-scstd.pid ExecStartPre=/sbin/modprobe iscsi-scst ExecStart=/sbin/iscsi-scstd $ISCSID_OPTIONS [Install] WantedBy=multi-user.target EOF
After configuring SCST kernel module loading and creating a systemd unit file for an iscsi-scst service, reload systemd unit files to include the new unit file.
Then enable and start the iscsi-scst service that you created.
systemctl daemon-reload systemctl enable --now iscsi-scst
To verify that you have satisfied the SCST iSCSI requirements for using LINSTOR Gateway to create a highly available iSCSI target, after installing LINSTOR Gateway, you can enter this command:
linstor-gateway check-health --iscsi-backends scst
Output from the command should indicate SCST iSCSI requirements are met.
Installing NFS support in LINSTOR Gateway
For NFS support in LINSTOR Gateway, you need to install NFS utilities on all cluster nodes.
Install the nfs-utils package on RPM based systems or the nfs-common package on DEB based systems.
After installing the correct NFS package for your operating system on all LINSTOR satellite nodes, reload the systemd unit files by entering the following command:
systemctl daemon-reload
You should not enable the NFS server service in systemd because that will conflict with DRBD Reactor managing the service.
Disable the nfs-server service and then verify its status by using the following commands:
systemctl disable nfs-server --now systemctl status nfs-server
Verify that the output from the status command lists the service as inactive and disabled:
● nfs-server.service - NFS server and services Loaded: loaded (/usr/lib/systemd/system/nfs-server.service; disabled; preset: disabled) Active: inactive (dead)
12.2. Installing LINSTOR Gateway
After verifying that prerequisites are installed and configured, you can install LINSTOR Gateway.
If you are a LINBIT customer, you can install LINSTOR Gateway by using your package manager to install the linstor-gateway package from LINBIT customer repositories.
LINBIT maintains LINSTOR Gateway at the project’s open source code repository.
If you need to, you can build the software from its open source code.
12.2.1. Installing the LINSTOR Gateway server
LINSTOR Gateway has a server part which needs to be running in the background on a node that “knows” how to reach the LINSTOR controller service running in your cluster. Usually, this will be your LINSTOR controller node itself. If you have configured a highly available LINSTOR controller, you will need to install the LINSTOR Gateway server part on every node in your cluster that can potentially run the LINSTOR controller service.
| For more information about LINSTOR Gateway server deployment choices, see the Architecture of a cluster section of the Understanding LINSTOR Gateway user guide. |
To install the LINSTOR Gateway server on a node, you can use a systemd service.
Create the file /etc/systemd/system/linstor-gateway.service on the same node as your LINSTOR controller service and copy the following content into it to create the service:
[Unit] Description=LINSTOR Gateway After=network.target [Service] ExecStart=/usr/sbin/linstor-gateway server --addr ":8080" [Install] WantedBy=multi-user.target
Next, reload systemd unit files to include the newly created service, and then start and enable the LINSTOR Gateway service:
systemctl daemon-reload systemctl enable --now linstor-gateway
Configuring the LINSTOR Gateway service
You can configure the LINSTOR Gateway server daemon by using a TOML file.
By default, the application will look for the configuration file in /etc/linstor-gateway/linstor-gateway.toml.
You can override this when using the LINSTOR Gateway CLI client by add a --config /path/to/config command line flag.
In the configuration file, you can specify where LINSTOR Gateway should look for the LINSTOR controller service.
By default, localhost:3370 is used.
This is the reason for the earlier recommendation to install the LINSTOR Gateway server on the same node (or nodes) as the LINSTOR controller service is installed on.
The following is an example configuration file specifying a list of potential LINSTOR controller nodes, by their IP addresses:
[linstor] controllers = ["10.10.1.1", "10.10.1.2", "10.10.1.3"]
12.3. Verifying LINSTOR Gateway requirements
As a final step before starting to use LINSTOR Gateway, verify that you have satisfied the prerequisites outlined in the previous sections.
12.3.1. Verifying LINSTOR Gateway parts are installed
Before using LINSTOR Gateway, you should verify that all its necessary parts are installed. The following instructions for verifying LINSTOR Gateway parts assume that you already installed and configured a LINSTOR cluster complete with storage pools, resource groups, and volume groups.
In addition to the initialized LINSTOR cluster, the following packages need to be present on all nodes:
-
linstor-client -
drbd-reactor -
nvmetcli -
targetcli(RPM) ortargetcli-fb(DEB), if you are using LIO for an iSCSI implementation -
nfs-utils(RPM) ornfs-common(DEB) -
nfs-server(RPM) ornfs-kernel-server(DEB) -
resource-agents
LINSTOR Gateway provides a utility to automatically check that the prerequisite tools are present on the node that you run the utility from. To use this utility, enter the following command on your LINSTOR controller node:
linstor-gateway check-health
Output from the command will show something similar to the following output if you installed all of the required parts. If the health check output shows an error, you must resolve the error before proceeding.
[✓] LINSTOR [✓] drbd-reactor [✓] Resource Agents [✓] iSCSI [✓] NVMe-oF [✓] NFS
If you do not plan to use a certain type of datastore implementation, it is acceptable to not install the parts for that datastore in your cluster. For example, if you only wanted to use LINSTOR Gateway to create and manage NVMe-oF backed datastores, then you could forego installing iSCSI and NFS parts. In this case, running the LINSTOR Gateway health check utility would report missing iSCSI and NFS parts but it would be fine for your use case.
12.3.2. Verifying LINSTOR cluster initialization
You can verify that you initialized the LINSTOR cluster properly by using some LINSTOR client list commands and comparing their output to the example outputs that follow.
Enter a linstor node list command to verify that all your LINSTOR nodes are listed as a satellite or combined type, and that you have three (or more) nodes to support DRBD quorum:
╭────────────────────────────────────────────────────────────╮ ┊ Node ┊ NodeType ┊ Addresses ┊ State ┊ ╞════════════════════════════════════════════════════════════╡ ┊ LINSTOR1 ┊ COMBINED ┊ 172.16.16.111:3366 (PLAIN) ┊ Online ┊ ┊ LINSTOR2 ┊ SATELLITE ┊ 172.16.16.112:3366 (PLAIN) ┊ Online ┊ ┊ LINSTOR3 ┊ SATELLITE ┊ 172.16.16.113:3366 (PLAIN) ┊ Online ┊ ╰────────────────────────────────────────────────────────────╯
Verify that the output from a linstor storage pool list command includes an LVM or ZFS backed storage pool:
╭─────────────────────────────────────────────────────────[...]─────────╮ ┊ StoragePool ┊ Node ┊ Driver ┊ PoolName ┊ [...] ┊ State ┊ ╞═════════════════════════════════════════════════════════[...]═════════╡ [...] ┊ lvmpool ┊ LINSTOR1 ┊ LVM ┊ lvpool ┊ [...] ┊ Ok ┊ ┊ lvmpool ┊ LINSTOR2 ┊ LVM ┊ lvpool ┊ [...] ┊ Ok ┊ ┊ lvmpool ┊ LINSTOR3 ┊ LVM ┊ lvpool ┊ [...] ┊ Ok ┊ ╰─────────────────────────────────────────────────────────[...]─────────╯
Enter a linstor resource-group list command to verify that you created at least one LINSTOR resource group that uses your storage pool:
╭────────────────────────────────────────────────────────────────╮ ┊ ResourceGroup ┊ SelectFilter ┊ VlmNrs ┊ Description ┊ ╞════════════════════════════════════════════════════════════════╡ ┊ DfltRscGrp ┊ PlaceCount: 2 ┊ ┊ ┊ ╞┄┄┄┄┄┄┄┄┄┄┄┄┄┄┄┄┄┄┄┄┄┄┄┄┄┄┄┄┄┄┄┄┄┄┄┄┄┄┄┄┄┄┄┄┄┄┄┄┄┄┄┄┄┄┄┄┄┄┄┄┄┄┄┄╡ ┊ iscsi_group ┊ PlaceCount: 2 ┊ 0 ┊ ┊ ┊ ┊ StoragePool(s): lvmpool ┊ ┊ ┊ ╞┄┄┄┄┄┄┄┄┄┄┄┄┄┄┄┄┄┄┄┄┄┄┄┄┄┄┄┄┄┄┄┄┄┄┄┄┄┄┄┄┄┄┄┄┄┄┄┄┄┄┄┄┄┄┄┄┄┄┄┄┄┄┄┄╡ ┊ nvmeof_group ┊ PlaceCount: 2 ┊ 0 ┊ ┊ ┊ ┊ StoragePool(s): lvmpool ┊ ┊ ┊ ╞┄┄┄┄┄┄┄┄┄┄┄┄┄┄┄┄┄┄┄┄┄┄┄┄┄┄┄┄┄┄┄┄┄┄┄┄┄┄┄┄┄┄┄┄┄┄┄┄┄┄┄┄┄┄┄┄┄┄┄┄┄┄┄┄╡ ┊ nfs_group ┊ PlaceCount: 3 ┊ 0 ┊ ┊ ┊ ┊ StoragePool(s): lvmpool ┊ ┊ ┊ ╰────────────────────────────────────────────────────────────────╯
Also verify that each resource group has a corresponding volume group:
for vg in {iscsi,nfs,nvmeof}_group; do
linstor volume-group list "$vg"
done
Output will be as follows:
╭──────────────────╮ ┊ VolumeNr ┊ Flags ┊ ╞══════════════════╡ ┊ 0 ┊ ┊ ╰──────────────────╯ ╭──────────────────╮ ┊ VolumeNr ┊ Flags ┊ ╞══════════════════╡ ┊ 0 ┊ ┊ ╰──────────────────╯ ╭──────────────────╮ ┊ VolumeNr ┊ Flags ┊ ╞══════════════════╡ ┊ 0 ┊ ┊ ╰──────────────────╯
12.4. Using LINSTOR Gateway to create iSCSI targets
After you have completed preparing your environment, you can start creating iSCSI logical units.
You will use the linstor-gateway command line utility to manage all iSCSI related actions.
Use linstor-gateway iscsi help for detailed information about the iscsi subcommand.
|
Assuming that you installed the necessary LIO iSCSI parts, entering the following command will create a new iSCSI target backed by a highly available DRBD resource in the LINSTOR cluster:
linstor-gateway iscsi create iqn.2019-08.com.linbit:example 172.16.16.97/24 1G \ --implementation lio-t \ --username=foo \ --password=bar \ --resource-group=iscsi_group
Replace lio-t with the iSCSI target implementation that you want to use and have installed the necessary parts for.
The implementation type can be one of: iet, lio, lio-t, scst, or tgt.
For example, use the --implementation scst option if you want to use the SCST iSCSI implementation and have installed the necessary parts.
If you do not specify an iSCSI target implementation type, one will be chosen for you based on installed parts and the logic in the OCF iSCSITarget resource agent.
The default implementation chosen by the resource agent might not be the one you want.
|
After entering this iscsi create command, LINSTOR Gateway will deploy the resource from the specified LINSTOR resource group, iscsi_group.
This command also creates the DRBD Reactor configuration files to enable high availability of the iSCSI target.
The LINSTOR resource name will be what you specify after the colon in the iSCSI qualified name (IQN), example, in this case.
When the behind-the-scenes commands complete, you will have a 1GiB iSCSI target with CHAP authentication enabled using the username and password that you specified.
The iSCSI target will be discoverable on the IP address that you specified.
The target will be backed by a DRBD device managed by LINSTOR.
You can find the DRBD Reactor configuration files that the command creates in the /etc/drbd-reactor.d/ directory on your nodes.
You can list LINSTOR Gateway-created iSCSI resources by using the linstor-gateway iscsi list command.
Output from the command will show a table listing iSCSI resources in the cluster:
╭───────────────────────────────────────────────────────────────────────────────────────────╮ ┊ IQN ┊ Service IP ┊ Service state ┊ LUN ┊ LINSTOR state ┊ ╞═══════════════════════════════════════════════════════════════════════════════════════════╡ ┊ iqn.2019-08.com.linbit:example ┊ 172.16.16.97/24 ┊ Started ┊ 1 ┊ OK ┊ ╰───────────────────────────────────────────────────────────────────────────────────────────╯
You can check the DRBD Reactor status on a node by using the drbd-reactorctl status command.
|
12.5. Deleting iSCSI targets
Entering the following command will delete the previously created example iSCSI target from DRBD Reactor and the LINSTOR cluster:
linstor-gateway iscsi delete iqn.2019-08.com.linbit:example
12.6. Creating NFS exports
To create an HA NFS export in your cluster, you only need to enter a single LINSTOR Gateway command.
This single command will create a new LINSTOR resource within the cluster.
In the example command that follows, the resource will have the name nfstest.
LINSTOR will use the specified resource group, nfs_group, as a template to deploy the resource from.
This command also creates the DRBD Reactor configuration files that make the NFS export highly available.
linstor-gateway nfs create nfstest 172.16.16.99/32 1G \ --allowed-ips=172.16.16.0/24 \ --filesystem ext4 \ --resource-group=nfs_group
|
The linstor resource-group set-property nfs_group FileSystem/Type ext4 You only need to set this once per resource group, and only on the resource group created specifically for LINSTOR Gateway NFS exports. |
After the nfs create command finishes running, you will have a 1GiB NFS export that will allow NFS clients in the network specified by the allowed-ips command argument to mount the exported file system.
Clients can reach the NFS server hosting the NFS export by using the IP address that you specified in the command, 172.16.16.99 in this example.
This IP address is a virtual IP (VIP) address.
Regardless of which LINSTOR satellite node is actively hosting the NFS export, NFS clients in the allowed network can reach the NFS server by the VIP address.
The LINSTOR Gateway-created export will be backed by a DRBD device managed by LINSTOR.
You can find the LINSTOR Gateway-created DRBD Reactor configuration file in the /etc/drbd-reactor.d/ directory on each LINSTOR satellite node.
You can list the NFS resources that LINSTOR Gateway creates by entering a linstor-gateway nfs list command.
| As a reminder, it is only possible to use LINSTOR Gateway to create a single NFS export within a cluster. |
Output from the command will show a table of information related to the LINSTOR Gateway-created NFS exports in your cluster.
╭────────────────────────────────────────────────────────────────────────────────────────────────╮
┊ Resource ┊ Service IP ┊ Service state ┊ NFS export ┊ LINSTOR state ┊
╞════════════════════════════════════════════════════════════════════════════════════════════════╡
┊ nfstest ┊ 172.16.16.99/32 ┊ Started (node-1) ┊ /srv/gateway-exports/nfstest ┊ OK ┊
╰────────────────────────────────────────────────────────────────────────────────────────────────╯
You can check the DRBD Reactor status using the drbd-reactorctl status command.
|
12.7. Deleting NFS exports
The following command will delete the NFS export from DRBD Reactor and the LINSTOR cluster:
linstor-gateway nfs delete -r nfstest
12.7.1. Creating additional NFS exports by using LINSTOR Gateway
If there is already a LINSTOR Gateway-created NFS export in your cluster, there is a limitation[6] that you cannot use another nfs create command to create another NFS export.
If you need to create additional NFS exports, you will need to plan ahead and create these exports with a single nfs create command.
You can create additional NFS exports by specifying additional volume size arguments to your first (and only) LINSTOR Gateway nfs create command.
An example command would be:
linstor-gateway nfs create example 172.16.16.99/24 20G 40G
Entering this command would create an NFS service with two exports, as shown in the output from a linstor-gateway nfs list command:
╭──────────────────────────────────────────────────────────────────────────────────────────────────────╮
┊ Resource ┊ Service IP ┊ Service state ┊ NFS export ┊ LINSTOR state ┊
╞══════════════════════════════════════════════════════════════════════════════════════════════════════╡
┊ example ┊ 172.16.16.99/24 ┊ Started (node-1) ┊ /srv/gateway-exports/example/vol1 ┊ OK ┊
┊ ┊ ┊ Started (node-1) ┊ /srv/gateway-exports/example/vol2 ┊ OK ┊
╰──────────────────────────────────────────────────────────────────────────────────────────────────────╯12.8. Creating NVMe-oF targets
The linstor-gateway command line utility will be used to manage all NVMe-oF target related actions.
Use linstor-gateway nvme help for detailed information regarding the nvme subcommand.
|
Entering the following command will create a new DRBD resource in the LINSTOR cluster with the specified name, linbit:nvme:vol0, and resource group, nvme_group.
This command also creates the DRBD Reactor configuration files to enable high availability of the NVMe-oF target.
linstor-gateway nvme create linbit:nvme:vol0 \ 172.16.16.98/24 2G \ --resource-group nvme_group
After the command finishes running, you will have a highly available 2GiB NVMe-oF target created in your cluster that is discoverable on the IP address specified in the command.
You can find the LINSTOR Gateway-created DRBD Reactor configuration file in the /etc/drbd-reactor.d/ directory on each LINSTOR satellite node.
You can list the NVMe-oF resources that you created by using LINSTOR Gateway by entering a linstor-gateway nvme list command.
Output will show a table listing any NVMe-oF resources and related information about them.
╭──────────────────────────────────────────────────────────────────────────────────╮ ┊ NQN ┊ Service IP ┊ Service state ┊ Namespace ┊ LINSTOR state ┊ ╞══════════════════════════════════════════════════════════════════════════════════╡ ┊ linbit:nvme:vol0 ┊ 172.16.16.98/24 ┊ Started ┊ 1 ┊ OK ┊ ╰──────────────────────────────────────────────────────────────────────────────────╯
You can check the DRBD Reactor status using the drbd-reactorctl status command.
|
13. LINSTOR volumes in CloudStack
This chapter describes using LINSTOR® to provision volumes that can be used to back primary storage in Apache CloudStack. CloudStack primary storage stores the virtual disks for virtual machines (VMs) running on hosts in CloudStack. A LINBIT®-developed CloudStack plugin integrates LINSTOR with CloudStack. A benefit to integrating LINSTOR with CloudStack is that it can be a way to provide highly available primary storage that is also flexible to manage.
| Currently, the LINSTOR plugin for CloudStack can only be used to provision volumes for use with KVM hypervisors. |
Setting up and deploying CloudStack can be a complex task. A production-ready deployment can take several weeks to months before it is ready for users. A basic test deployment in a virtual environment can be set up in a few hours perhaps. This chapter will deal only with aspects related to integrating LINSTOR in CloudStack and should be considered a general overview. You should supplement instructions in this chapter with instructions and best practice recommendations from the CloudStack documentation.
| Attention should be paid to security, firewall, and resource provisioning instructions in the CloudStack documentation, and in other chapters in the LINSTOR User Guide, before production deployment. |
| In this chapter, as in other areas of the LINSTOR User Guide, the word node is used. In most cases, you can think of a node as equivalent to a CloudStack host. |
13.1. Introduction to CloudStack
From the CloudStack documentation: “Apache CloudStack is an open source Infrastructure-as-a-Service (IaaS) platform that manages and orchestrates pools of storage, network, and computer resources to build a public or private IaaS compute cloud.”
13.2. Preparing your environment for CloudStack and LINSTOR deployment
You will need to make a few preparatory steps before deploying LINSTOR for use with CloudStack.
13.2.1. Configuring time synchronization
It is important that the nodes in your cluster are time synchronized. To do this, you can
install and configure a tool such as chrony or OpenNTPD.
13.2.2. Adding node IP addresses and host names
Add your cluster nodes’ IP addresses and host names to each node’s /etc/hosts file.
13.3. Installing and preparing LINSTOR for CloudStack
The LINSTOR plugin is included in Apache CloudStack versions 4.16.1 and later. You do not have to install anything else to support LINSTOR. CloudStack versions 4.16.0 and earlier do not support the LINSTOR plugin.
| One of the pull requests did not merge properly in CloudStack v4.17.0 which caused a CloudStack UI bug in the CloudStack initialization wizard. More details are available here. If you need to be on the v4.17 branch, it is recommended (at time of writing) that you install v4.17.1. |
Follow the installation instructions in the LINSTOR User Guide to install LINSTOR on the storage providing nodes in your cluster.
A basic outline of installation steps is:
-
Install necessary packages for storage layers that you will be using, for example, ZFS or LVM. The steps below use ZFS as a backing storage layer for LINSTOR.
When using LINSTOR together with LVM and DRBD, set the
global_filtervalue in the LVM global configuration file (/etc/lvm/lvm.confon RHEL) to:global_filter = [ "r|^/dev/drbd|", "r|^/dev/mapper/[lL]instor|" ]
This setting tells LVM to reject DRBD and other devices created or set up by LINSTOR from operations such as scanning or opening attempts. In some cases, not setting this filter might lead to increased CPU load or stuck LVM operations.
-
Install the necessary LINSTOR packages (DRBD® kernel module,
linbit-sds-controller, andlinbit-sds-satellitepackages) from LINBIT repositories if you are a LINBIT customer, otherwise, you will need to build from source. -
Restart the
multipathddaemon.systemctl restart multipathd
-
Enable and start the LINSTOR Controller and LINSTOR Satellite services on your nodes.
# systemctl enable --now linstor-controller # systemctl enable --now linstor-satellite
-
Add your nodes to LINSTOR.
linstor node create <node_host_name>
-
Create a new LINSTOR storage pool on all of your participating nodes. For example, given a ZFS pool named
zfs_storage, enter the following to create a storage pool namedDfltStorPool:# linstor storage-pool create zfs <node_host_name> DfltStorPool zfs_storage
-
Create a LINSTOR resource group to be used for CloudStack. To create a resource group named
cloudstack, to be placed on two of your cluster nodes, enter:# linstor resource-group create cloudstack --place-count 2 --storage-pool DfltStorPool
-
Create a LINSTOR volume group from your resource group, by entering the command:
# linstor volume-group create cloudstack
13.3.1. Verifying resource creation
After installing LINSTOR and creating a resource group backed by a storage pool and storage layer, test that you can create storage resources. You can do this by spawning resources from the resource group that you created.
| The CloudStack setup best practices recommend that a primary storage mount point (and therefore the LINSTOR resource that backs it) “should not exceed 6TB in size.” |
# linstor resource-group spawn cloudstack testres 1GiB
Verify that LINSTOR created your resources by using a resource list command.
# linstor resource list ╭──────────────────────────────────────────────────────────────────────────────────╮ ┊ ResourceName ┊ Node ┊ Port ┊ Usage ┊ Conns ┊ State ┊ CreatedOn ┊ ╞══════════════════════════════════════════════════════════════════════════════════╡ ┊ testres ┊ node-0 ┊ 7000 ┊ Unused ┊ Ok ┊ UpToDate ┊ 2022-11-10 20:12:30 ┊ ┊ testres ┊ node-1 ┊ 7000 ┊ Unused ┊ Ok ┊ UpToDate ┊ 2022-11-10 20:12:30 ┊ ┊ testres ┊ node-2 ┊ 7000 ┊ Unused ┊ Ok ┊ TieBreaker ┊ 2022-11-10 20:12:29 ┊ ╰──────────────────────────────────────────────────────────────────────────────────╯
13.4. Installing CloudStack
After installing and preparing LINSTOR, you can install and configure CloudStack. As disclaimed previously, you should take these instructions as a way to setup CloudStack quickly for testing and illustrative purposes. Refer to CloudStack documentation for detailed instructions and best practice recommendations, before deploying into production.
13.4.1. Installing MySQL
First, install a MySQL server instance that is necessary for CloudStack’s database.
On Ubuntu, enter:
# apt install -y mysql-server
On RHEL, enter:
# dnf install -y mysql-server
13.4.2. Configuring the CloudStack database
After installing the MySQL server package, create a CloudStack database configuration file named
/etc/mysql/conf.d/cloudstack.cnf with the following contents:
[mysqld] innodb_rollback_on_timeout=1 innodb_lock_wait_timeout=600 max_connections=350 (1) log-bin=mysql-bin binlog-format = 'ROW'
| 1 | 350 is the max_connections value specified in
the
CloudStack installation guide. You can change this value depending on your needs. |
If you are on an Ubuntu 16.04 or later system, for binary logging, you need to
specify a server_id in your .cnf database configuration file, for example:
[mysqld] server_id = 1 innodb_rollback_on_timeout=1 innodb_lock_wait_timeout=600 max_connections=350 log-bin=mysql-bin binlog-format = 'ROW'
Then restart the MySQL service by entering systemctl restart mysql.
13.4.3. Installing NFS for secondary storage
Next, install and configure NFS for CloudStack’s secondary storage. You only need to do this on the node that will be your CloudStack management node. CloudStack uses secondary storage to store such things as operating system images for VMs and snapshots of VM data.
To install NFS, on Ubuntu, enter:
# apt install -y nfs-kernel-server
On RHEL, enter:
# dnf install -y nfs-utils
After installing the NFS server, create an NFS export for CloudStack’s secondary storage by entering the following commands:
# mkdir -p /export/secondary # echo "/export *(rw,async,no_root_squash,no_subtree_check)" >> /etc/exports # exportfs -a
Next, enable and start the NFS server service.
# systemctl enable --now nfs-server
13.5. Installing and configuring CloudStack
General CloudStack installation and configuration instructions follow. As your environment might have specific needs or variations, you should also reference the instructions in the CloudStack Installation Guide.
13.5.1. Installing CloudStack
While official CloudStack releases are “always in source code form,” for convenience, there are community generated DEB and RPM packages available at cloudstack.org:
-
Ubuntu DEB repository: https://download.cloudstack.org/ubuntu
-
EL8 RPM repository: https://download.cloudstack.org/el/8/
-
EL7 RPM repository: https://download.cloudstack.org/el/7/
You can follow the links above to find and download the packages that you need for your installation. Be sure to verify the integrity of downloaded packages against CloudStack’s signing keys, as outlined in the instructions here.
Alternatively, you can follow instructions here to configure the CloudStack repository appropriate to your Linux distribution and then pull and install packages by using your distribution’s package manager.
After adding the CloudStack repository, you might need to update the package manager’s repository list, before you can install packages.
For your CloudStack management node, install these packages:
-
cloudstack-management -
cloudstack-common -
cloudstack-ui
For your other cluster nodes that will be hosting VMs, install the cloudstack-agent package.
13.5.2. Initializing the CloudStack database
After installing the necessary CloudStack packages, initialize the CloudStack database.
For testing purposes, you can enter the following command on your management node:
# cloudstack-setup-databases cloud:cloud --deploy-as=root:nonsense -i <node_name>
Here, the cloud after cloud: and nonsense are passwords that you can change as you see
fit.
For production deployments, follow the more detailed instructions in the CloudStack Installation Guide.
13.6. Installing the CloudStack system virtual machine image template
CloudStack needs to run some system VMs for some of its functionality. You can download a CloudStack VM template image and then run a CloudStack script that will prepare the image for various system VMs in deployment. On the CloudStack management node, enter the following commands:
# CS_VERSION=4.17 # CS_VERSION_PATCH=4.17.1 # wget https://download.cloudstack.org/systemvm/$CS_VERSION/systemvmtemplate-$CS_VERSION_PATCH-kvm.qcow2.bz2 # /usr/share/cloudstack-common/scripts/storage/secondary/cloud-install-sys-tmplt \ -m /export/secondary \ -f systemvmtemplate-$CS_VERSION_PATCH=-kvm.qcow2.bz2 \ -h kvm -o localhost -r cloud -d cloud
13.7. Configuring KVM hypervisor hosts for use in CloudStack
Currently, the LINSTOR CloudStack plugin only supports KVM hypervisor hosts. The instructions that follow are for configuring your CloudStack installation with KVM hypervisor hosts.
Enter the following command to add libvirt configurations to every node in your cluster that
will host CloudStack VMs:
# cat << EOF >> /etc/libvirt/libvirtd.conf listen_tls = 0 listen_tcp = 1 tcp_port = "16509" auth_tcp = "none" # not suitable for production mdns_adv = 0 EOF
Restart the libvirtd service on all hypervisor nodes.
# systemctl restart libvirtd
13.7.1. Configuring AppArmor
If you are running CloudStack on Ubuntu Linux and if AppArmor is enabled, enter the following:
# ln -s /etc/apparmor.d/usr.sbin.libvirtd /etc/apparmor.d/disable/ # ln -s /etc/apparmor.d/usr.lib.libvirt.virt-aa-helper /etc/apparmor.d/disable/ # apparmor_parser -R /etc/apparmor.d/usr.sbin.libvirtd # apparmor_parser -R /etc/apparmor.d/usr.lib.libvirt.virt-aa-helper
13.7.2. Restarting the CloudStack management service
After making the necessary setup and preparatory configurations, restart the
cloudstack-management service.
# systemctl restart cloudstack-management
You can follow the progress of CloudStack’s initial database setup by entering:
# journalctl -u cloudstack-management -f
13.7.3. Logging into the CloudStack UI
After some time, you should be able to log in to the CloudStack management UI. Given a management
node resolvable hostname of node-0, enter the following URL into a web browser on a computer
in your cluster’s network: http://node-0:8080/client.
Once you are greeted by the CloudStack UI portal login page, log in to the portal by using the
default username admin and the default password password.
After successfully logging in, the CloudStack UI will display the “Hello and Welcome to CloudStack” page.
13.7.4. Running the CloudStack initialization wizard
You can continue to set up CloudStack by launching an initialization wizard. Click the “Continue with installation” button to launch the wizard.
The wizard will first prompt you to change the default password for the administrator user. After changing the password, you can continue through the wizard steps to configure a zone, network, and resources details. Complete the fields in each setup step according to your environment and needs. More details about initializing CloudStack can be found here.
The following fields will be common to all LINSTOR use cases in CloudStack:
-
Zone details:
-
Hypervisor: KVM
-
-
Add resources, IP Address step:
-
Host Name: <host_name_of_cluster_node_that_will_host_VMs>
-
Username: root
-
Password: <root_password_that_you_configured_previously_for_the_host>
-
-
Add resources, Primary Storage step:
-
Protocol: Linstor
-
Server: <IP_address_of_LINSTOR_controller_node>
-
Resource Group: <LINSTOR_resource_group_name_that_you_configured_previously>
-
Based on configuring an NFS export for secondary storage earlier, complete the fields presented during the “Add resources, Secondary Storage” step as follows:
-
Provider: NFS
-
IP Address: <IP_address_of_NFS_server> # should be the CloudStack management node
-
Path: <NFS_mount_point> #
/export/secondary, as configured previously
After completing entry fields in the “Add resources” fields and clicking the “Next” button, the wizard will display a message indicating the “Zone is ready to launch.” Click the “Launch Zone” button.
| The “Adding Host” step of the “Launch Zone” process might take a while. |
After the zone is added, the wizard will show a “Zone creation complete” message. You can then click the “Enable Zone” button. After another “Success” notification you will be returned to the CloudStack UI dashboard.
13.8. Taking next steps in CloudStack
After configuring LINSTOR for use in CloudStack you can move onto other tasks, such as adding hosts to host your CloudStack VMs.
LINBIT has also made available a video demonstrating deploying LINSTOR and CloudStack into a three-node VM cluster. You can view the video here.
13.9. High availability and LINSTOR volumes in CloudStack
The CloudStack documentation on HA-enabled instances explains that in case of KVM hypervisors, only HA-enabled hosts are safe from split-brain situations. HA-enabled hosts need to have the ability of “out-of-band management” which is IPMI.
That documentation is correct for KVM instances on NFS or iSCSI storage. When the instances’ virtual disks are on LINSTOR, HA-enabled hosts are not necessary and not recommended. No “out-of-band management” is necessary, and no IPMI is required. CloudStack’s “VM-HA” is sufficient and safe.
The quorum mechanism built into DRBD and enabled by LINSTOR prevents any split-brain from happening.
13.9.1. Explanation and reasoning
If CloudStack loses contact with a hypervisor, CloudStack initiates a process to ensure the continuity of operations. Specifically, it will automatically restart the VMs that were running on the lost hypervisor on another available hypervisor node. This process is designed to minimize downtime and ensure the smooth operation of your CloudStack environment.
There are two possible cases to consider. In one case, while CloudStack has lost connection to a
hypervisor, DRBD still has network connections to and from that hypervisor. In
this case, the VMs running on the hypervisor host can still access their storage volumes. DRBD will therefore refuse any
attempts of starting the KVM process on another hypervisor host, by failing the open() system call.
In the other case, DRBD also loses connections to that hypervisor and the remaining nodes have a quorum for that specific DRBD resource. In this case, DRBD will allow CloudStack to start a KVM process on one of the remaining nodes. This is because it is granted that the unreachable hypervisor has lost quorum on its DRBD devices. DRBD will then suspended I/O on the isolated hypervisor for the VMs running on those DRBD storage devices. So, in case the unreachable host was only isolated from the network, but other services and processes were unaffected, for example, the hypervisor was not lost due to a reboot, the VM instances running on the lost hypervisor will remain in a frozen I/O state.
For details on automatic recovery from such situations refer to details in the Recovering a Primary Node that Lost Quorum section of the DRBD User Guide.
14. LINSTOR storage domains in Oracle Virtualization
Oracle Virtualization is an Oracle Linux-based “enterprise-grade server virtualization solution that provides KVM virtualization and management capabilities” according to the Oracle website. Oracle Linux Virtualization Manager (OLVM) is the management platform within the Oracle Virtualization solution.
This chapter describes using LINSTOR® to provision persistent, replicated, and high-performance block storage for Oracle Linux Virtualization Manager.
14.1. Introduction to Oracle Linux Virtualization Manager
OLVM is a virtualization management platform based on oVirt. It can configure, manage and monitor Kernel-based Virtual Machine (KVM) hosts running on Oracle Linux.
In OLVM, data domains provide centralized storage for virtual machine disk images, ISO files, and snapshots. OLVM supports multiple types of data domains, also called storage domains, which you can integrate with LINSTOR:
-
iSCSI or NFS: LINSTOR Gateway lets you create and manage highly available iSCSI targets and NFS exports backed by LINSTOR.
-
Managed block storage: An OLVM storage domain where each virtual disk is provisioned as its own volume, rather than from a shared storage pool. This enables LINSTOR-managed volumes to attach directly to virtual machines in OLVM, improving performance and avoiding the limitations of iSCSI and NFS storage.
14.2. Preparing LINSTOR Gateway for OLVM
With LINSTOR Gateway, you can create iSCSI targets and NFS exports to use as data domains in OLVM. All volume access is routed through the LINSTOR Gateway host(s) exporting the volume(s). Volume access includes all I/O from any running virtual machines including any other processes actively using the data domain.
As prerequisites, you will need:
-
An operational LINSTOR Cluster
-
A completed LINSTOR Gateway installation
You can deploy LINSTOR (and LINSTOR Gateway) on the same nodes as OLVM (hyperconverged), or on separate nodes outside of your OLVM environment (non-hyperconverged).
|
14.3. Creating OLVM data domains with LINSTOR Gateway
Use the linstor-gateway command to create iSCSI or NFS exports.
Choose a virtual IP (VIP) address that is reachable from your OLVM environment.
This is how clients will reach your iSCSI targets or NFS exports.
The following example creates an iSCSI target with a 100 GiB LUN, using a VIP address of 192.168.0.100:
linstor-gateway iscsi create iqn.2019-08.com.linbit:data-domain 192.168.0.100/24 100G
After entering the iSCSI create command, output will show that LINSTOR Gateway successfully created your iSCSI target:
Created iSCSI target 'iqn.2019-08.com.linbit:data-domain'
The following example creates an NFS export of 100 GiB, available at 192.168.0.101:/srv/gateway-exports/nfs-data:
linstor-gateway nfs create nfs-data 192.168.0.101/24 100G
After entering the NFS create command, output will show that LINSTOR Gateway successfully created your NFS export:
Created export 'nfs-data' at 192.168.0.101:/srv/gateway-exports/nfs-data
Data domains must be added to OLVM through the Administration Portal, available at https://engine-fqdn/ovirt-engine/.
In OLVM, go to Storage and then click Domains. In the Storage Domains pane, click New Domain and then follow these steps:
-
Select iSCSI or NFS from the Storage Type drop-down list.
-
Choose a name for the new data domain.
-
Enter the required connection parameters to complete the configuration.
-
Click OK.
14.3.1. Using LINSTOR Gateway to deploy the OLVM self-hosted engine
LINSTOR Gateway iSCSI targets can be used to create the data domain for the OLVM self-hosted engine.
| The iSCSI data domain must be a dedicated iSCSI target for exclusive use by the self-hosted engine VM. |
Create an iSCSI target with at least 74 GiB to use for the self-hosted engine VM storage.
The following example creates a 100 GiB volume exported as iqn.2019-08.com.linbit:olvm-engine, available at the VIP address 192.168.0.200.
Change the VIP address and iSCSI target name to appropriate values for your environment.
linstor-gateway iscsi create iqn.2019-08.com.linbit:engine-data 192.168.0.200/24 100G
During the OLVM self-hosted engine deployment, you will be asked to provide details for the storage of the self-hosted engine VM.
You only need to provide the storage type iscsi and the VIP address 192.168.0.200.
All other information will be discovered automatically.
Please specify the storage you would like to use (glusterfs, iscsi, fc,
nfs)[nfs]: iscsi
Please specify the iSCSI portal IP address: 192.168.0.200
Please specify the iSCSI portal port [3260]:
Please specify the iSCSI discover user:
Please specify the iSCSI discover password:
Please specify the iSCSI portal login user:
Please specify the iSCSI portal login password:
The following targets have been found:
[1] iqn.2019-08.com.linbit:engine-data
TPGT: 1, portals:
192.168.0.200:3260
Please select a target (1) [1]: 1
Please select the destination LUN (1) [1]:
After the setup completes, the iSCSI target is added as an iSCSI data domain to OLVM.
14.4. Creating managed block storage data domains with LINSTOR
| Before adding managed block storage to OLVM, you must first add an iSCSI or NFS master data domain. |
LINSTOR provides a Cinderlib driver for OLVM that enables the use of managed block storage (MBS) data domains.
When using managed block storage domains with OLVM and LINSTOR:
-
Each virtual disk image maps one-to-one to a unique LINSTOR resource.
-
The OLVM volume UUID is included in the corresponding LINSTOR resource name.
|
Using managed block storage requires additional configuration in OLVM and LINSTOR:
-
All KVM hosts, including the OLVM engine host, must be registered with LINBIT with
ovirtanddrbd-9repositories enabled. -
All KVM hosts must be a LINSTOR cluster node, with each host configured as a LINSTOR satellite node.
-
The Cinderlib integration must be enabled in OLVM. This feature is disabled if you do not explicitly enable it during the OLVM engine deployment process. To enable it after deploying the OLVM engine, run
engine-setupon the engine host:engine-setup --reconfigure-optional-components
Enter Yes when prompted:
--== PRODUCT OPTIONS ==-- Configure Cinderlib integration (Currently in tech preview) (Yes, No) [No]: Yes
-
You need to install the
linstor-cinderpackage on the engine host:$ dnf install -y --enablerepo=ovirt linstor-cinder
The managed block storage data domain must be added through the OLVM Administration Portal, available at https://engine-fqdn/ovirt-engine/.
In OLVM, go to Storage and then click Domains. In the Storage Domains pane, click New Domain, and then take the following steps to add a managed block storage data domain:
-
Select Managed Block Storage from the Domain Function drop-down list.
-
Name the new data domain
linstor-cinder. -
Use the following driver options:
Property Value Description volume_driverlinstor_cinder.LinstorDrbdDriverSpecifies the use of the LINSTOR Cinder driver for managed block storage.
linstor_urislinstor://linstor-controller-ip-addressURL of the LINSTOR controller endpoint(s). Separate multiple endpoints by using a comma (
,).linstor_default_resource_group_nameDfltRscGrpLINSTOR resource group to use. Volumes created in this data domain will inherit all settings from the resource group.
DfltRscGrpis the default resource group in LINSTOR. In most cases, you should create resource groups, for example,rg_cinder, to better align LINSTOR with your OLVM environment’s storage needs.
| In OLVM, you can only create VMs with managed block storage volumes through the Administration Portal. The VM Portal does not support creating new volumes in managed block storage data domains. |
.res resource files. However, property changes made on the parent are not copied to the child objects (either the resource definition or resource LINSTOR objects), that is, the child objects do not carry the property themselves. The change affects the object children, but the property itself remains on the parent.
nfsserver OCF resource agent.